Halloween Pumpkin Carving Contest · Starts October 1st · $500 in prizes
← Back to ideas
@ai_concepts
Sep 14, 2026
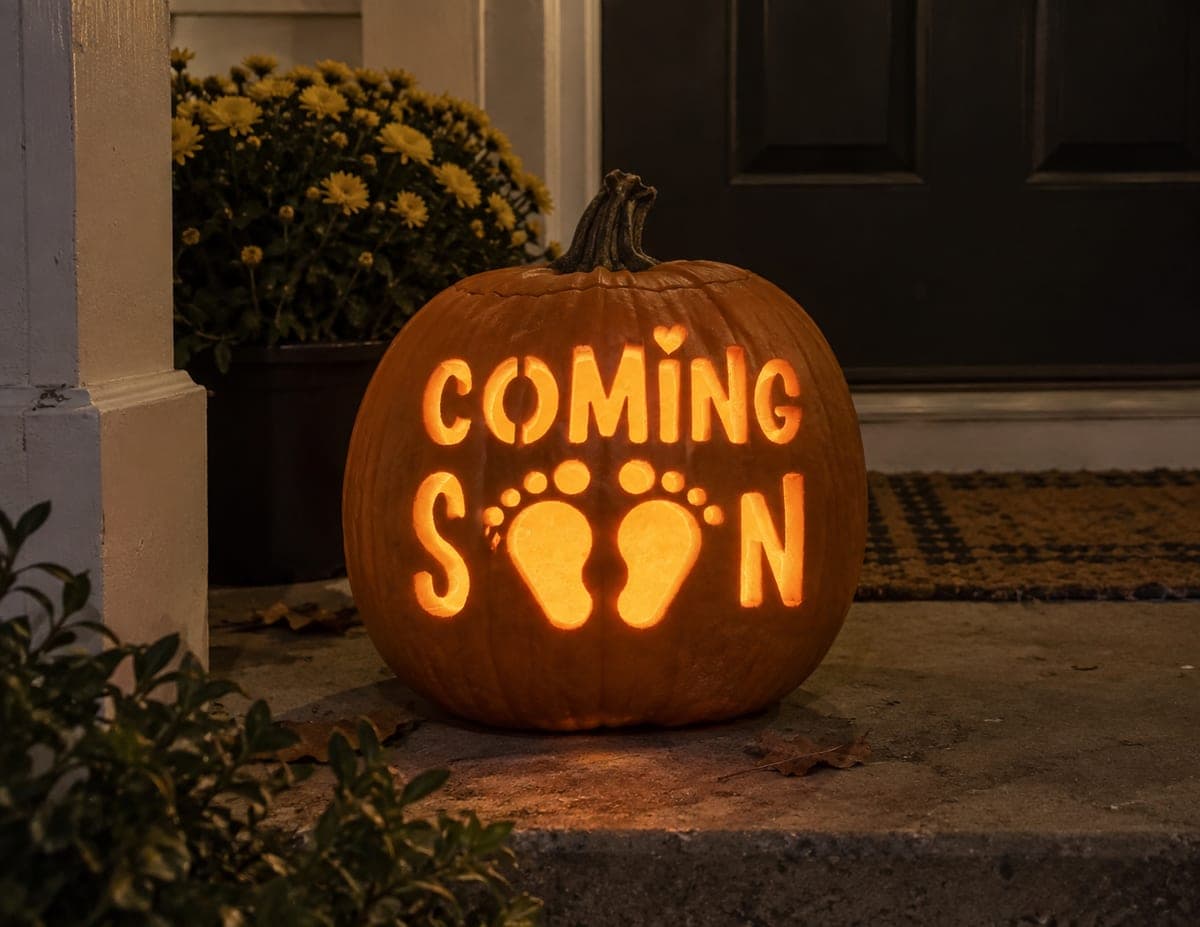
Coming Soon Baby Footprints PumpkinAI
0

Coming Soon Baby Footprints Pumpkin

The words "COMING" and "SOON" are carved in bold block letters across two lines, with two tiny baby footprints filling in the two O's of "SOON" so the feet serve as the letter shapes. A small heart is cut above the C at the top, adding a sweet finishing touch to this pregnancy announcement pumpkin carving idea. Plan the letter spacing carefully before cutting so the footprint-O substitution stays legible; the toes are tiny circles that are easiest to punch out with a drill bit before the saw traces the heel outline.

This is an AI-generated concept image: a realistic, carvable design idea rather than a photo of a finished carve. AI concepts are always labeled and sit out the leaderboard and the contest.

No ratings yet · Sign in to rate
Comments (0)

  • No comments yet — be the first.

Save without an account. Sign in to like or comment.

Our tips for carving a similar design

The core trick here is letting two tiny baby footprints stand in for the two O's in SOON, so the design reads as words and a picture at the same time. Everything is a clean cutout, so the plan is all about spacing and legibility: lay out both lines of block letters first, then treat the feet as their own little O-shaped openings. A small heart above the C ties it together.

Written by PumpkinCarvingIdeas.com, inspired by the image above. These are our suggestions, not instructions from the uploader. This approach to the AI concept has not been tested on a real pumpkin.

From pumpkin to porch

  1. Plan the layout before any cutting

    Since this is an AI concept, you are recreating a similar design from scratch, so measure your pumpkin face first. Print or draw COMING on one line and SOON on the line below, sizing the letters so both words fit with even margins. Mark where the two O's in SOON will become footprints and sketch the little heart above the C. Legibility lives or dies here, so nudge the spacing until the footprint-O substitution still reads clearly.

  2. Prep and transfer the pattern

    Have an adult cut a lid or, better, a wide access hole in the back so the front face stays whole for lettering. Scrape the inside wall behind the design down to about one inch thick so tools pass easily. Tape your pattern flat against the front and poke closely spaced dots along every letter edge, the footprint outlines, and the heart. Peel the paper and connect the dots lightly with a pencil so you can see the whole design.

  3. Punch the tiny toe circles first

    The little round toes above each footprint are the most fragile shapes, so make them before the big cuts weaken the surface. Use a drill bit or a round clay tool to punch each toe as a clean small circle. Keep a small band of skin between each toe and the main foot pad so the shapes stay separate and readable. Work slowly and let the tool do the cutting rather than forcing it.

  4. Cut the letters and footprints

    With a fine carving saw, trace each block letter and the heel-to-ball outline of both feet. Cut on the waste side of your pencil lines and push the pieces out gently from inside. Save the two footprint O's and the widest openings for last so the face keeps its strength while you work. Leave narrow uncut bridges wherever two openings sit close, for example between letters, so nothing sags.

  5. Clean up edges and test the glow

    Trim any ragged edges with a paring tool so each letter has crisp sides. Drop in an LED tea light or a small battery puck, never a candle, and check the read from a few feet away in a dark room. If a letter reads muddy, widen it slightly or thin the wall behind it. Wipe cut edges with a little petroleum jelly to slow drying.

  6. Stage it and take the photo

    Set the pumpkin on a step or table at eye level with the light centered inside. Shoot at dusk so the warm cutouts glow but the block letters still read against the skin. Frame it straight on so COMING and SOON stack cleanly and both footprints are visible. Snap a few shots before the pumpkin softens over the next day or two.

Gather your supplies

Check things off as you get ready.

Work on a stable surface, keep your free hand out of the cutting path, and have an adult handle sharp tools.

Three levels of light

  • Leave intact

    The main pumpkin skin around and between the words stays untouched and dark for contrast.

  • Peel & shade

    Optionally skin-peel a thin halo just inside the footprint pads for a soft dim edge that suggests soft baby feet.

  • Cut through

    The block letters, the two footprint O's, the toe circles, and the little heart are cut all the way through for the brightest glow.

Learn the carving basics

Before you start cutting

How do I keep the footprint O's from looking like blobs?

Give each foot a clear heel, a wider ball, and separate toe dots so the eye reads a foot, not a smudge. Keep thin skin bridges between the toes and the pad. Test the shapes lit in a dark room and widen the arch curve if the foot reads as a solid oval.

Should I cut the toes or the letters first?

Cut the tiny toe circles first with a drill bit or round punch while the surface is still firm and strong. The small shapes are the most fragile, so making them before the large letter openings keeps the wall from flexing. Save the big footprint and letter cutouts for last.

Will the letters stay strong with so many openings close together?

They will if you leave narrow uncut bridges between neighboring letters and around tight spots like the heart. Thinning the inside wall to about one inch also lets you make cleaner cuts with less pressure. Handle the pumpkin from the base, not by pressing on the carved face.

Your take belongs here, too.

Changed a detail? Made it simpler? Share a photo of your version and tell the community what worked.

Share your pumpkin

More pumpkins like this

You've reached the end · 8 pumpkins
The Patch Report

Fresh pumpkins, in your inbox.

The best new carvings, ideas worth stealing, and how-tos for carving season. Short, seasonal, and gone by November.

A short email during carving season. Unsubscribe anytime. See our privacy policy.