Halloween Pumpkin Carving Contest · Starts October 1st · $500 in prizes
← Back to ideas
@ai_concepts
Sep 25, 2026
Cream Eyes Pink Cheeks Painted Pumpkin Face IdeaAI
0

Report this carving

Tell us what is wrong. Reports are private.

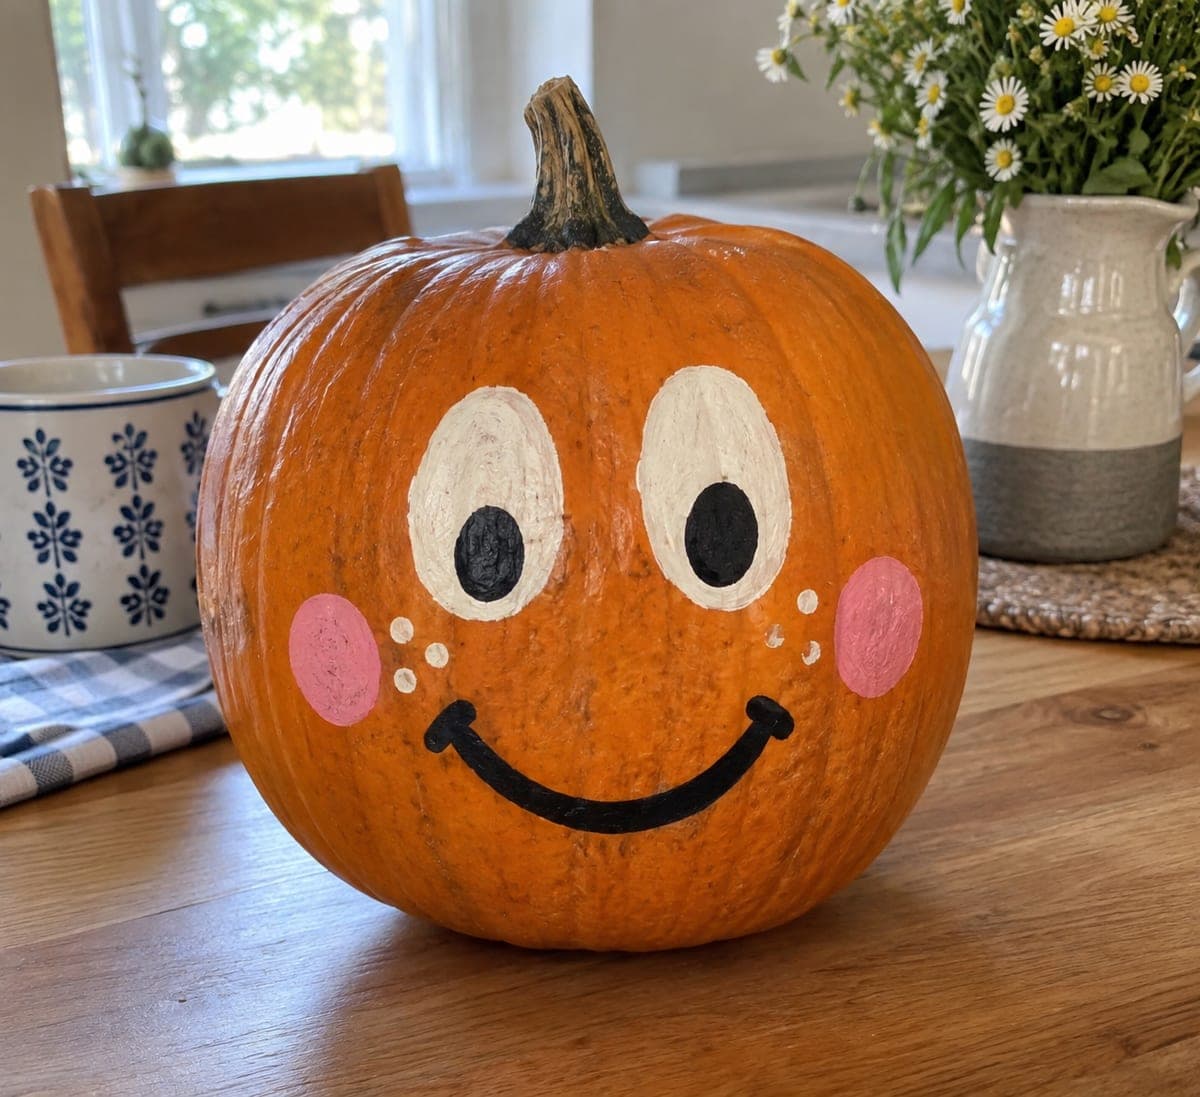
Cream Eyes Pink Cheeks Painted Pumpkin Face Idea

Large cream eye ovals with black pupil dots, a broad black smile, two pink cheek circles, and six little cream freckles paint a cheerful and charming pumpkin face on an intact shell using just three colors. The cream freckles are the detail that makes this design feel genuinely warm rather than generic. Paint the two large cream ovals first as your anchor, add the black mouth second, then place the pink cheeks so they overlap the lower edge of the eye ovals slightly for a naturally cartoonish proportion.

No ratings yet · Sign in to rate

Comments (0)

  • No comments yet — be the first.

Save without an account. Sign in to like or comment.

Our tips for carving a similar design

Three paint colors and five painted elements are all this design needs. The two large cream eye ovals go on first as the compositional anchor, and every other element positions itself in relation to them. The six small cream freckles are the detail that gives this face genuine warmth and stops it from reading as generic.

From pumpkin to porch

  1. Clean and dry the pumpkin

    Wipe the pumpkin surface with a damp cloth and let it dry completely. The orange rind provides a warm background that suits this design, so no base coat is needed. Choose a pumpkin with a relatively flat front face for the most even painted features.

  2. Paint the two cream eye ovals

    Sketch two large oval shapes at eye height with a washable marker, spacing them evenly on either side of the center line. Fill each oval with cream or off-white acrylic using a medium round brush. Apply two coats for opacity, letting the first dry before the second.

  3. Add black pupils

    Once the cream ovals are fully dry, paint a small black dot centered in each oval for the pupil. Keep the pupils the same size and centered so the eyes look forward rather than cross-eyed. A cotton swab dipped in black paint makes a consistently round dot without any brush control required.

  4. Paint the broad black smile

    Sketch a wide upturned smile below and between the eyes with a washable marker, then fill it in with black acrylic using a flat brush. A gently curved, open-ended smile looks friendlier than a closed or thinly pursed mouth. Let it dry before adding anything nearby.

  5. Add pink cheeks and cream freckles

    Paint two pink circles below and slightly outside the eyes for the cheeks, overlapping the lower edge of each cream oval slightly for a natural cartoon proportion. Once the pink is dry, dab six small cream dots as freckles scattered across the cheek areas using the handle end of a small brush.

  6. Seal and display

    Apply a clear acrylic sealer spray when all paint is fully dry. This design reads well both indoors and on a covered porch. The warm palette of orange, cream, and pink suits the design for display through November.

Written with AI to match this design

Gather your supplies

Check things off as you get ready.

Work on a stable surface, keep your free hand out of the cutting path, and have an adult handle sharp tools.

Three levels of light

  • Leave intact

    The orange rind background remains visible between all painted elements

  • Peel & shade

    None, shell stays intact

  • Cut through

    None, illuminate from outside with a spotlight or porch light

Learn the carving basics

Before you start cutting

How do I get the two cream eye ovals to look like they are the same size?

Trace a single oval template, such as an egg-shaped piece of cardboard, twice on the rind. Both tracings from the same template guarantee identical shapes regardless of your freehand painting consistency. Alternatively, trace two equal-sized spoons of the same shape.

The pink cheeks are bleeding into the still-wet cream ovals. How do I prevent this?

Wait until the cream ovals are fully cured, which takes at least fifteen to twenty minutes for acrylic, before applying the pink. If bleeding still occurs, apply a second cream coat over the oval first as a barrier layer and let it cure fully before adding pink beside it.

Can I add eyelashes or eyebrows to this design?

Yes, black painted eyelashes added above the cream ovals make the face feel more expressive. Use a fine liner brush and paint four to five short curved strokes above each oval, starting from the top edge of the cream and curving upward. Keep them short so they stay bold rather than delicate and unreadable from a distance.

Your take belongs here, too.

Changed a detail? Made it simpler? Share a photo of your version and tell the community what worked.

Share your pumpkin

More pumpkins like this

You've reached the end · 8 pumpkins
The Patch Report

Fresh pumpkins, in your inbox.

The best new carvings, ideas worth stealing, and how-tos for carving season. Short, seasonal, and gone by November.

A short email during carving season. Unsubscribe anytime. See our privacy policy.