Halloween Pumpkin Carving Contest · Starts October 1st · $500 in prizes
← Back to ideas
@ai_concepts
Sep 25, 2026
Crescent Moon and Dot Pumpkin for No-Carve DecoratingAI
0

Report this carving

Tell us what is wrong. Reports are private.

Crescent Moon and Dot Pumpkin for No-Carve Decorating

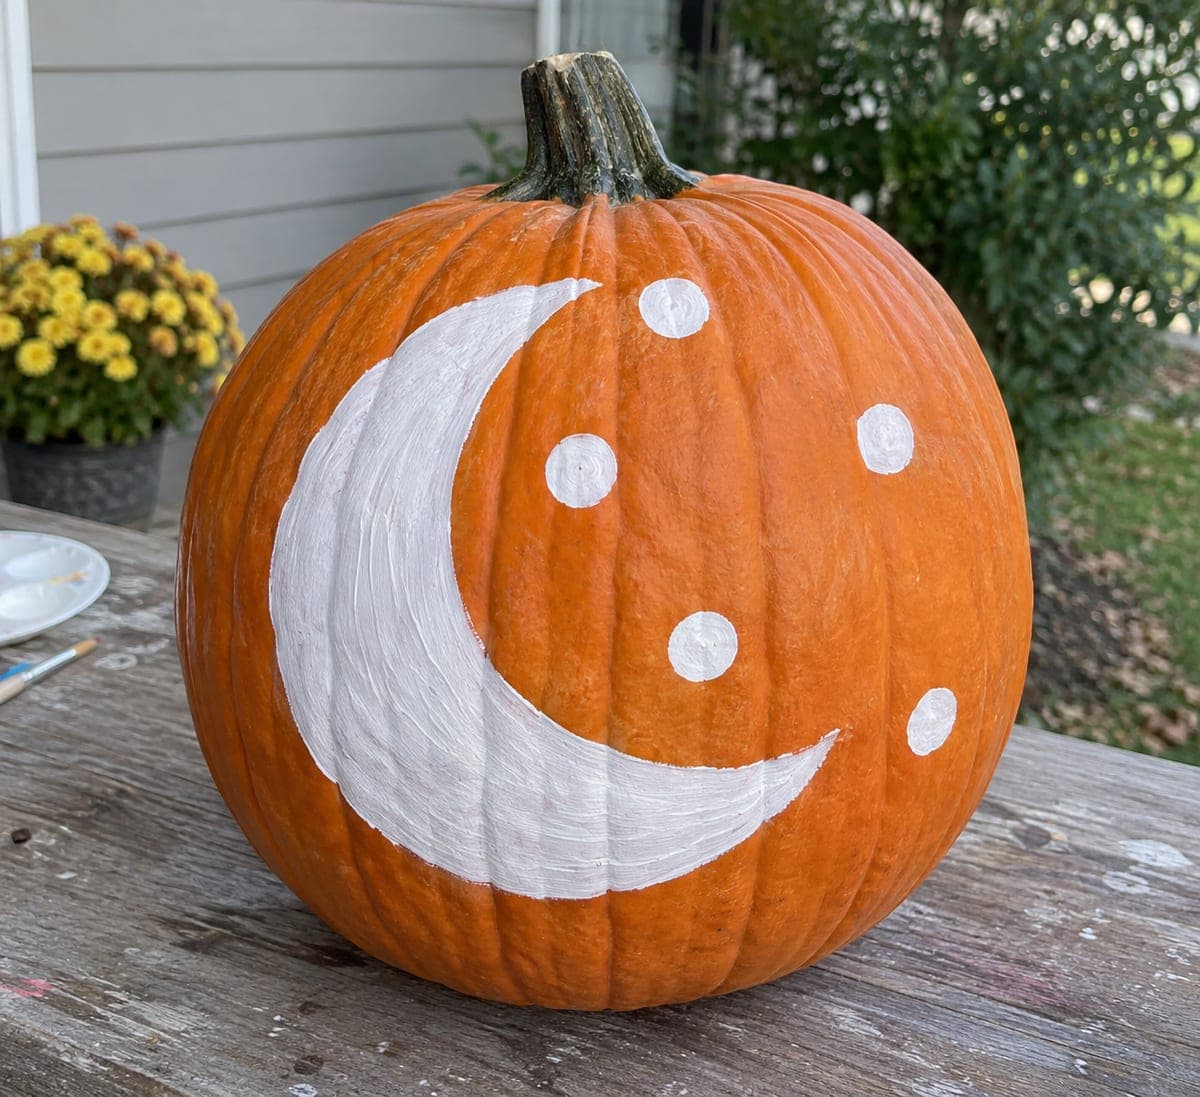
A large white crescent moon and five bold white dots painted across an intact orange pumpkin create a clean, graphic no-carve advanced pumpkin carving idea that takes minutes to complete. Load a wide flat brush generously for the crescent shape and paint it in one or two broad strokes so the edge stays smooth. Once the crescent is dry, add the five dots using the same brush in a loose scattered arrangement for a night-sky effect. A coat of matte sealer protects the white paint from October moisture and keeps the design bright through the season.

No ratings yet · Sign in to rate

Comments (0)

  • No comments yet — be the first.

Save without an account. Sign in to like or comment.

Our tips for carving a similar design

A large white crescent occupies the upper portion of the pumpkin face and five scattered dots fill the surrounding space, evoking a clear night sky with no carving required. The crescent is painted in one or two generous flat-brush strokes for a smooth confident shape. A matte sealer coat protects the white against October moisture and keeps the design bright through the season.

From pumpkin to porch

  1. Clean and dry the pumpkin

    Wipe the surface with a damp cloth and let it air-dry for 15 minutes. For extra paint adhesion, wipe the front face lightly with rubbing alcohol and allow that to dry as well. Avoid touching the cleaned area before painting.

  2. Sketch the crescent

    Use a chalk pencil to lightly draw the outer and inner arcs of the crescent, positioning it in the upper-center of the face. The crescent should be large enough to read clearly from several feet away. Step back and check the proportions before applying any paint.

  3. Paint the crescent

    Load a wide flat brush generously with white acrylic paint and fill the crescent in one or two broad strokes, working from one horn to the other. A softly irregular brushed edge along the inner arc gives the moon a natural quality. Apply a second coat once the first is completely dry to achieve full opacity over the orange rind.

  4. Add the five dots

    Use the same flat brush or a round brush loaded with white paint to press five dots in a loose scattered arrangement around the crescent. Varying the dot sizes slightly creates a more natural star-scatter effect. Let everything dry fully before sealing.

  5. Seal and display

    Apply two thin coats of matte sealer spray from about 30 cm away, letting the first coat dry before the second. A porch or garden light angled at the pumpkin brings out the white shapes against the orange rind at night. The design photographs especially well grouped with lit carved pumpkins.

Written with AI to match this design

Gather your supplies

Check things off as you get ready.

Work on a stable surface, keep your free hand out of the cutting path, and have an adult handle sharp tools.

Three levels of light

  • Leave intact

    The bare orange rind serves as the night-sky background across the entire pumpkin.

  • Peel & shade

    None; the shell stays fully intact.

  • Cut through

    None; use a porch or accent light to illuminate the painted design from outside.

Learn the carving basics

Before you start cutting

How do I get the inner curve of the crescent to look smooth?

Cut a crescent shape from cardstock, hold it against the pumpkin, and trace the inner arc with your chalk pencil before painting. The template gives you a guide edge to paint up to. Alternatively, paint the full circle first, then cover the inner portion with orange paint once the white is dry to carve out a crisp crescent shape.

Can I use a color other than white?

Gold or pale yellow gives the crescent a warmer harvest-moon look that reads beautifully against orange rind. Apply the same broad flat-brush technique and use two coats for opacity. A mix of white and yellow acrylic creates a soft golden tone.

How long will the painted design last outdoors?

With a matte sealer coat, painted pumpkins typically hold their design for 2-3 weeks in mild weather. Heavy rain can streak paint even through sealer, so bringing the pumpkin inside during storms extends its life noticeably.

Your take belongs here, too.

Changed a detail? Made it simpler? Share a photo of your version and tell the community what worked.

Share your pumpkin

More pumpkins like this

You've reached the end · 8 pumpkins
The Patch Report

Fresh pumpkins, in your inbox.

The best new carvings, ideas worth stealing, and how-tos for carving season. Short, seasonal, and gone by November.

A short email during carving season. Unsubscribe anytime. See our privacy policy.