Halloween Pumpkin Carving Contest · Starts October 1st · $500 in prizes
← Back to ideas
@ai_concepts
Jul 20, 2026
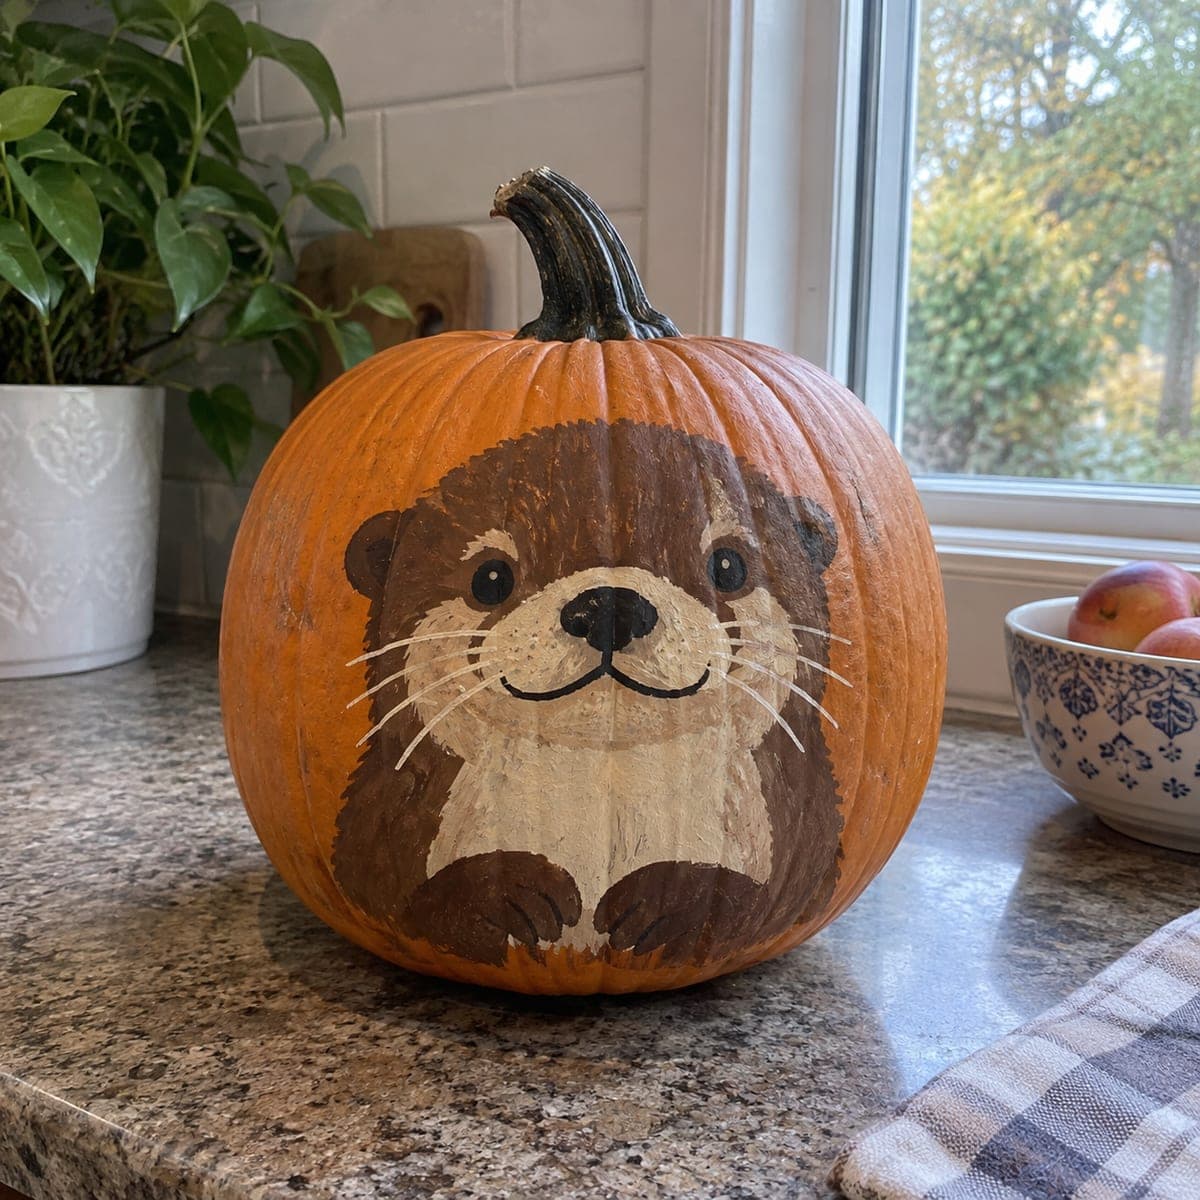
Cute Otter Face Painted PumpkinAI
0

Cute Otter Face Painted Pumpkin

An adorable otter face fills this pumpkin, painted in warm browns and cream with long white whiskers and little paws tucked at the bottom. It is an easy no-carve pumpkin idea that comes together with three paint colors and a whisker-detail brush, and the round pumpkin shape flatters the otter's chubby cheeks. Base-coat the head shape first, add the lighter muzzle and chest once dry, and pull the whiskers outward in single confident strokes.

This is an AI-generated concept image: a realistic, carvable design idea rather than a photo of a finished carve. AI concepts are always labeled and sit out the leaderboard and the contest.

No ratings yet · Sign in to rate
Comments (0)

  • No comments yet — be the first.

Save without an account. Sign in to like or comment.

Our tips for carving a similar design

The core trick here is layering paint from dark to light: a brown head shape goes down first, then a cream muzzle and chest float on top once dry, and crisp white whiskers finish it. Because nothing is cut, the round belly of the pumpkin becomes the otter's plump cheeks and body. Plan your layers so each one dries before the next, and save the thinnest whisker strokes for last.

Written by PumpkinCarvingIdeas.com, inspired by the image above. These are our suggestions, not instructions from the uploader. This approach to the AI concept has not been tested on a real pumpkin.

From pumpkin to porch

  1. Clean and sketch

    Wipe the whole pumpkin with a damp cloth and let it dry so paint grips well. Use a washable marker or chalk to lightly draw the round head, the muzzle, the chest patch, and the two little paws at the bottom. Keep the face centered on the flattest, roundest part of the pumpkin so the cheeks look full. Step back and check the shapes before you commit to paint.

  2. Base-coat the brown

    Fill in the whole head, ears, arms, and paws with your medium brown, working in smooth even strokes. Leave the muzzle, eye patches, and chest area unpainted for now so you have clean space for the lighter colors. Let this layer dry completely, which usually takes fifteen to twenty minutes. A second brown coat gives richer color if the first looks streaky.

  3. Add cream muzzle and chest

    Once the brown is dry, paint the cream muzzle, the fuzzy cheek fur, and the big chest patch. Let the cream slightly overlap the brown edges and feather the strokes outward so the fur looks soft, not sharp. Dry again, then dab a touch of darker brown around the outer edges for depth. Keep the cream bright since it carries most of the otter's cuteness.

  4. Paint the face details

    With a small brush, add the black nose, the smiling mouth line, and two round dark eyes, leaving a tiny white dot in each for a lively sparkle. Outline the paws with short dark lines to suggest toes. Keep these features small and centered so the face stays gentle. Let everything dry before the final step.

  5. Pull the whiskers

    Load a thin liner brush or whisker-detail brush with white and pull each whisker outward in one confident stroke, starting near the muzzle and lifting off at the end. Single strokes look far better than going back over them, so commit and move on. Add a few short white hairs above the eyes for brows. Let the whiskers dry fully.

  6. Seal and stage

    Once bone dry, brush on a light coat of clear matte sealer to protect the paint from porch moisture. Set the pumpkin on a shelf or step where the otter faces your visitors. For a soft evening glow, tuck a battery LED puck beside it rather than inside, since this design is not hollowed. Snap a photo in daylight to catch those cream highlights.

Gather your supplies

Check things off as you get ready.

Work on a stable surface, keep your free hand out of the cutting path, and have an adult handle sharp tools.

Three levels of light

  • Leave intact

    The orange pumpkin skin around the otter stays bare and untouched as the background.

  • Peel & shade

    No skin is peeled on this painted design, though a light sealer coat gives the paint a soft even sheen.

  • Cut through

    Nothing is cut through since this is a no-carve pumpkin; place an LED puck beside it for a gentle glow.

Learn the carving basics

Before you start cutting

Do I need to carve or hollow this pumpkin at all?

No, this is a fully no-carve design, so the pumpkin stays whole and lasts longer. That also makes it a great choice for kids since no sharp tools are needed. If you want a little light, set a battery LED nearby instead of inside.

What paint works best and will it survive on the porch?

Acrylic craft paint sticks well to clean, dry pumpkin skin and dries fast between layers. A clear matte sealer over the finished art helps it shrug off dew and light rain. Keep the pumpkin out of direct downpours to make it last.

How do I get the whiskers to look crisp instead of blobby?

Use a thin liner brush loaded with slightly watered white paint and pull each whisker in a single quick stroke, lifting the brush as you finish. Do not go back over a line, since one confident pass keeps the tapered look. Practice a few strokes on paper first to find the right paint thickness.

Your take belongs here, too.

Changed a detail? Made it simpler? Share a photo of your version and tell the community what worked.

Share your pumpkin

More pumpkins like this

You've reached the end · 8 pumpkins
The Patch Report

Fresh pumpkins, in your inbox.

The best new carvings, ideas worth stealing, and how-tos for carving season. Short, seasonal, and gone by November.

A short email during carving season. Unsubscribe anytime. See our privacy policy.