Halloween Pumpkin Carving Contest Β· Starts October 1st Β· $500 in prizes
← Back to ideas
@ai_concepts
Sep 25, 2026
Diagonal Star Trail Odd-Shaped Pumpkin DesignAI
0

Report this carving

Tell us what is wrong. Reports are private.

Diagonal Star Trail Odd-Shaped Pumpkin Design

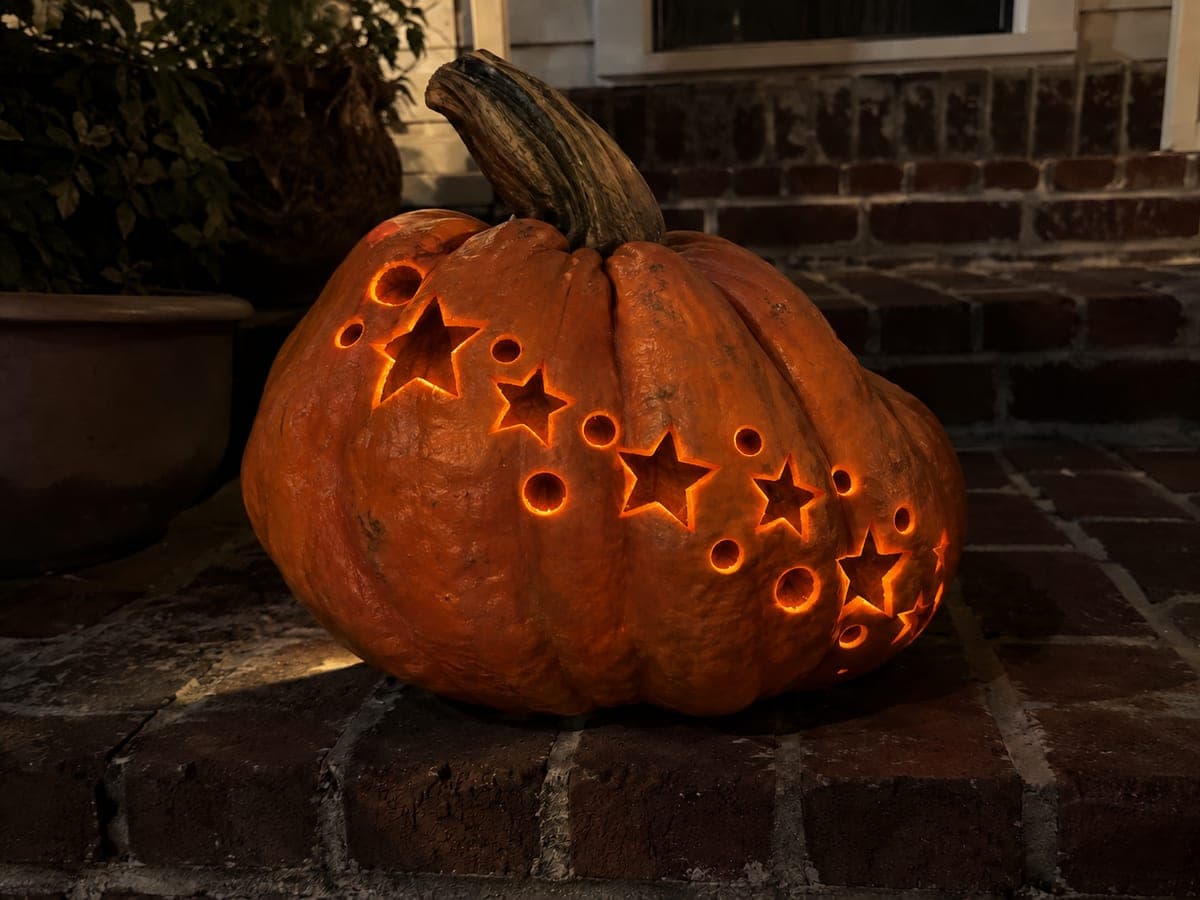
A flowing diagonal line of seven open stars and ten round apertures sweeps across the smoother sections of a lobed odd-shaped pumpkin, turning its irregular surface into an artistic feature rather than a problem. Map the diagonal path from the top-left to the bottom-right before cutting, placing each shape in the flattest available panel. On brick steps at night the angled trail of light suggests a shooting star cutting across the pumpkin.

No ratings yet Β· Sign in to rate

Comments (0)

  • No comments yet β€” be the first.

Save without an account. Sign in to like or comment.

Our tips for carving a similar design

The diagonal orientation is what transforms a simple pattern into a narrative. Mapping the trail from top-left to bottom-right before cutting, and confirming every shape falls on a flat panel of the lobed surface, prevents crowding at the lobes and ensures the trail reads clearly at night. Drilling the circles first preserves shell rigidity for the star cuts.

From pumpkin to porch

  1. Identify a stable base and hollow

    Find a lobed pumpkin with a flat enough base to sit without rolling. Hollow through the top to a 2 cm wall. Dry the outer surface before planning the layout.

  2. Draw the diagonal path

    Using a dry-erase marker, draw a faint diagonal line from the top-left to the bottom-right across the broadest face of the pumpkin. This is the center line of your trail and all shapes will be centered on it.

  3. Place all shapes along the diagonal

    Mark seven star positions evenly along the diagonal, each in the flattest available lobe panel. Fill gaps between stars with the ten circle hole marks. Step back to confirm the trail looks like a continuous flowing arc before cutting.

  4. Drill all ten circle holes

    Use a spade bit to drill each circle hole while the shell is fully intact. Work from the center of the trail outward to both ends.

  5. Cut the seven star apertures

    Cut each star with a narrow jab saw, always inserting the blade in smooth rind patches. Pop each fragment inward after completing the final cut to confirm all points are free. Clean star tips with a paring knife.

  6. Display on brick steps at night

    Place an LED lantern inside for bright, directional light. Set the pumpkin on the brick steps with the diagonal trail facing outward. The angled band of stars and circles creates the impression of a shooting meteor crossing the pumpkin's surface.

Written with AI to match this design

Gather your supplies

Check things off as you get ready.

Work on a stable surface, keep your free hand out of the cutting path, and have an adult handle sharp tools.

Three levels of light

  • Leave intact

    The broad lobed rind above and below the trail and the rind between all shapes stay dark, defining the trail by contrast.

  • Peel & shade

    None on this design.

  • Cut through

    All seven star apertures and all ten circle holes are cut through for full glow.

Learn the carving basics

Before you start cutting

How do I draw a straight diagonal across a lobed surface?

A flexible tape measure or a length of masking tape pressed against the surface curves naturally and provides a straight visual reference line. Alternatively, anchor a chalk line at the top-left and snap it gently against the surface to mark the diagonal.

Some lobes are too narrow for a star. What should I put there instead?

Replace any star that would land on a narrow lobe with two or three circle holes clustered tightly. A cluster of dots reads as part of a flowing trail just as effectively as a star and requires far less flat rind to execute.

Will the diagonal trail still read clearly if I view the pumpkin from a slight angle?

Yes. A diagonal trail reads from a range of viewing angles because the progression from top-left to bottom-right creates a strong directional cue that holds even in low light. The main viewing angle where it is most dramatic is straight on from about a meter away.

Your take belongs here, too.

Changed a detail? Made it simpler? Share a photo of your version and tell the community what worked.

Share your pumpkin

More pumpkins like this

You've reached the end Β· 8 pumpkins
The Patch Report

Fresh pumpkins, in your inbox.

The best new carvings, ideas worth stealing, and how-tos for carving season. Short, seasonal, and gone by November.

A short email during carving season. Unsubscribe anytime. See our privacy policy.