Halloween Pumpkin Carving Contest · Starts October 1st · $500 in prizes
← Back to ideas
@ai_concepts
Sep 25, 2026
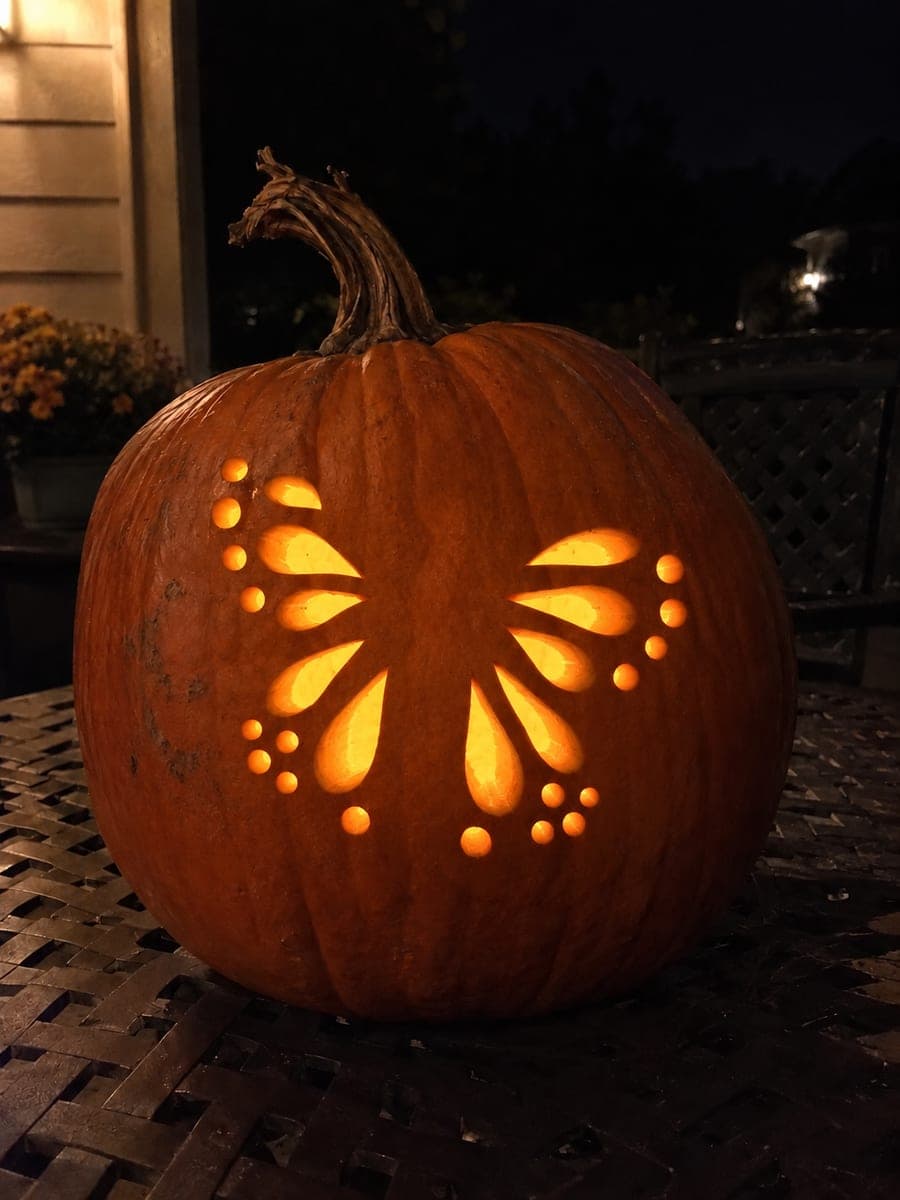
Moth Pattern Cutout Odd Shaped Pumpkin LanternAI
0

Report this carving

Tell us what is wrong. Reports are private.

Moth Pattern Cutout Odd Shaped Pumpkin Lantern

Separate teardrop wing apertures and round dot holes form a moth silhouette on an odd-shaped pumpkin, with the solid central body retained by broad rind bridges and no cut outline connecting the wings. Orient the moth design so the bolder wing sections fall on the pumpkin's widest panels, which tend to be the most carvable. Lit from inside on a patio at night, the paired wing openings glow symmetrically against the uneven orange shell.

No ratings yet · Sign in to rate
Comments (0)

  • No comments yet — be the first.

Save without an account. Sign in to like or comment.

Our tips for carving a similar design

The moth design relies on separate open apertures rather than a single large cutout, which means the solid central body stays intact by default as long as all cuts are made outward from the body area. Placing the wider wing sections on the pumpkin's widest panels and using round dots for smaller accents makes the most of an irregular surface. Broad rind bridges between every aperture are non-negotiable for structural integrity.

From pumpkin to porch

  1. Orient the moth and hollow

    Choose the face that gives the widest available area for the wing spread. Cut the hollow through the top, hollow to a 2 cm wall, and identify the central body axis on the outer surface.

  2. Transfer the moth template

    Print the moth template scaled to fit the pumpkin's widest panel. Tape it and transfer the outline via toothpick-poke method. Connect the dots with a dry-erase marker, ensuring the body area is clearly marked as solid and the aperture positions are clear.

  3. Drill the dot accent holes first

    Use a small spade bit to drill all round dot holes while the rind is fully intact. Work symmetrically, doing the left and right side dots in pairs.

  4. Cut the teardrop wing apertures

    Use a narrow jab saw to cut each teardrop shape, starting at the narrow tip and working around the full perimeter. Cut the upper wing apertures first on both sides, then the lower wing apertures. Maintain at least 5 mm of rind between every adjacent aperture.

  5. Verify solid body integrity

    After all cuts are complete, gently press the central body area with two fingers. It should feel completely solid with no give. If any small section shifts, it means a cut strayed too far toward the center, and you need to bridge it with a thin bead of craft glue immediately.

  6. Light on the patio at night

    Insert an LED lantern for steady brightness, replace the lid, and place on the patio at night. The paired wing apertures glow symmetrically against the irregular orange shell, and the solid body reads clearly as the moth's form.

Written with AI to match this design

Gather your supplies

Check things off as you get ready.

Work on a stable surface, keep your free hand out of the cutting path, and have an adult handle sharp tools.

Three levels of light

  • Leave intact

    The central solid moth body, all rind bridges between apertures, and the surrounding pumpkin rind stay dark.

  • Peel & shade

    None on this all-cutout design.

  • Cut through

    All teardrop wing apertures and all round dot accent holes glow fully, outlining the moth form in light.

Learn the carving basics

Before you start cutting

How do I ensure the wing apertures look symmetrical on an odd-shaped pumpkin?

Mark the vertical center axis of the moth on the pumpkin before drawing any apertures, then measure each aperture's position as a distance from that axis. Cutting in left-right pairs, completing both sides of each row before moving to the next, keeps the symmetry consistent even when the background surface is irregular.

My teardrop tips came out slightly rounded rather than sharp. Is that fixable?

Yes. Insert the tip of a paring knife at the tip location and make two shallow slicing cuts meeting at a point, one from each side. This sharpens a rounded tip without widening the aperture significantly. One careful pass per side is usually enough.

Can I convert this design to a butterfly by changing the wing shapes?

Yes. Butterfly wings are typically rounder and broader at the top lobe, while moth wings are more triangular and elongated. Swapping the teardrop shapes for broader rounded apertures and using fewer, larger wing holes creates a recognizable butterfly without changing the structural approach of the design.

Your take belongs here, too.

Changed a detail? Made it simpler? Share a photo of your version and tell the community what worked.

Share your pumpkin

More pumpkins like this

You've reached the end · 8 pumpkins
The Patch Report

Fresh pumpkins, in your inbox.

The best new carvings, ideas worth stealing, and how-tos for carving season. Short, seasonal, and gone by November.

A short email during carving season. Unsubscribe anytime. See our privacy policy.