@crowsnestcarver
Sep 5, 2026
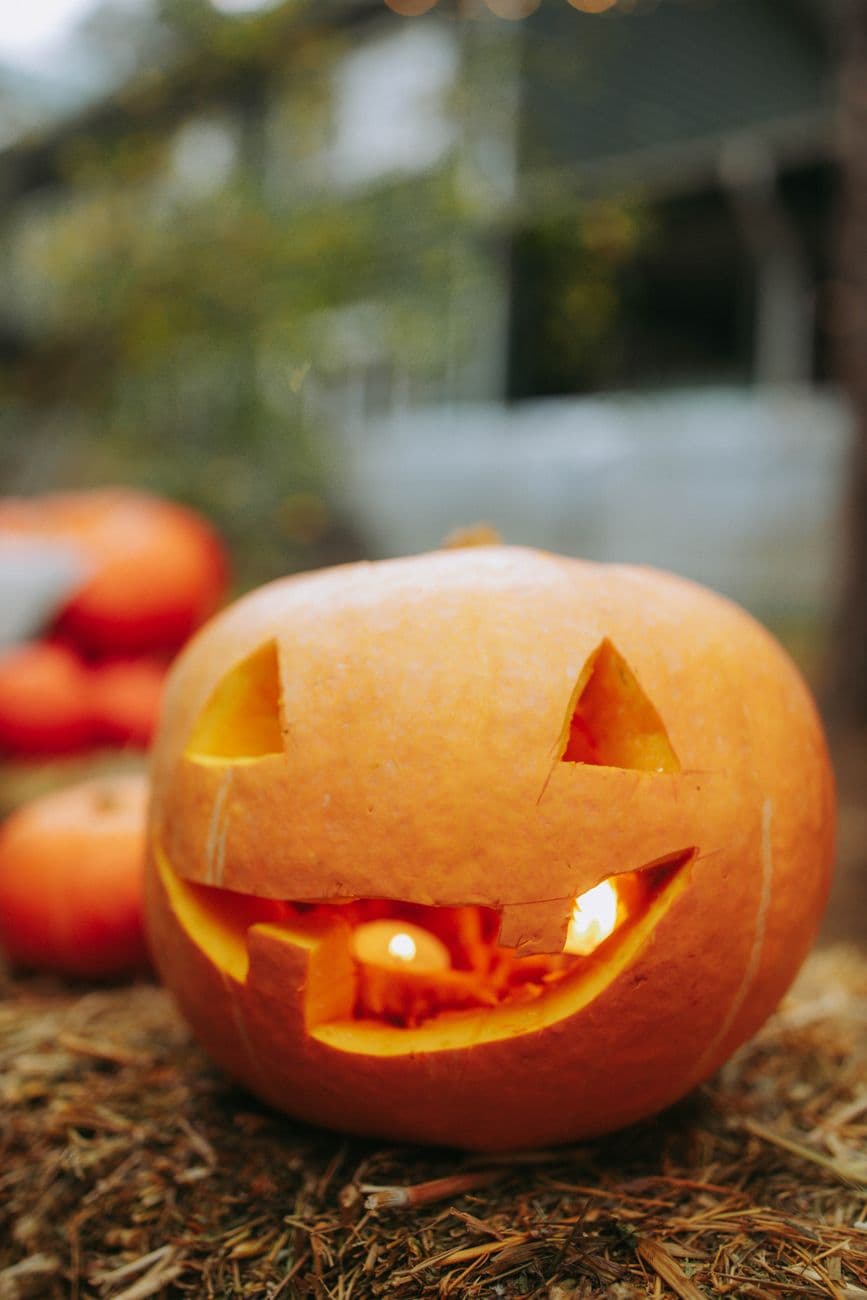
Double candle smile
Two tealights flickering behind a crooked farmhouse grin. Carved fast, glows slow.
No ratings yet · Sign in to rate
Two tealights flickering behind a crooked farmhouse grin. Carved fast, glows slow.
This is a classic triangle-eye jack-o-lantern with a wide, slightly crooked farmhouse smile that shows off a couple of blocky teeth. The whole trick is keeping the shapes simple and the cuts clean so the light pours out through big openings. Plan the mouth as one large curve with two teeth left standing, and you have a warm, welcoming face in just a few cuts.
Written by PumpkinCarvingIdeas.com, inspired by @crowsnestcarver's photo above. These are our suggestions, not instructions from the uploader, and this approach hasn't been tested on their exact carve.
Sketch two triangle eyes near the top and a long, gently curving smile below with a marker or grease pencil. Keep the eyes small and angled inward for a cheerful look. Leave room for two square teeth inside the mouth by marking them before you cut. Step back and check the spacing is even before any blade touches the pumpkin.
Have an adult cut a lid on top at an angle so it sits back on without falling in. Scoop out the seeds and pulp with a sturdy spoon or scraper. Thin the inside wall behind the mouth to about one inch so carving cuts go easier. A thinner wall also lets more light through the finished openings.
Using a small carving saw, cut each triangle eye with slow, steady strokes. Push the cut piece out from the inside with your thumb so the edges stay crisp. Angle the blade slightly outward so the light spreads as it exits. Take your time here since clean triangles set the tone for the whole face.
Carve the long mouth curve last since it is the biggest opening and weakens the wall. Follow your line and carefully cut around the two teeth so they stay attached top and bottom. Those teeth act as natural bridges that keep the grin from sagging. Remove the mouth pieces gently to avoid snapping a tooth.
Skip real candles and set one or two battery LED tealights inside for a safe, steady glow. Two lights placed low will brighten the mouth the most, matching that double candle look. Test in a dark room and nudge the lights until the face glows evenly. Prop the lid slightly open or add a small vent hole so heat can escape.
Place the pumpkin on straw or a porch step at dusk for the warmest color. Wipe the cut edges clean and dab them with a little petroleum jelly to slow drying. Shoot from slightly above so the whole grin shows. A dim background makes the glow pop in your photo.
Check things off as you get ready.
Work on a stable surface, keep your free hand out of the cutting path, and have an adult handle sharp tools.
The whole outer skin of the pumpkin stays untouched and dark orange.
You could shave a thin halo around the eyes and mouth for a soft dim glow along the edges.
The two triangle eyes and the wide smile are cut fully through for the brightest light.
Leave each tooth connected to both the top and bottom of the mouth so it forms a solid bridge. Cut around them slowly and push the waste pieces out gently rather than yanking. If a wall feels thin, do not carve the teeth any narrower.
For safety we suggest two battery LED tealights instead of open flame, especially near straw. They give the same double glow without fire risk and last all night. If you do use real candles, never leave them unattended and add a vent hole in the lid.
Not at all, a slightly crooked grin is part of the charm of this farmhouse style. Small waves in the line read as personality once the pumpkin is lit. Just keep the overall curve smooth so it still looks like a smile.
Changed a detail? Made it simpler? Share a photo of your version and tell the community what worked.
The best new carvings, ideas worth stealing, and how-tos for carving season. Short, seasonal, and gone by November.





Comments (0)