Halloween Pumpkin Carving Contest · Starts October 1st · $500 in prizes
← Back to ideas
@ai_concepts
Aug 2, 2026
Easy Surprised Face Jack-O-LanternAI
0

Easy Surprised Face Jack-O-Lantern

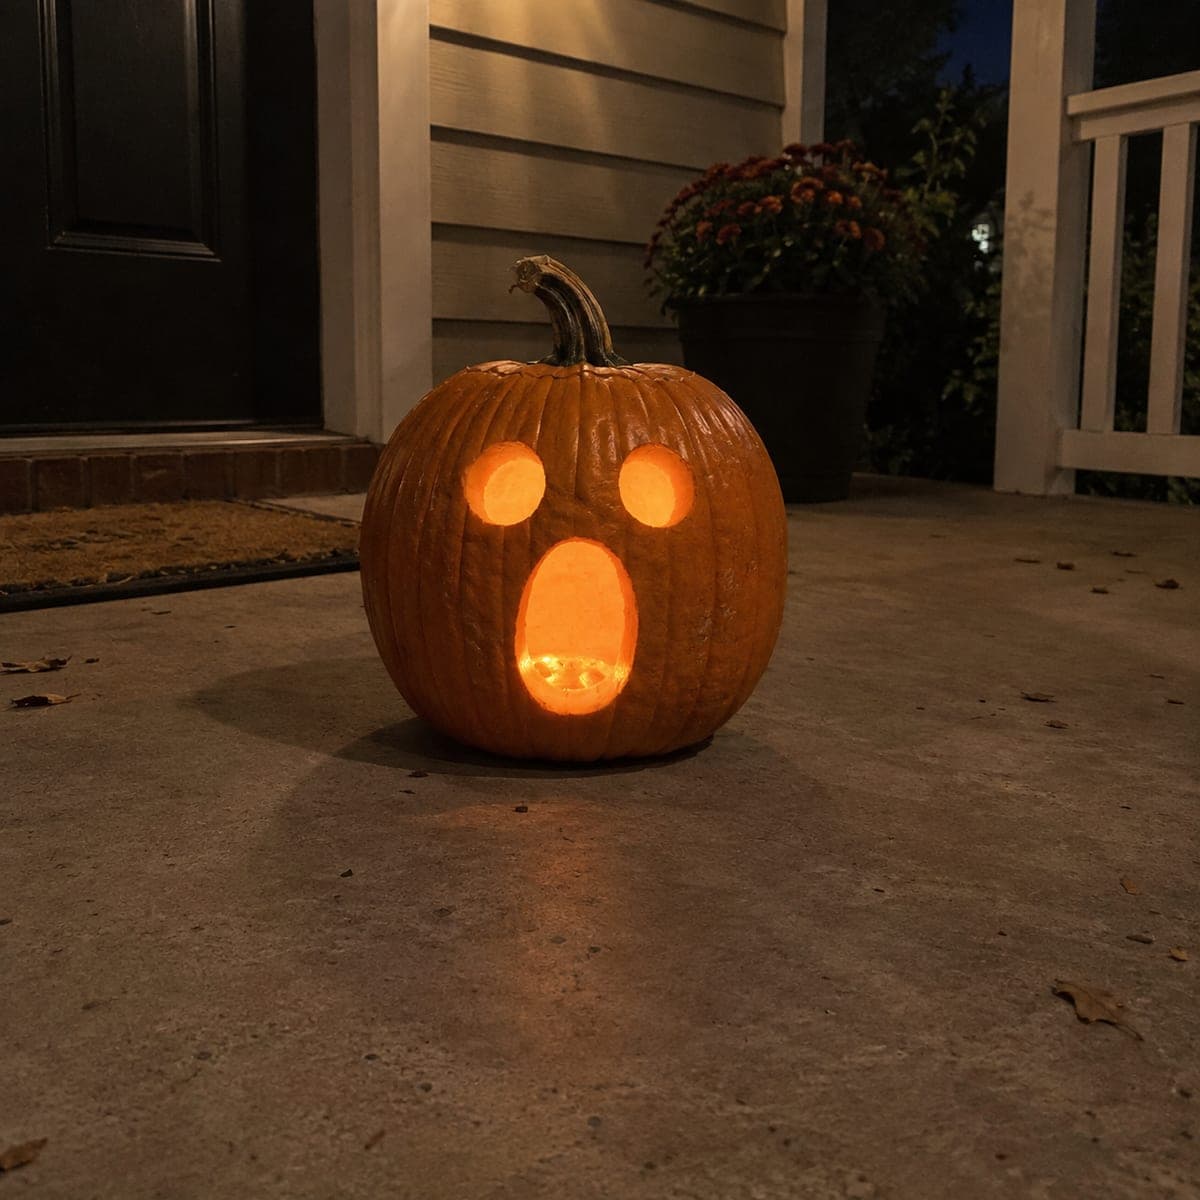
Two round eyes and a big oval mouth give this classic jack-o-lantern a permanently startled expression, and the whole thing takes three cuts. It is the ideal first carving for kids: an adult handles the lid and gutting, then even simple curves cut with a small saw produce a face with real personality. Round shapes are more forgiving than triangles because small wobbles disappear into the curve. Drop in an LED tealight and it is done in twenty minutes.

This is an AI-generated concept image: a realistic, carvable design idea rather than a photo of a finished carve. AI concepts are always labeled and sit out the leaderboard and the contest.

No ratings yet · Sign in to rate
Comments (0)

  • No comments yet — be the first.

Save without an account. Sign in to like or comment.

Our tips for carving a similar design

The whole trick here is keeping every opening a soft curve, since round eyes and an oval mouth hide the little wobbles that make triangles look messy. Plan for two matching round eyes set high and one tall oval mouth below and slightly off center. An adult opens and guts the pumpkin first, then the face is just three clean cutouts.

Written by PumpkinCarvingIdeas.com, inspired by the image above. These are our suggestions, not instructions from the uploader. This approach to the AI concept has not been tested on a real pumpkin.

From pumpkin to porch

  1. Pick and open the pumpkin

    Choose a round, sturdy pumpkin that sits flat without rolling. An adult should cut the lid at an angle so it cannot fall in, or cut a hatch in the back if you want to keep the stem tidy. Angle the knife toward the center as you go around. Save the lid and set it aside.

  2. Scoop and thin the front

    Scrape out the seeds and pulp with a sturdy spoon or a scoop tool. On the front face where you will carve, thin the wall down to about one inch so a small saw glides through easily. A thinner wall also lets more light escape once the LED is inside. Wipe the carving face dry before you mark it.

  3. Mark the three shapes

    Draw two round eyes near the upper middle of the face, keeping them the same size and evenly spaced. Below and centered, draw a tall oval for the open mouth. Step back and check the spacing before you cut, since a marker line wipes off easily but a saw cut does not. Keep all three shapes well inside the pumpkin's widest curve so the walls stay strong.

  4. Cut the eyes first

    Using a small carving saw, poke a starter hole inside one eye and follow your curved line all the way around. Let the saw do the work with gentle back and forth strokes rather than forcing it. Cut the second eye the same way, then push both pieces out from the inside. Save the big oval mouth for last so the face stays firm while you work.

  5. Cut the mouth and clean up

    Saw out the oval mouth last, since it is the largest opening and removing it early would weaken the face. Trim any ragged edges with the tip of your tool for smooth curves. Wipe away leftover marker and dry the inside. A light coat of petroleum jelly on the cut edges helps slow shriveling.

  6. Light it and set it out

    Drop a battery LED tealight inside and skip real flames entirely. Test it in the dark to see how the three openings glow, and rotate the pumpkin so the best face points outward. Place it on a flat porch spot away from foot traffic. Snap your photo while the light is warm and the edges are crisp.

Gather your supplies

Check things off as you get ready.

Work on a stable surface, keep your free hand out of the cutting path, and have an adult handle sharp tools.

Three levels of light

  • Leave intact

    The full orange skin across the face and body stays untouched and dark.

  • Peel & shade

    Optional shallow scraping just inside each opening edge softens the glow and blends the cut into the skin.

  • Cut through

    The two round eyes and the tall oval mouth are cut all the way through for the brightest light.

Learn the carving basics

Before you start cutting

How big should I make the eyes compared to the mouth?

Keep the two eyes small and equal, roughly the size of a large coin, and make the mouth clearly taller and wider than a single eye. That size difference is what reads as surprise rather than a plain face. Sketch them first and adjust before cutting.

Why cut the mouth last?

The mouth is the biggest opening, so removing it early leaves the front wall weak and prone to sagging or cracking. Cutting the smaller eyes first keeps the face stable while you work. As a rule, always save the largest cutout for the end.

Can a child do this carving?

Yes, with an adult handling the lid, gutting, and the actual saw work. Kids can draw the shapes, scoop seeds, and place the LED light. The forgiving round curves mean a slightly shaky line still looks intentional.

Your take belongs here, too.

Changed a detail? Made it simpler? Share a photo of your version and tell the community what worked.

Share your pumpkin

More pumpkins like this

You've reached the end · 8 pumpkins
The Patch Report

Fresh pumpkins, in your inbox.

The best new carvings, ideas worth stealing, and how-tos for carving season. Short, seasonal, and gone by November.

A short email during carving season. Unsubscribe anytime. See our privacy policy.