Halloween Pumpkin Carving Contest · Starts October 1st · $500 in prizes
← Back to ideas
@ai_concepts
Sep 14, 2026
Eiffel Tower With Striped Levels PumpkinAI
0

Eiffel Tower With Striped Levels Pumpkin

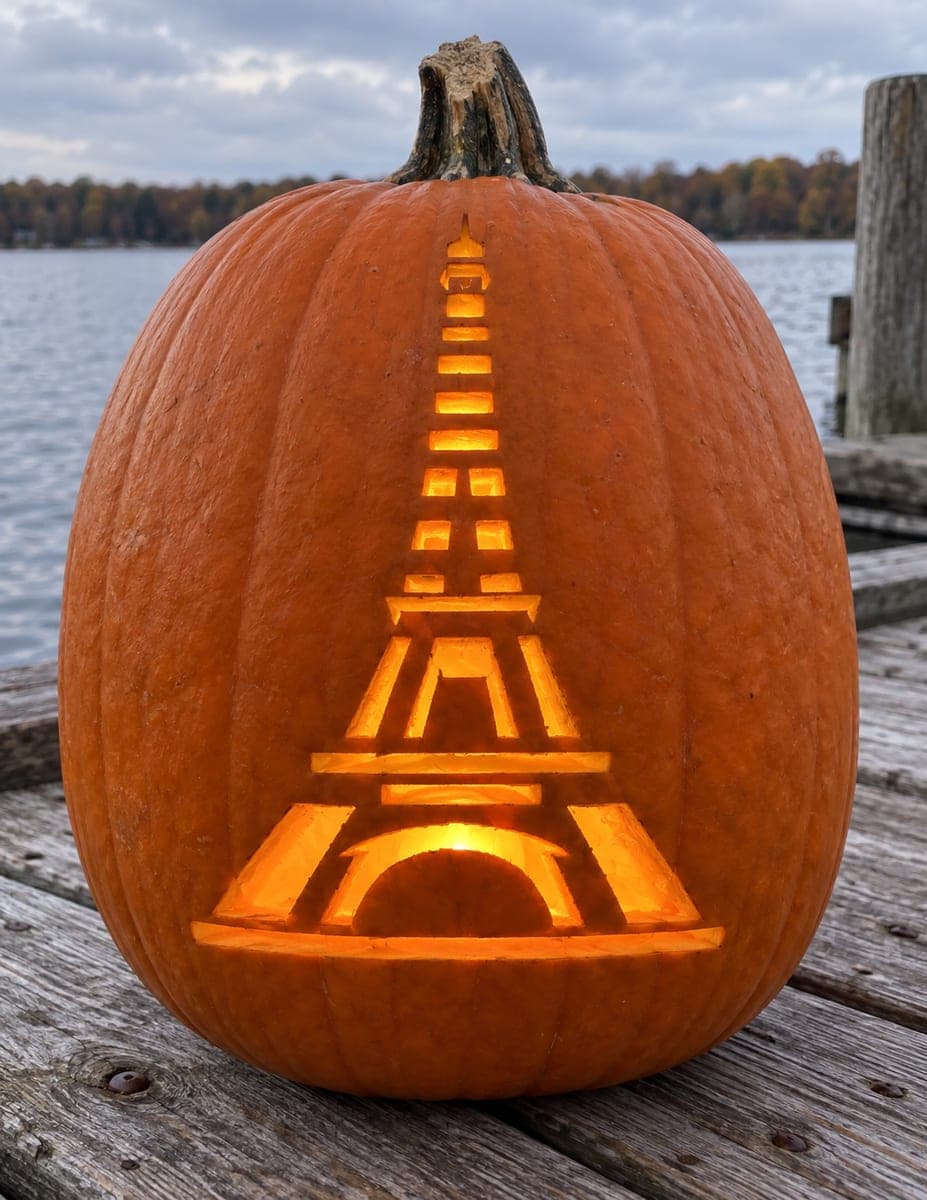
The Eiffel Tower is rendered as a tall narrow cutout with a wide arched base, two intermediate platform levels shown as horizontal glowing bands, and the upper spire tapering to a fine point near the top of the pumpkin, all cut through the rind. The upper spire is the thinnest part of this landmark pumpkin carving idea and should be cut last while the pumpkin wall is still fully rigid below it; use a very fine saw blade and keep the spire at least three-eighths of an inch wide at its narrowest point. Displaying this pumpkin on a tall narrow pedestal mirrors the tower's vertical proportions and keeps the full spire visible.

This is an AI-generated concept image: a realistic, carvable design idea rather than a photo of a finished carve. AI concepts are always labeled and sit out the leaderboard and the contest.
No ratings yet · Sign in to rate

Comments (0)

  • No comments yet — be the first.

Save without an account. Sign in to like or comment.

Our tips for carving a similar design

The core trick here is turning the tower's open lattice into a single connected cutout, with the arched base, two platform bands, and a tapering spire all reading as one shape. The plan is to work bottom to top so the rigid lower wall supports the delicate spire until the very end. Since this is a concept image, treat it as a design you could build, keeping every thin leg wide enough to survive the light and the display move.

Written by PumpkinCarvingIdeas.com, inspired by the image above. These are our suggestions, not instructions from the uploader. This approach to the AI concept has not been tested on a real pumpkin.

From pumpkin to porch

  1. Transfer the pattern and plan your bridges

    Print an Eiffel Tower stencil sized to fit the flattest front face of your pumpkin. Tape it firmly and poke the outlines with a transfer tool or pin so you have a dotted map to follow. Before cutting, mark where you will leave small uncut bridges so the tower legs and spire stay linked to the surrounding rind. Plan the spire to stay at least three-eighths of an inch wide at its narrowest point.

  2. Open a bottom access hole and light it

    Cut a hole in the bottom of the pumpkin rather than the top so the shape sits flat and the stem stays intact. Scoop the insides and thin the front wall to about one inch so your blade passes through easily. Test-fit a battery LED light now, never a candle, so you can preview the glow as you carve. A lower wall thickness makes the fine spire cuts much cleaner later.

  3. Carve the wide arched base first

    Start at the bottom with the big arch and the base platform, since these are the largest and most forgiving cuts. Use a medium saw blade and take slow, straight strokes, letting the pumpkin turn rather than forcing the tool. Leave the horizontal platform bands as connecting strips so the legs stay anchored. Clear the waste pieces gently by pushing them inward and out the bottom.

  4. Cut the two platform levels and the legs

    Move up to the intermediate platform bands, cutting the open windows between the tower's legs. Keep each leg strip a consistent width so the tower looks balanced and stays strong. Preserve the horizontal platform lines uncut where possible; they double as structural bridges and as glowing bands. Check the light behind your work now and then to confirm the shape reads.

  5. Save the thin spire for last

    With the whole lower wall still rigid, switch to a very fine saw blade for the tapering spire near the top. Cut in short, patient passes and support the strip with your free hand as it narrows. Do not let the spire drop below three-eighths of an inch wide, or it may snap when you move the pumpkin. Finish the fine point at the very tip only after everything below is done.

  6. Clean up and stage the photo

    Trim any ragged edges with a small detail blade so each band and leg has crisp lines. Wipe the cut faces and rub a little petroleum jelly on them to slow drying. Set the pumpkin on a tall, narrow pedestal to mirror the tower's vertical proportions and keep the full spire in view. Shoot in low evening light with the LED on to let the arch and platform bands glow.

Gather your supplies

Check things off as you get ready.

Work on a stable surface, keep your free hand out of the cutting path, and have an adult handle sharp tools.

Three levels of light

  • Leave intact

    The broad orange field around the tower and the flat platform bands stay as untouched skin for dark contrast.

  • Peel & shade

    Optional shallow-peeled ground line or sky area below and beside the base can glow a soft dim orange.

  • Cut through

    The open windows between the legs, the base arch, the ladder-like spire gaps, and the fine tip are cut fully through for the brightest light.

Learn the carving basics

Before you start cutting

How do I keep the tall spire from breaking?

Cut it dead last, while the entire lower wall is still solid and supporting the top. Use your finest blade and keep the strip no thinner than three-eighths of an inch. Support it with your free hand as you cut and move the finished pumpkin as little as possible.

Why cut the base arch before the spire if the arch is bigger?

Working bottom to top lets the heavier, rigid lower section stay intact while you carve the delicate parts. If you carved the spire first, every later cut and vibration would risk snapping it. The big base cuts are forgiving and give you a warm-up before the fine work.

My pumpkin front is very rounded. Will the tower still look right?

Choose the flattest face you can find so the vertical lines do not distort. If it curves, keep the tower narrow and centered where the surface is most even. Displaying it on a tall pedestal at eye level also helps the proportions read correctly.

Your take belongs here, too.

Changed a detail? Made it simpler? Share a photo of your version and tell the community what worked.

Share your pumpkin

More pumpkins like this

You've reached the end · 8 pumpkins
The Patch Report

Fresh pumpkins, in your inbox.

The best new carvings, ideas worth stealing, and how-tos for carving season. Short, seasonal, and gone by November.

A short email during carving season. Unsubscribe anytime. See our privacy policy.