Halloween Pumpkin Carving Contest · Starts October 1st · $500 in prizes
← Back to ideas
@ai_concepts
Sep 4, 2026
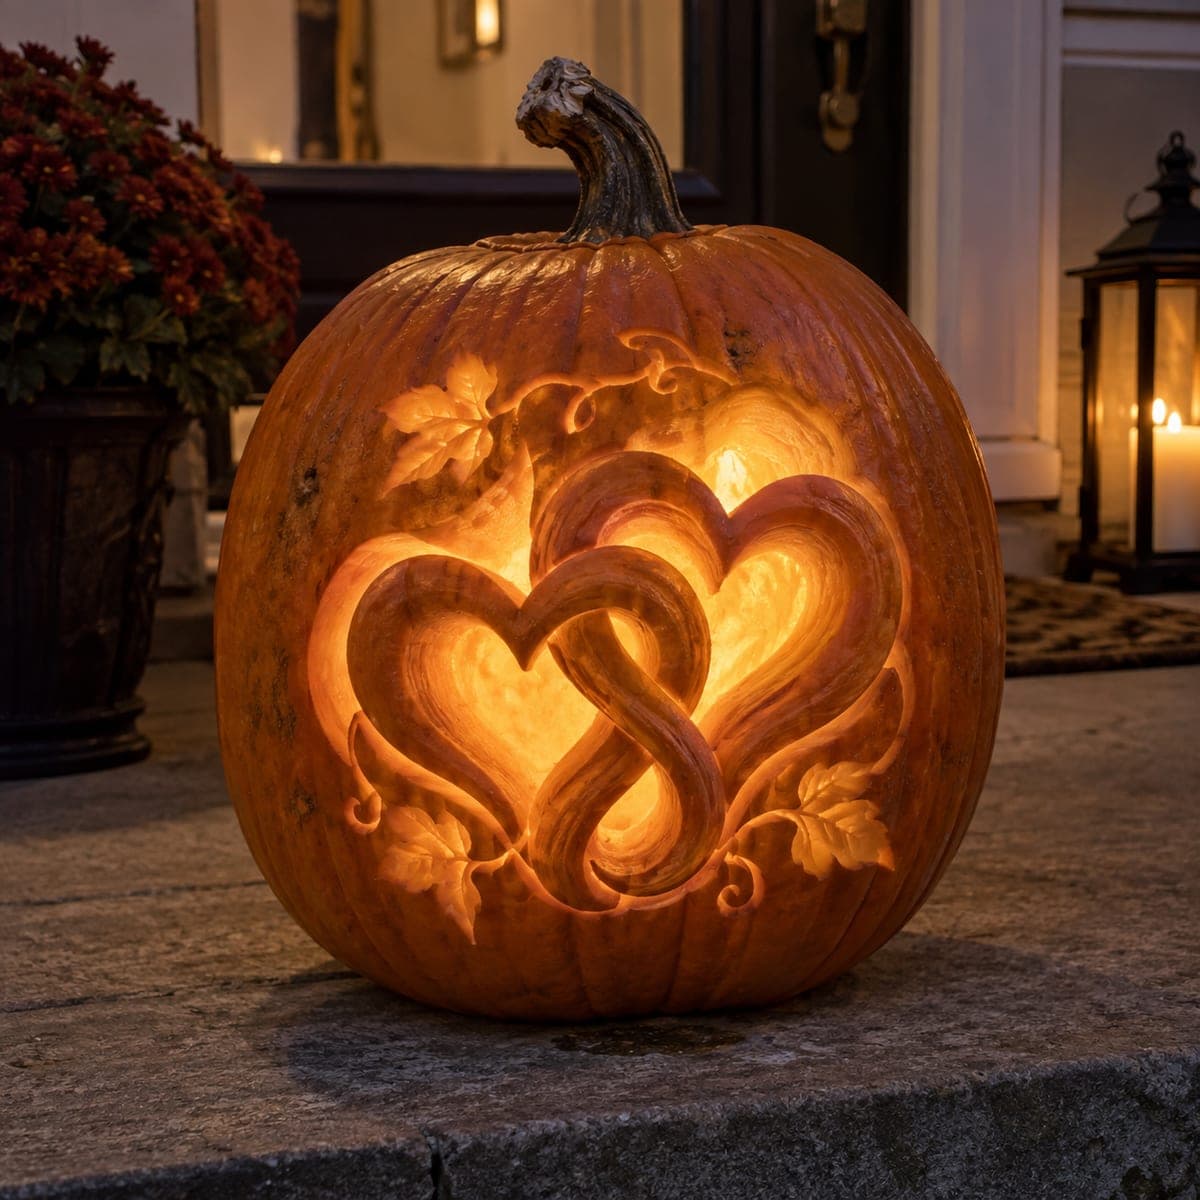
Entwined Hearts and Vines Carved PumpkinAI
0

Entwined Hearts and Vines Carved Pumpkin

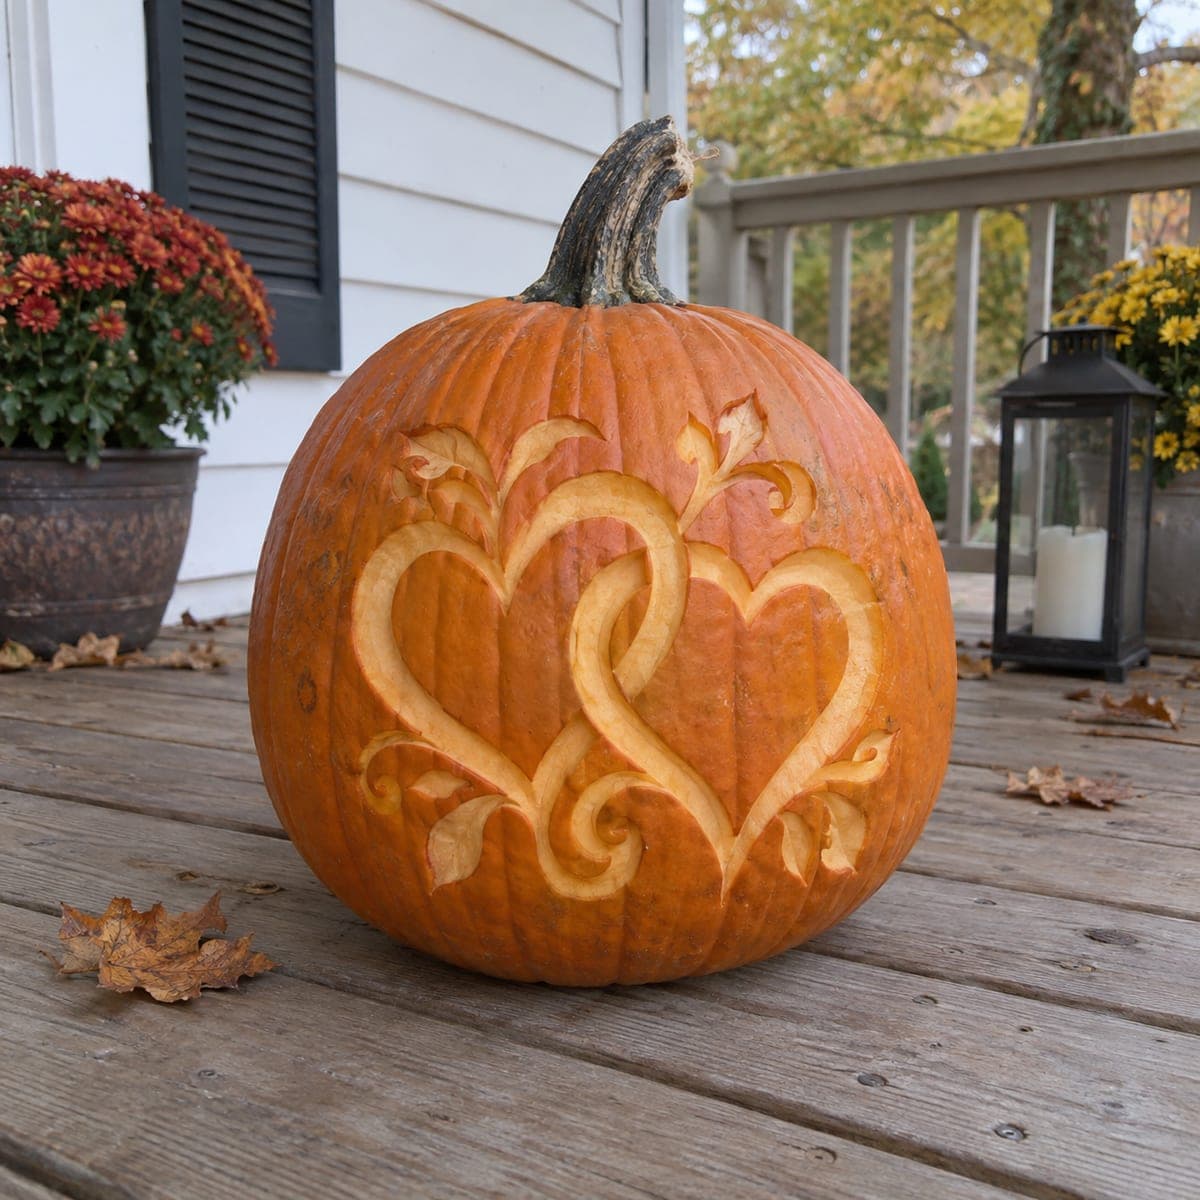
Two interlocking hearts wrapped in curling leafy vines are etched across this pumpkin, a romantic design that suits a fall wedding, anniversary porch display, or couple's first Halloween together. The linked loops are carved so each heart appears to pass through the other. Peel the heart bands at an even shallow depth, alternate which band sits on top at each crossing to sell the weave, and add the vine flourishes last.

This is an AI-generated concept image: a realistic, carvable design idea rather than a photo of a finished carve. AI concepts are always labeled and sit out the leaderboard and the contest.

No ratings yet · Sign in to rate
Comments (0)

  • No comments yet — be the first.

Save without an account. Sign in to like or comment.

Our tips for carving a similar design

The whole trick here is the woven crossing of two hearts, where each band appears to pass over and under the other. Rather than cutting all the way through, you peel the skin to a shallow, even depth so the design glows warm against the darker skin. Save the delicate vine curls for last so you can carve them cleanly without weakening the hearts.

Written by PumpkinCarvingIdeas.com, inspired by the image above. These are our suggestions, not instructions from the uploader. This approach to the AI concept has not been tested on a real pumpkin.

From pumpkin to porch

  1. Transfer the pattern

    Since this is a concept design, start by finding or drawing a two-heart pattern with vine flourishes. Tape the stencil onto the smoothest face of the pumpkin and poke the outlines with a transfer tool or pushpin. Mark small notes on the paper for which band sits on top at each crossing so you can keep the weave consistent. Remove the paper and connect any faint dotted lines with a washable marker.

  2. Open and clean the pumpkin

    Have an adult cut a lid or, better for a display piece, a wide hole in the back so the front stays smooth. Scoop out the seeds and pulp, then thin the carving wall on the front to about one inch with a scraper. A thinner wall makes shallow etching much easier and lets more light through. Pat the inside dry before you start detailing.

  3. Score the outlines

    With a fine detail blade, trace lightly along every marked line to a shallow depth, just cutting the skin. Do not saw deep here, you only want to define the edges of the heart bands and vines. Take your time at each crossing so the over-and-under breaks stay crisp. Clean, shallow scoring now gives you tidy borders when you peel.

  4. Peel the heart bands

    Use a ribbon or lino-style scraping tool to shave off just the orange skin inside the two heart loops, exposing the pale flesh beneath. Keep the depth even and shallow so the bands glow the same soft tone all the way around. At each crossing, stop the top band cleanly and leave a thin strip of untouched skin where the lower band dips under it. Alternating which band sits on top at each junction is what sells the woven look.

  5. Add the vine flourishes

    Now peel the curling leaves and scrolls the same way, keeping them slightly thinner than the heart bands so they read as delicate accents. Leave narrow ribs of dark skin between close curls so nothing blurs together. Work from the center outward so your hand rests on uncarved skin. If you want a few brighter sparks, an adult can cut fully through only the tightest tips of a couple leaves, saving those pierced cuts for last.

  6. Light it and photograph

    Drop a battery LED puck or string inside and set it on a shaded porch. The peeled hearts and vines will glow warm while the surrounding skin stays dark. Rub a little petroleum jelly on the exposed flesh to slow drying and keep the glow crisp for a few days. Shoot your photo at dusk for the best contrast.

Gather your supplies

Check things off as you get ready.

Work on a stable surface, keep your free hand out of the cutting path, and have an adult handle sharp tools.

Three levels of light

  • Leave intact

    The surrounding skin and the thin ribs between crossings and vine curls stay untouched and dark.

  • Peel & shade

    The heart bands and vine flourishes are skin-peeled to an even shallow depth for a soft mid glow.

  • Cut through

    Optional tiny pierced tips on a couple of leaves for the brightest sparks, saved for last.

Learn the carving basics

Before you start cutting

How do I make the two hearts look woven together?

At each spot where the bands cross, pick one to be on top and stop the lower band with a thin strip of untouched skin dipping beneath it. Then alternate which band is on top at the next crossing. That switch back and forth is what tricks the eye into seeing a real weave.

Do I need to cut all the way through anywhere?

Not for the main design. This is a shading project, so the hearts and vines are peeled, not cut through, which keeps the whole face strong. If you want a few bright accents you can pierce only the tiny tips of a leaf or two at the very end.

How do I keep the peeled areas from browning before the big day?

Exposed flesh dries and darkens fast. Coat the peeled hearts and vines with a thin layer of petroleum jelly and keep the pumpkin cool and out of direct sun. Carving within a day or two of your event gives the crispest glow.

Your take belongs here, too.

Changed a detail? Made it simpler? Share a photo of your version and tell the community what worked.

Share your pumpkin

More pumpkins like this

You've reached the end · 8 pumpkins
The Patch Report

Fresh pumpkins, in your inbox.

The best new carvings, ideas worth stealing, and how-tos for carving season. Short, seasonal, and gone by November.

A short email during carving season. Unsubscribe anytime. See our privacy policy.