Halloween Pumpkin Carving Contest · Starts October 1st · $500 in prizes
← Back to ideas
@ai_concepts
Jul 25, 2026
Interlocking Red Hearts Painted PumpkinAI
0

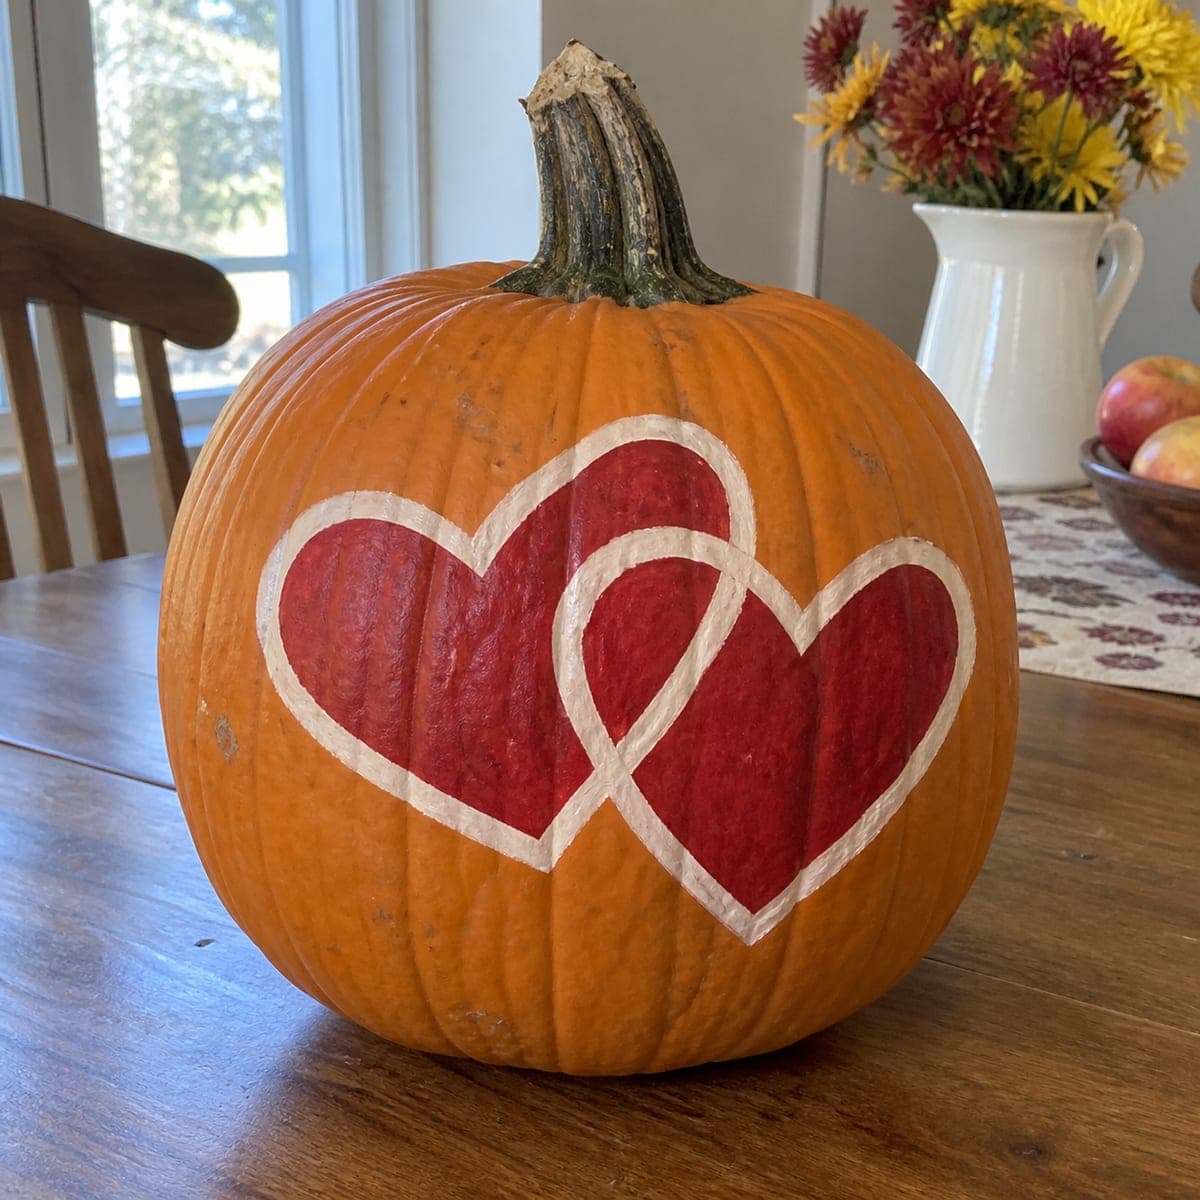
Interlocking Red Hearts Painted Pumpkin

Two red hearts linked like chain links, each outlined in crisp white, turn this no-carve pumpkin into a sweet fall accent that works well past Halloween. The overlap effect comes from painting both hearts solid, then re-painting the white outline so one border appears to pass under the other. Use chalk to sketch the hearts, keep the outlines about a half inch wide, and seal with clear spray if it will sit outside.

This is an AI-generated concept image: a realistic, carvable design idea rather than a photo of a finished carve. AI concepts are always labeled and sit out the leaderboard and the contest.

No ratings yet · Sign in to rate

Comments (0)

  • No comments yet — be the first.

Save without an account. Sign in to like or comment.

Our tips for carving a similar design

The whole trick here is a painted chain-link illusion: two solid red hearts overlap, and one white outline is repainted so it appears to pass under the other. Since this is a no-carve design, you build everything with chalk guidelines and paint, no blade required. Plan for solid base colors first, crisp white borders second, and a clear sealant last if it lives outdoors.

Written by PumpkinCarvingIdeas.com, inspired by the image above. These are our suggestions, not instructions from the uploader. This approach to the AI concept has not been tested on a real pumpkin.

From pumpkin to porch

  1. Clean and dry the pumpkin

    Wipe the whole surface with a damp cloth and let it dry fully so paint grips well. Pick a smooth, flat-facing panel with as few deep ribs as possible for the hearts. Set it on a towel so it does not roll while you work. A clean, dry surface keeps chalk lines and paint from smearing.

  2. Sketch the two hearts in chalk

    Draw one heart slightly higher on the left and a second heart lower on the right so they overlap in the middle like chain links. Chalk wipes off easily, so redraw until both shapes look even and balanced. Keep the point where they cross clearly marked, since that is where the overlap illusion happens. Step back and check the spacing before you commit to paint.

  3. Paint both hearts solid red

    Fill each heart completely with red acrylic craft paint, staying inside your chalk lines. Let the first coat dry, then add a second coat for even, rich color. Do not worry about the overlap yet, just get two clean solid hearts. Let everything dry fully before moving on.

  4. Add the white outlines

    Using a small round brush, trace a white border about a half inch wide around each heart. At the crossing point, paint the white line of only one heart across the other so that border looks like it passes on top, and leave a small gap in the second heart's line so it appears to slip underneath. This tiny break is what sells the interlocking look. Steady your hand on the pumpkin and work in short strokes.

  5. Seal and cure

    Once the paint is completely dry, mist the panel with a light coat of clear acrylic spray sealer, especially if the pumpkin will sit outside. Hold the can about a foot away and use thin passes to avoid drips. Let it cure in a shaded, ventilated spot. Sealing helps the red and white survive damp fall weather.

  6. Style and photograph

    Set the finished pumpkin on a table or porch with the hearts facing your main viewing angle. Since nothing is hollowed out, keep it away from direct heat and it will hold for weeks. For a photo, use soft daylight so the white outlines pop against the red. A few small pumpkins or fall flowers alongside make a nice grouping.

Gather your supplies

Check things off as you get ready.

Work on a stable surface, keep your free hand out of the cutting path, and have an adult handle sharp tools.

Three levels of light

  • Leave intact

    The bare orange skin around the hearts stays untouched and reads as the background.

  • Peel & shade

    This design is painted, not lit, so the solid red hearts act as the mid tone against the orange body.

  • Cut through

    No cutouts here, but the crisp white outlines are the brightest visual pop and carry the whole look.

Learn the carving basics

Before you start cutting

How do I make the hearts actually look interlocked?

Paint both hearts solid red first, then handle the white outlines at the crossing point carefully. Let one heart's white border run continuously across the other, and leave a small break in the second heart's border right where they meet. That gap tricks the eye into seeing one loop pass under the other.

What paint holds up best on a pumpkin?

Acrylic craft paint works well and dries fast, usually needing two thin coats for solid color. Avoid watery washes, which soak into the skin unevenly. Finish with a clear acrylic spray sealer so the color resists moisture, especially outdoors.

Will this last longer than a carved pumpkin?

Yes, because nothing is cut open, so there is no exposed flesh to rot quickly. A sealed, painted pumpkin kept out of direct heat and sun can look good for several weeks. Wipe off any surface moisture and it will carry you well past Halloween.

Your take belongs here, too.

Changed a detail? Made it simpler? Share a photo of your version and tell the community what worked.

Share your pumpkin

More pumpkins like this

You've reached the end · 8 pumpkins
The Patch Report

Fresh pumpkins, in your inbox.

The best new carvings, ideas worth stealing, and how-tos for carving season. Short, seasonal, and gone by November.

A short email during carving season. Unsubscribe anytime. See our privacy policy.