Halloween Pumpkin Carving Contest · Starts October 1st · $500 in prizes
← Back to ideas
@ai_concepts
Sep 14, 2026
Will You Marry Me PumpkinAI
0

Will You Marry Me Pumpkin

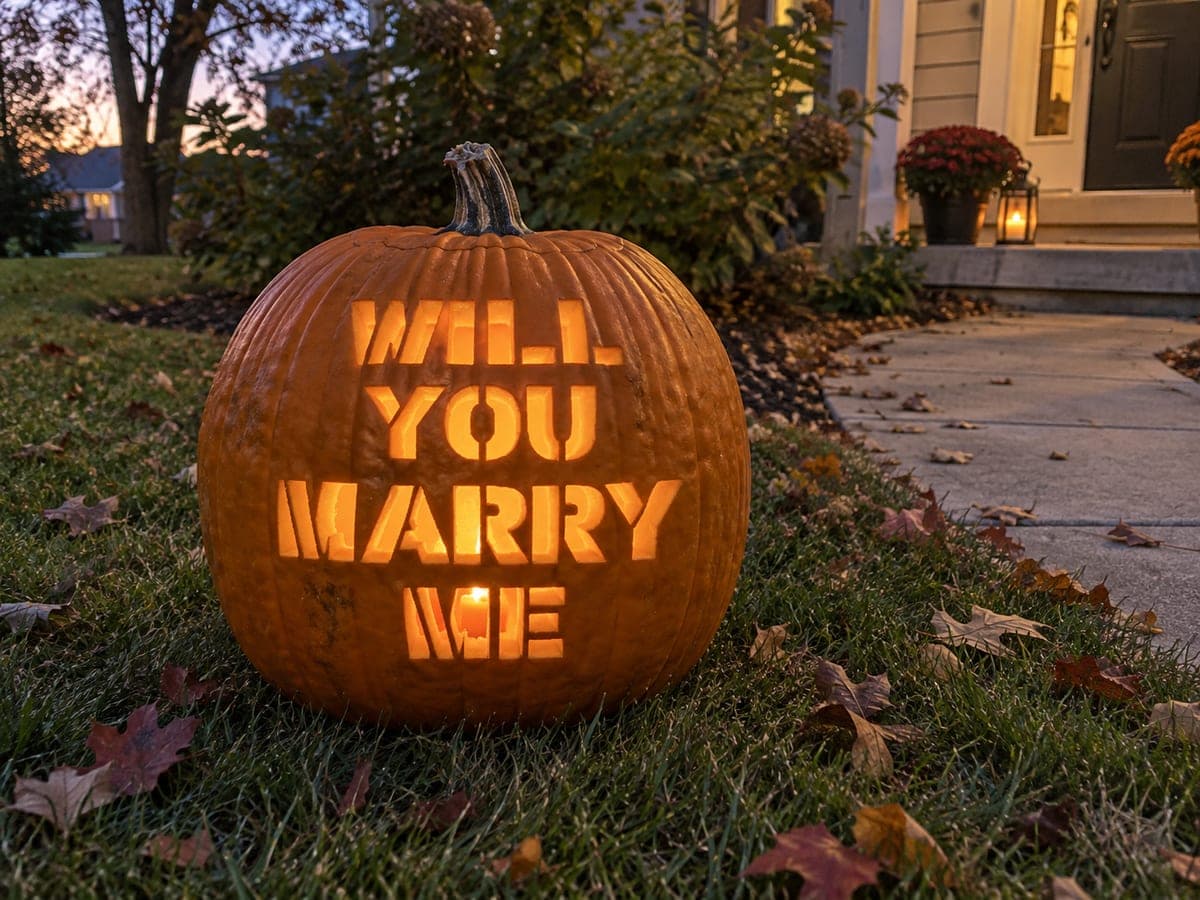
Four lines of wide stencil caps reading WILL YOU / MARRY / ME are cut straight across a round pumpkin, glowing brightly against an autumn yard in this memorable proposal pumpkin carving idea. The letters are large and evenly spaced so the message is instantly readable at a distance. Each enclosed letter center -- the middle of the R, the bowl of the P -- needs a small bridge of rind to stay in place, so mark those spots before starting to cut. Set the finished jack-o-lantern in the grass with a battery light inside so it stays lit through the whole moment.

This is an AI-generated concept image: a realistic, carvable design idea rather than a photo of a finished carve. AI concepts are always labeled and sit out the leaderboard and the contest.
No ratings yet · Sign in to rate

Comments (0)

  • No comments yet — be the first.

Save without an account. Sign in to like or comment.

Our tips for carving a similar design

The whole trick here is clean, wide block capitals stacked in four lines so the phrase reads instantly from across the lawn. Because every letter is a full cutout, the light pours straight through, which means your spacing and your rind bridges do all the work. Plan the layout on paper first, then transfer it so the four lines sit centered and level on the roundest face of the pumpkin.

Written by PumpkinCarvingIdeas.com, inspired by the image above. These are our suggestions, not instructions from the uploader. This approach to the AI concept has not been tested on a real pumpkin.

From pumpkin to porch

  1. Pick a tall, flat-faced pumpkin and open the back

    Choose a pumpkin with a broad, smooth front so all four lines fit without wrapping around the curve. Cut a wide access hole in the back rather than the top, which keeps the front face intact and makes it easy to reach in for the light. Scrape the inside wall behind the lettering area down to about one inch thick so it carves cleanly. A thinner wall lets your saw glide through the tight corners of the letters.

  2. Lay out and transfer the four lines

    Print WILL YOU on the top line, MARRY on the next, and ME on the bottom, sizing the caps to fill the face evenly. Tape the stencil on snugly, tucking darts into the paper so it hugs the curve without wrinkling. Poke the outline with a transfer tool or a pushpin, spacing dots close together on curves. Peel the paper and connect the dots with a washable marker so you have a clear guide before any blade touches the pumpkin.

  3. Mark your rind bridges before cutting

    Any letter with an enclosed center needs a small bridge of skin so the middle piece does not fall out. On this phrase the R in MARRY has a loop that traps a little island of rind, so mark two thin bridges across that gap now. Do the same for any rounded letter counters in your chosen font. Marking them first keeps you from absent-mindedly cutting them away mid carve.

  4. Carve the small interior details first

    Start with the tightest spots, like the inside of the R and the crossbars of the E and the corners of the M. Use a fine detail saw and let the blade do the work with gentle back and forth strokes, not force. Cut the small enclosed pieces before the big strokes so the face stays firm and stable while you work. Leave every bridge you marked fully intact.

  5. Cut the large letter strokes and clear the pieces

    Now open up the long vertical and horizontal strokes of each letter, saving the biggest cutouts for last so the pumpkin keeps its strength. Push each freed piece gently inward and out through the back hole rather than pulling it forward, which protects thin edges. Work one line at a time and check readability by stepping back every few letters. Clean up ragged edges with a small knife for crisp, easy-to-read type.

  6. Light it and stage the moment

    Drop a bright battery LED puck inside, or two for an even glow across all four lines, and never use a candle for a proposal you want to last. Set the pumpkin level in the grass so the lines do not tilt. Test it at dusk from the distance your partner will first see it, and adjust the light position so no line falls dark. Have your phone ready and the ring closer than the pumpkin.

Gather your supplies

Check things off as you get ready.

Work on a stable surface, keep your free hand out of the cutting path, and have an adult handle sharp tools.

Three levels of light

  • Leave intact

    The whole natural pumpkin skin around and between the words stays dark so the letters pop.

  • Peel & shade

    Optionally shave a thin border just outside each line to add a soft halo that frames the message.

  • Cut through

    Every letter of WILL YOU MARRY ME is cut fully through for the brightest, most readable glow.

Learn the carving basics

Before you start cutting

How do I keep the middle of the R from falling out?

Leave one or two thin bridges of rind spanning the enclosed loop so the little island stays anchored to the surrounding skin. Mark those bridges before you cut anything, and carve around them carefully. A couple of narrow bridges are nearly invisible once the pumpkin is lit.

Will all four lines fit on one pumpkin face?

They can if you pick a pumpkin that is tall and fairly flat across the front rather than short and squat. Size your stencil to the face and leave even margins top and bottom. If the letters start wrapping onto the curved sides they get hard to read, so go bigger on the pumpkin before you shrink the text.

How can I make sure it stays lit through the whole proposal?

Use fresh battery LED lights, ideally two pucks so the light spreads across all four lines evenly. Skip candles entirely since a flame can flicker out or dim at the worst moment. Test everything at dusk beforehand and keep a spare set of batteries in your pocket.

Your take belongs here, too.

Changed a detail? Made it simpler? Share a photo of your version and tell the community what worked.

Share your pumpkin

More pumpkins like this

You've reached the end · 8 pumpkins
The Patch Report

Fresh pumpkins, in your inbox.

The best new carvings, ideas worth stealing, and how-tos for carving season. Short, seasonal, and gone by November.

A short email during carving season. Unsubscribe anytime. See our privacy policy.