Halloween Pumpkin Carving Contest · Starts October 1st · $500 in prizes
← Back to ideas
@ai_concepts
Sep 25, 2026
Expert Charizard Pumpkin Carving with Full Dragon PortraitAI
0

Report this carving

Tell us what is wrong. Reports are private.

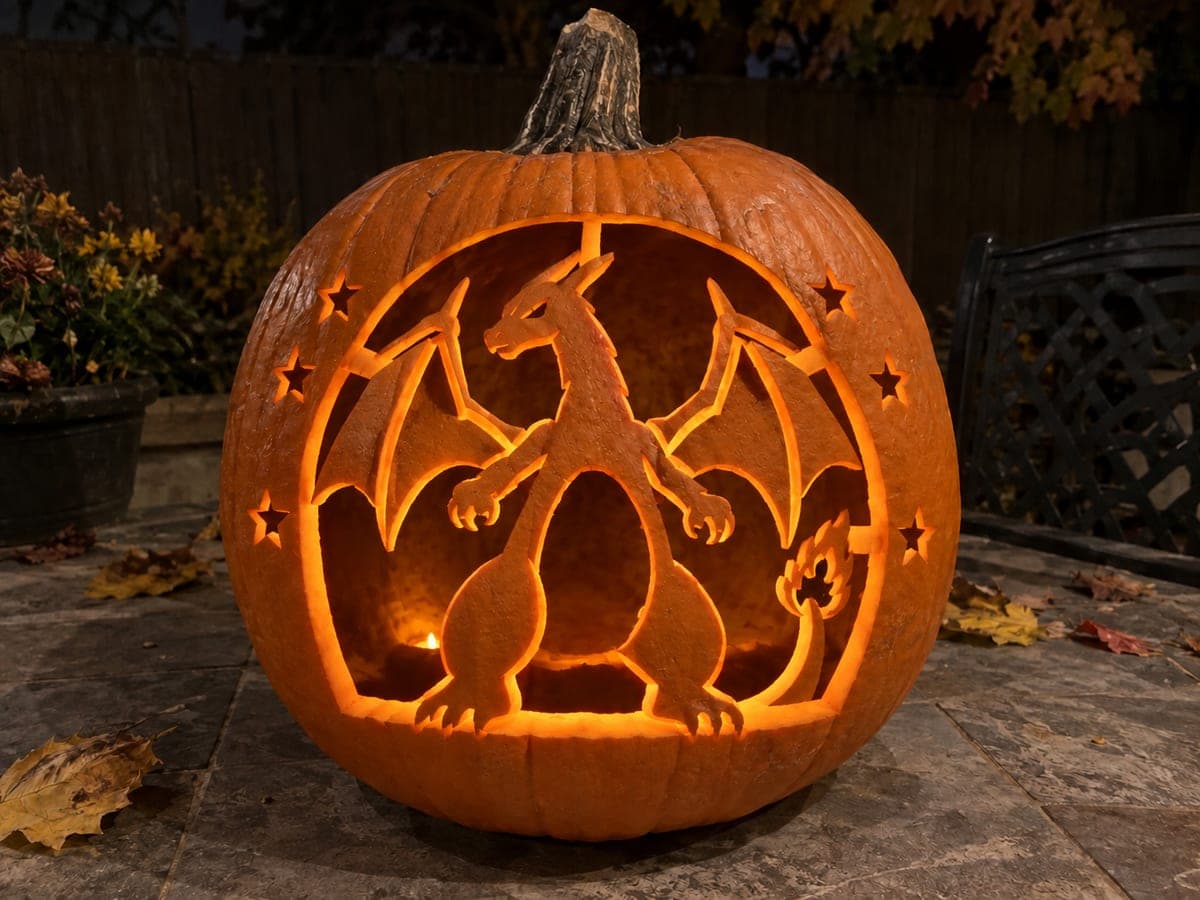
Expert Charizard Pumpkin Carving with Full Dragon Portrait

Cut-through main apertures and broadly rooted retained pupils, teeth, wing ribs, and flame silhouette sections build a detailed Charizard portrait on this expert pumpkin carving idea, with secondary surface accents shallow back-carved for a layered, illustrated effect. Wide rind bridges at every key joint keep the design structurally sound through the full display season. Mark all bridge positions on the stencil before transferring so you never accidentally cut through a critical connection.

No ratings yet · Sign in to rate

Comments (0)

  • No comments yet — be the first.

Save without an account. Sign in to like or comment.

Our tips for carving a similar design

This expert portrait layers cut-through apertures for the brightest glow with broadly rooted retained sections for pupils, teeth, wing ribs, and flame silhouette. Every retained piece connects to the shell on at least two wide bridges, mapped out on the stencil before any transfer begins. Shallow back-carved secondary accents complete the illustrated look and are done only after all structural cuts are confirmed stable.

From pumpkin to porch

  1. Plan and annotate the stencil

    Before transferring anything, print the pattern and draw a circle around every retained piece, noting its two required bridge contacts. This annotation step catches any area where a bridge might be accidentally cut and is the single most important prep action for an expert design. Only proceed to pumpkin transfer when every bridge is clearly marked.

  2. Hollow to precise thickness

    Cut a back opening, remove all pulp, and thin the carving face to a consistent three-quarters of an inch or slightly less over areas where back-carved accents will be added. Use a Dremel drum-sanding bit or a flat rasp for fine thickness control in the wing rib zone.

  3. Transfer the full pattern

    Tape the pattern securely and trace every line, including all bridge positions, with a pounce wheel. Re-draw the bridge marks in pen once the paper is removed. Confirm every mark is legible before picking up the carving saw.

  4. Cut large background and body apertures

    Open the largest cut-through areas first to release rind tension evenly. Use a fine-tipped carving saw, adults only, and remove each section without levering on adjacent retained pieces. Check the stencil annotation between every cut to confirm the next bridge location.

  5. Work the portrait details

    Move to the wing ribs, facial apertures, pupils, and teeth in that order, from largest retained unit to smallest. Keep every retained tooth anchored to both the upper and lower lip roots. Rib bridges should be at least three-eighths of an inch wide; widen any that feel narrow before finishing the adjacent cut.

  6. Back-carve accents and display

    Complete the shallow surface work with a Dremel ball bit or V-gouge, adding scale detail and wing-membrane texture. Insert a bright LED, rub exposed cut edges with petroleum jelly to slow drying, and display in a prominent spot where the full portrait is visible from a distance.

Written with AI to match this design

Gather your supplies

Check things off as you get ready.

Work on a stable surface, keep your free hand out of the cutting path, and have an adult handle sharp tools.

Three levels of light

  • Leave intact

    Retained pupils, teeth, wing ribs, and flame silhouette sections stay dark against the full-cut glow

  • Peel & shade

    Back-carved scale marks and wing-membrane texture glow as a rich mid-tone illustrated layer

  • Cut through

    All main portrait apertures and large body openings are fully cut through for maximum light output

Learn the carving basics

Before you start cutting

How do I carve the flame silhouette tips without them snapping?

Flame tips that are thinner than three-eighths of an inch should be back-carved rather than fully cut. Score the tip outline with a sharp knife first to define the edge cleanly, then use a small U-gouge to hollow the face side to about half the wall thickness. The glow effect is nearly identical to a full cut but the structural risk is dramatically lower.

My wing ribs cracked slightly during carving. Can I repair them?

A thin application of craft glue or white PVA pressed into a hairline crack from the back of the shell can stabilize it enough to last a display season. Press gently and hold for a minute, then allow it to dry fully before continuing to carve nearby. Avoid applying any weight or pressure to the cracked rib until the adhesive has cured.

How many sessions should I split this carving across?

For most carvers, splitting the work into two sessions is ideal: the first for hollowing, pattern transfer, and large body cuts, and the second for the portrait details and back-carving. Wrap the pumpkin in a damp paper towel and refrigerate it between sessions to keep it firm. Starting the second session with a misted surface helps prevent saw chattering on dried rind edges.

Your take belongs here, too.

Changed a detail? Made it simpler? Share a photo of your version and tell the community what worked.

Share your pumpkin

More pumpkins like this

You've reached the end · 8 pumpkins
The Patch Report

Fresh pumpkins, in your inbox.

The best new carvings, ideas worth stealing, and how-tos for carving season. Short, seasonal, and gone by November.

A short email during carving season. Unsubscribe anytime. See our privacy policy.