Halloween Pumpkin Carving Contest Β· Starts October 1st Β· $500 in prizes
← Back to ideas
@ai_concepts
Sep 25, 2026
Easy Charizard Pumpkin Carving with Glowing Dragon CutoutsAI
0

Report this carving

Tell us what is wrong. Reports are private.

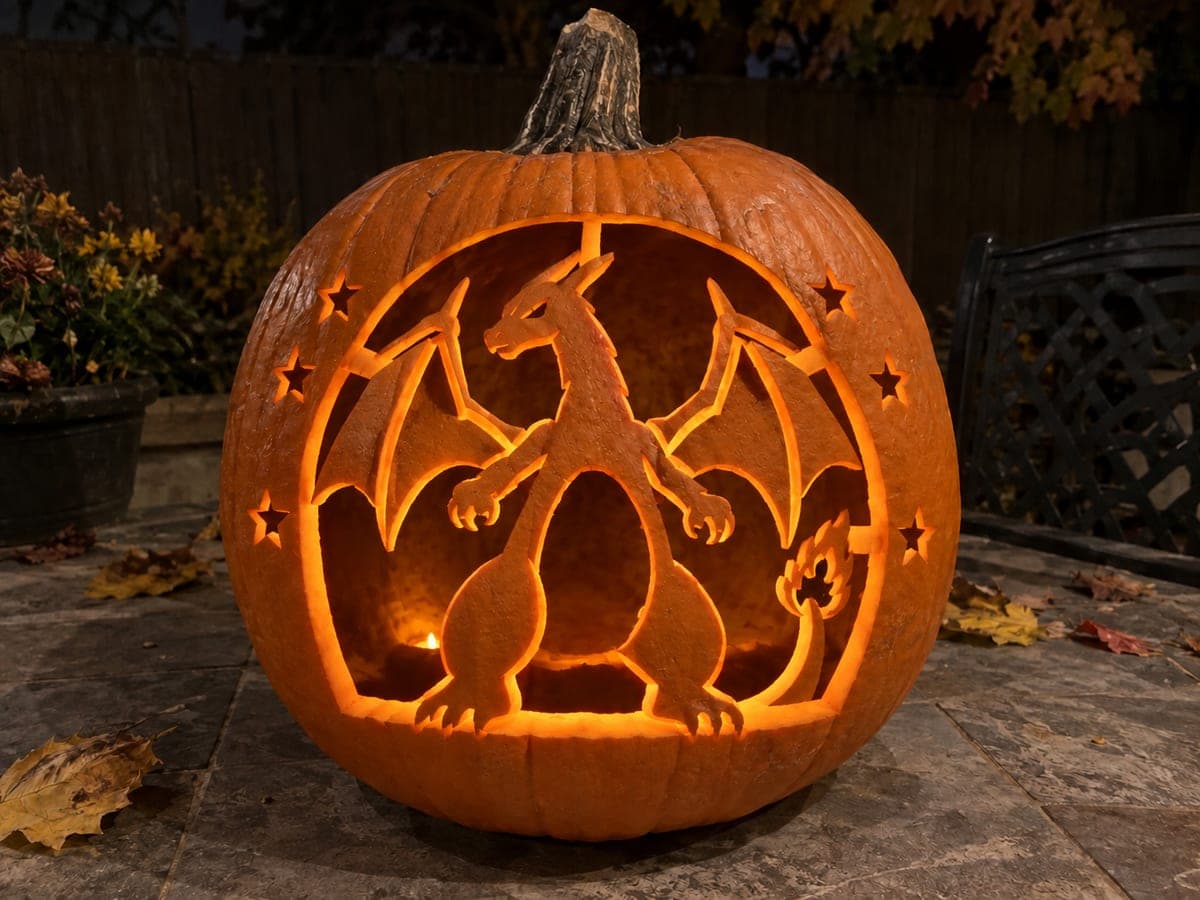
Easy Charizard Pumpkin Carving with Glowing Dragon Cutouts

Charizard's dragon silhouette glows through cut-through main apertures on this easy Charizard pumpkin carving idea, retained pupils, wing ribs, and flame silhouettes broadly connected to the shell so the design stays structurally sound. Surface accent marks are kept shallow back-carved for clean edges without fragile freestanding pieces. Position the flame detail near the top of the pumpkin face so it naturally reads as the tail flame when lit from inside.

No ratings yet Β· Sign in to rate

Save this design for carving night, then share a photo of your own jack-o'-lantern once it's glowing.
Comments (0)

  • No comments yet β€” be the first.

Save without an account. Sign in to like or comment.

Our tips for carving a similar design

This design opens the main dragon body, wing, and flame shapes as cut-through apertures while keeping pupils, wing ribs, and the flame silhouette broadly anchored to the surrounding rind. Placing the flame detail near the top of the pumpkin face helps it read naturally as Charizard's signature tail flame when the interior light shines through. Secondary accent marks are kept shallow so the overall structure stays strong.

From pumpkin to porch

  1. Hollow and thin the walls

    Cut a back panel or bottom lid and scoop the interior completely. Thin the walls over the carving face to about three-quarters of an inch, checking for any unusually thick ridges that might cause the saw blade to jump. Consistent thickness is especially important around the narrow wing rib sections.

  2. Transfer the silhouette

    Print the Charizard silhouette at the correct scale and tape it to the pumpkin. Trace every edge and bridge position with a pin tool or pounce wheel. Mark the wing rib bridges and the flame silhouette attachment points clearly with a felt-tip pen before removing the paper.

  3. Cut the large body and wing apertures

    Start with the biggest open areas, the body cavity and the spaces between wing ribs. Use a thin carving saw and short, controlled strokes. Adults should handle all cutting. Removing the large sections first establishes the dragon's overall outline before you refine the smaller details.

  4. Carve the flame silhouette

    The flame sits near the top of the face and connects to the shell on broad anchor points at its base. Cut the open areas around the flame shape while leaving those base connections intact. Work slowly near the flame tips, which can be thin, and leave any very pointed tip slightly blunted rather than cutting all the way to a sharp point.

  5. Back-carve the surface accent marks

    Use a small gouge or Dremel ball bit to shave the secondary accent details, scale marks or wing texture, roughly halfway through the rind wall. Keep passes light and check depth from the inside with a flashlight. A soft ambient glow through the wall, not a full hole, is the correct depth.

  6. Light and display

    Place a battery-powered LED inside toward the center. A warm orange light reinforces the fiery Charizard theme. Set the pumpkin on a stable surface where the flame detail at the top is at eye level for best visual impact.

Written with AI to match this design

Gather your supplies

Check things off as you get ready.

Work on a stable surface, keep your free hand out of the cutting path, and have an adult handle sharp tools.

Three levels of light

  • Leave intact

    Retained pupils, wing ribs, and flame silhouette sections stay dark as solid rind shapes against the glow

  • Peel & shade

    Shallow surface accent marks on the wings and body glow softly as a mid-tone texture layer

  • Cut through

    Main body cavity, wing-span apertures, and surrounding flame openings are fully cut through

Learn the carving basics

Before you start cutting

How do I stop the wing rib sections from breaking off?

Each wing rib needs to stay connected to the surrounding shell at both ends. Before cutting, confirm that the space between two ribs is wide enough to fit the saw blade without the blade pressing against the rib walls. If the rib spacing is tight, widen the opening slightly on the non-rib side rather than risking a snap by forcing the blade through a narrow gap.

The flame silhouette tip is very thin. Should I cut it fully or leave it shallow?

Leave any flame tip that is thinner than a quarter-inch as a shallow back-carved accent rather than a full cut-through. The visual difference when lit is minimal, and a shallow tip is far less likely to break during the display period. You can always deepen it later if you feel confident after the surrounding areas are secure.

Can I use an electric pumpkin carving tool instead of a hand saw?

Yes, a jigsaw-style electric carving tool works well for the large open body areas and speeds up the process. Switch to a hand saw or a fine Dremel bit for the narrower wing rib sections where the vibration of a power tool is more likely to crack thin rind. Always keep fingers well away from the blade regardless of the tool type.

Your take belongs here, too.

Changed a detail? Made it simpler? Share a photo of your version and tell the community what worked.

Share your pumpkin

More pumpkins like this

You've reached the end Β· 8 pumpkins
The Patch Report

Fresh pumpkins, in your inbox.

The best new carvings, ideas worth stealing, and how-tos for carving season. Short, seasonal, and gone by November.

A short email during carving season. Unsubscribe anytime. See our privacy policy.