Halloween Pumpkin Carving Contest · Starts October 1st · $500 in prizes
← Back to ideas
@ai_concepts
Sep 25, 2026
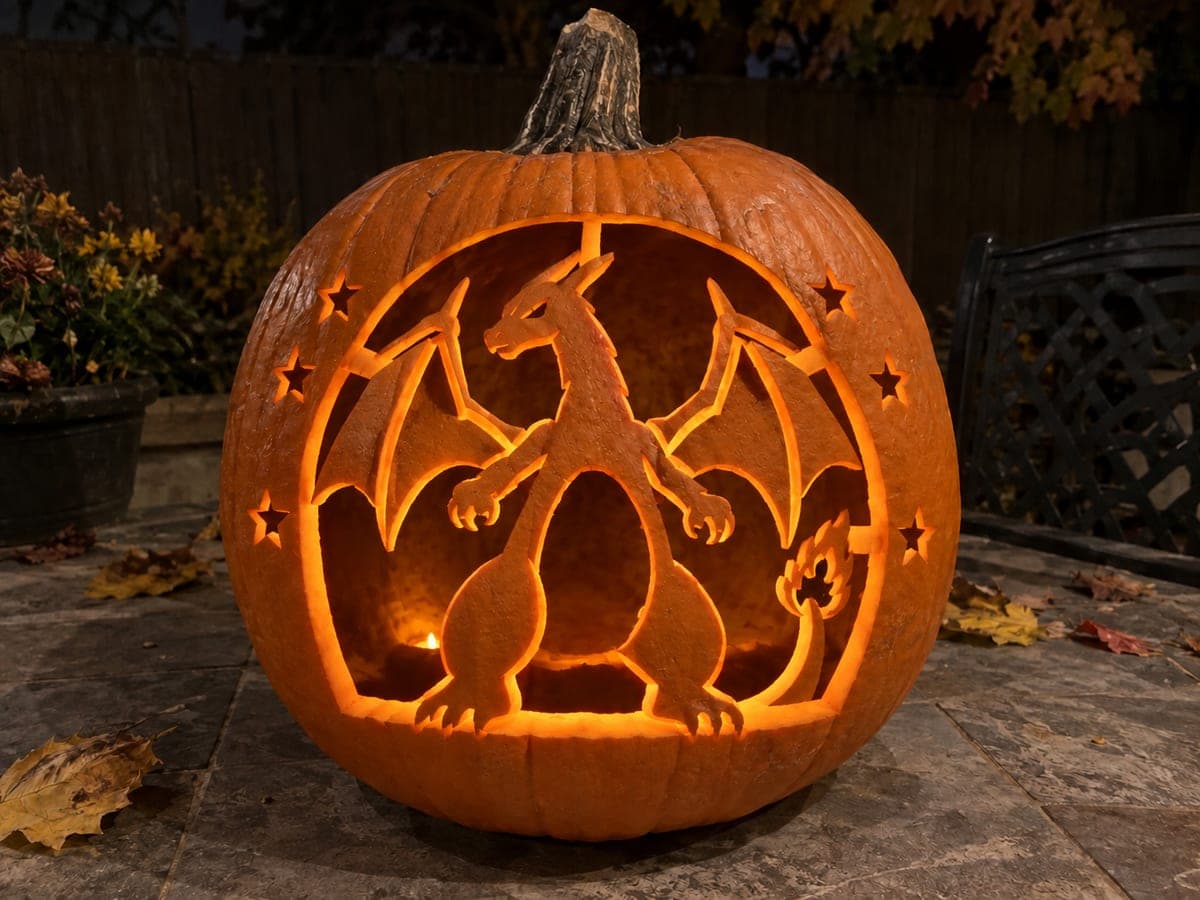
Charizard Pumpkin with Retained Wings and Flame DetailAI
0

Report this carving

Tell us what is wrong. Reports are private.

Charizard Pumpkin with Retained Wings and Flame Detail

This medium Charizard pumpkin carving idea opens the main body and face apertures while keeping wing ribs, pupils, and silhouette sections broadly anchored, creating a recognizable dragon profile that holds together at night. Smaller surface accents use shallow back-carving for layered texture without extra structural risk. Cut the body silhouette first to establish the wing outline boundaries before working the internal rib detail.

No ratings yet · Sign in to rate
Comments (0)

  • No comments yet — be the first.

Save without an account. Sign in to like or comment.

Our tips for carving a similar design

This medium build opens the main body and face apertures while keeping wing ribs, pupils, and silhouette boundary sections anchored on broad rind bridges. Cutting the body silhouette outline first establishes clear wing boundaries before any interior rib work begins. Shallow back-carved accent marks add surface texture without requiring additional through-cuts.

From pumpkin to porch

  1. Prep and hollow

    Cut a back-panel or bottom opening, scoop out all pulp, and thin the carving area walls to about three-quarters of an inch. Pay extra attention to the wall thickness in the wing zone since the rib cuts will leave slender columns of rind between open spaces.

  2. Transfer and mark bridges

    Tape the pattern to the pumpkin face and trace all lines with a pin tool. Circle every wing rib and silhouette bridge on the pattern first so their positions are committed to memory before the paper comes off. Re-mark the bridge positions on the pumpkin surface with a felt-tip pen.

  3. Cut the outer body silhouette

    Begin with the outermost boundary cuts that define the dragon's full body shape. These large cuts frame the wing area and give you a clear reference for where the ribs will fall. Use a thin carving saw with slow, deliberate strokes and remove each cut section cleanly.

  4. Carve the wing rib apertures

    Work between the rib lines, opening each inter-rib space as a separate cut. Every rib must stay connected to the outer shell at both its top and base. Keep the saw blade parallel to the rib to avoid angling into the bridge. If any rib narrows toward a tip, stop the cut short and clean up with a small detail knife from the front surface.

  5. Cut the face and pupil details

    Move to the facial apertures last among the full cuts, retaining pupils on wide double-anchored bridges. The face area is smaller than the wing zone, so the rind here is less likely to flex now that the larger body cuts are stable.

  6. Add surface accents and light

    Use a gouge or Dremel ball bit to add shallow body scale or wing-membrane texture. Insert a battery-powered orange LED and display the pumpkin where the wing silhouette profile is visible from multiple angles.

Written with AI to match this design

Gather your supplies

Check things off as you get ready.

Work on a stable surface, keep your free hand out of the cutting path, and have an adult handle sharp tools.

Three levels of light

  • Leave intact

    Wing rib columns, retained pupils, and silhouette boundary sections stay as dark rind shapes

  • Peel & shade

    Shallow scale and membrane texture accents glow as a soft mid-tone across the body

  • Cut through

    Body cavity apertures, inter-rib spaces, and main face openings are fully cut through

Learn the carving basics

Before you start cutting

What is a safe minimum width for a wing rib?

Each rib should be at least three-eighths of an inch wide at its thinnest point. If the design calls for thinner ribs, thin the wall behind them slightly with a back-carve to make them glow more brightly, rather than narrowing the rib itself. Glowing rib details often look better than razor-thin structural ones anyway.

In what order should I cut the inter-rib spaces?

Work from the outer edge of the wing inward toward the body, cutting each inter-rib space in sequence. Starting at the outer edge means the most distant cuts are made while the rind is still fully supported. As you approach the body, the adjacent cuts are already complete and you have a clear reference for where the bridge zones sit.

Can I substitute a linoleum gouge for the Dremel on the accent marks?

A sharp V-gouge or U-gouge works perfectly well for the surface accents and gives you excellent tactile feedback on depth. Make a series of shallow passes rather than trying to reach full depth in one stroke. A gouge also quieter and requires no power, which many carvers prefer for detailed work.

Your take belongs here, too.

Changed a detail? Made it simpler? Share a photo of your version and tell the community what worked.

Share your pumpkin

More pumpkins like this

You've reached the end · 8 pumpkins
The Patch Report

Fresh pumpkins, in your inbox.

The best new carvings, ideas worth stealing, and how-tos for carving season. Short, seasonal, and gone by November.

A short email during carving season. Unsubscribe anytime. See our privacy policy.