Halloween Pumpkin Carving Contest Β· Starts October 1st Β· $500 in prizes
← Back to ideas
@ai_concepts
Aug 17, 2026
Fairy Resting on a Crescent Moon PumpkinAI
0

Fairy Resting on a Crescent Moon Pumpkin

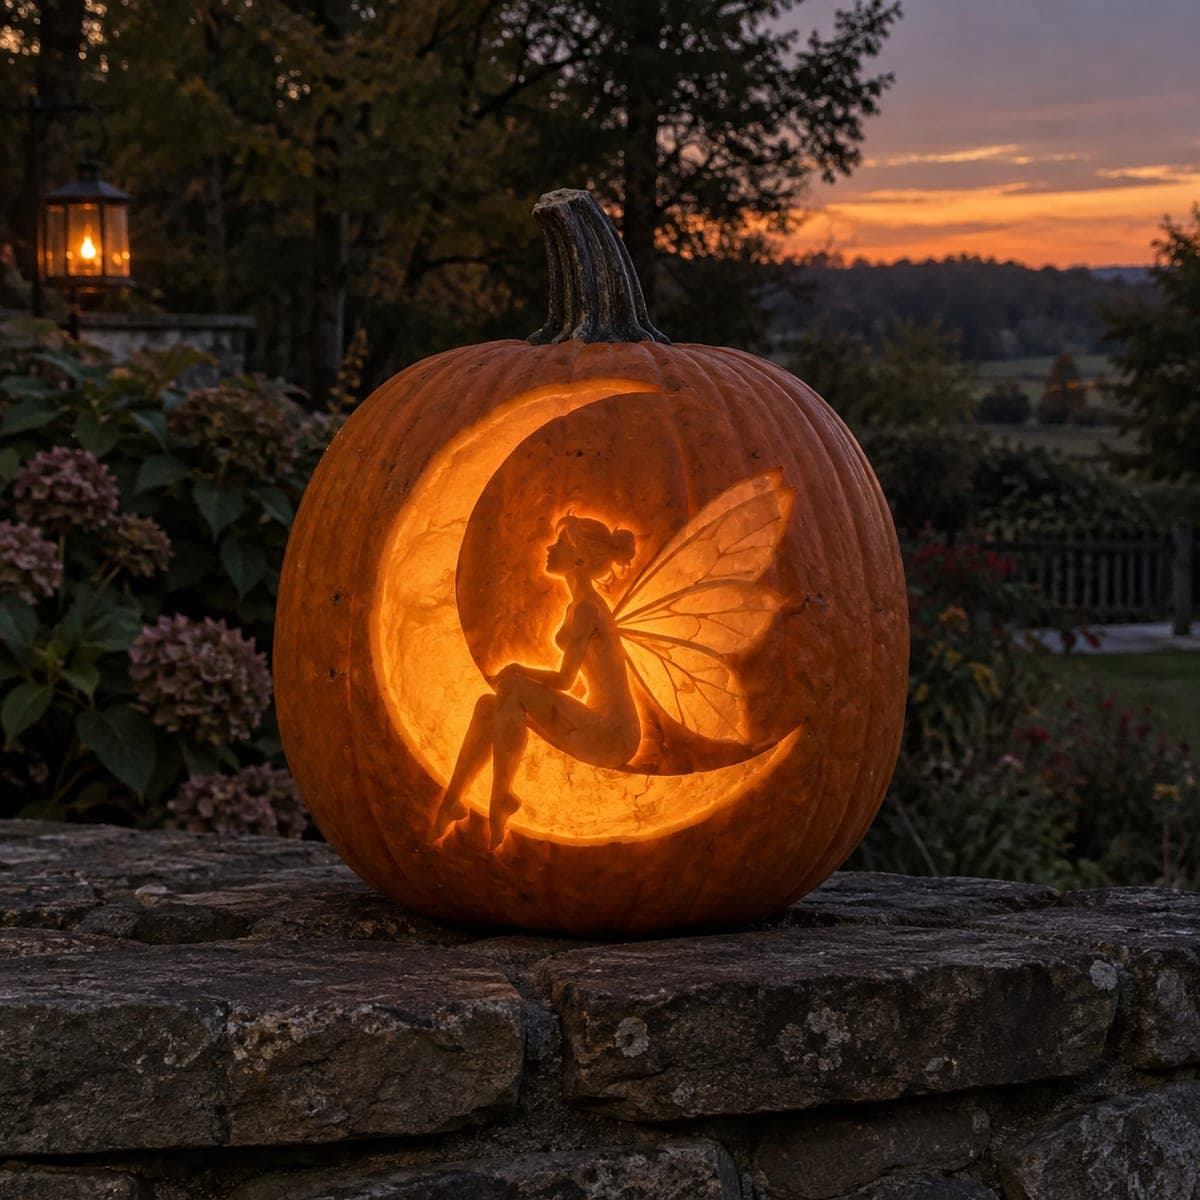
A fairy sits in dark silhouette on a glowing crescent moon, her delicate veined wings shining behind her like stained glass. Carve the moon as thinned rind for the bright backdrop, keep the fairy's body at full skin depth, and etch the wing membranes partway so they glow softer than the moon. That three-level contrast is what makes the scene float at dusk. A magical pumpkin carving idea for anyone who prefers enchanting over frightening.

This is an AI-generated concept image: a realistic, carvable design idea rather than a photo of a finished carve. AI concepts are always labeled and sit out the leaderboard and the contest.

No ratings yet Β· Sign in to rate

Comments (0)

  • No comments yet β€” be the first.

Save without an account. Sign in to like or comment.

Our tips for carving a similar design

The whole scene works on a three-level light trick: a bright thinned crescent moon, a fully dark fairy silhouette sitting on it, and softly glowing veined wings behind her. Plan the moon as your big glow, keep the fairy at full skin depth so she reads as a clean shadow, and etch the wings only partway so they shine like dim stained glass. Map all three depths before any blade touches the pumpkin.

Written by PumpkinCarvingIdeas.com, inspired by the image above. These are our suggestions, not instructions from the uploader. This approach to the AI concept has not been tested on a real pumpkin.

From pumpkin to porch

  1. Pick a smooth pumpkin and open the back

    Choose a tall pumpkin with one broad, even face for the design. Cut a hatch in the back rather than the top so the front stays uninterrupted. Scrape the inside wall behind the design down to about one inch so light passes through the thinned areas evenly. A thinner wall makes the moon and wings glow far more clearly.

  2. Transfer the stencil and mark your three zones

    Tape your fairy, moon, and wing pattern to the front and poke the outlines through with a pin or transfer tool. Before cutting, lightly shade or label the three zones so you never mix them up: moon to thin, fairy to leave dark, wings to etch. Add small bridge marks where thin wing veins meet the body so they stay attached. This planning step is what keeps a complex silhouette from falling apart.

  3. Thin the crescent moon for the bright backdrop

    Using a ribbon or loop tool, shave the entire crescent shape down to a thin, even rind so it becomes your brightest glow. Work slowly and check thickness by holding a light behind it as you go. Keep the inner curve of the crescent crisp where it wraps around the fairy. Stop while a little rind remains so the moon glows warm orange instead of blowing out.

  4. Leave the fairy at full skin depth

    Do not carve the fairy's body, head, or pose at all. Her full untouched skin is what makes her read as a solid dark silhouette against the moon. Clean up her edges with a small detail knife so the profile and seated pose stay sharp. Resist the urge to peel her, since any thinning would break the shadow effect.

  5. Etch the wings partway for a soft glow

    Scrape only the wing membranes to a medium depth, deeper than skin but not all the way through. Leave the vein lines and wing outline at full thickness so they stay dark and hold the delicate structure together. These raised veins act as bridges, keeping the thin wing panels from tearing. Aim for the wings to glow dimmer than the moon so the layers separate.

  6. Light it and photograph at dusk

    Drop a battery LED puck or string inside through the back hatch, never a candle. Warm white gives the closest match to that stained glass feel. Set the pumpkin outside at dusk so the fading sky frames the glow. Rotate the light until the moon reads brightest, the wings softer, and the fairy stays a clean shadow.

Gather your supplies

Check things off as you get ready.

Work on a stable surface, keep your free hand out of the cutting path, and have an adult handle sharp tools.

Three levels of light

  • Leave intact

    The fairy's body, head, and seated pose stay full skin depth as a dark silhouette, along with the wing vein lines.

  • Peel & shade

    The wing membranes are etched partway so they glow a soft dim orange behind her.

  • Cut through

    The crescent moon is thinned to a bright backdrop, the brightest glow in the scene.

Learn the carving basics

Before you start cutting

How do I keep the thin wings from tearing?

Leave the wing outline and all the vein lines at full thickness and only scrape the membrane panels between them. Those raised veins act as bridges that hold the delicate sections together. If a panel feels fragile, scrape it a little less deep rather than cutting through.

Why leave the fairy uncarved instead of cutting her out?

The scene depends on the fairy reading as a solid shadow against the lit moon. If you thin or cut her body she loses that crisp silhouette and the layering falls apart. Full untouched skin is exactly what makes her float in front of the glow.

This is a concept image, so can a real pumpkin really do three light levels?

Yes, this effect is very achievable on a real pumpkin. Untouched skin stays dark, scraped rind glows dim, and thinned or cut areas glow bright, so you just assign each part of the design a depth. The key is thinning the inside wall evenly and testing with your LED as you carve.

Your take belongs here, too.

Changed a detail? Made it simpler? Share a photo of your version and tell the community what worked.

Share your pumpkin

More pumpkins like this

You've reached the end Β· 8 pumpkins
The Patch Report

Fresh pumpkins, in your inbox.

The best new carvings, ideas worth stealing, and how-tos for carving season. Short, seasonal, and gone by November.

A short email during carving season. Unsubscribe anytime. See our privacy policy.