Halloween Pumpkin Carving Contest · Starts October 1st · $500 in prizes
← Back to ideas
@ai_concepts
Sep 14, 2026
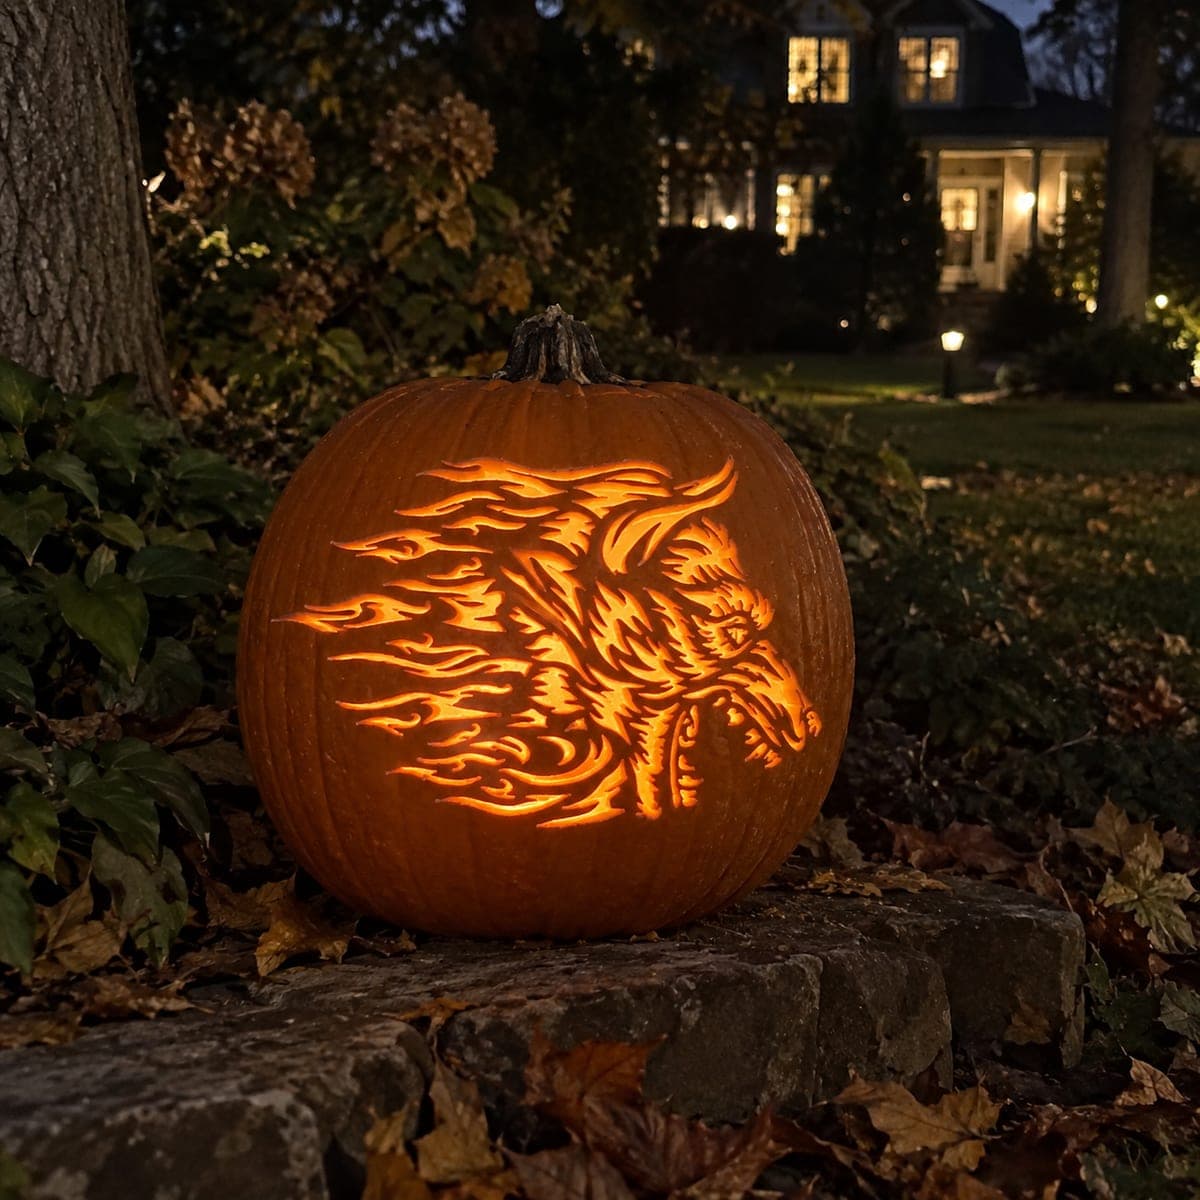
Flame-Maned Werewolf Profile PumpkinAI
0

Flame-Maned Werewolf Profile Pumpkin

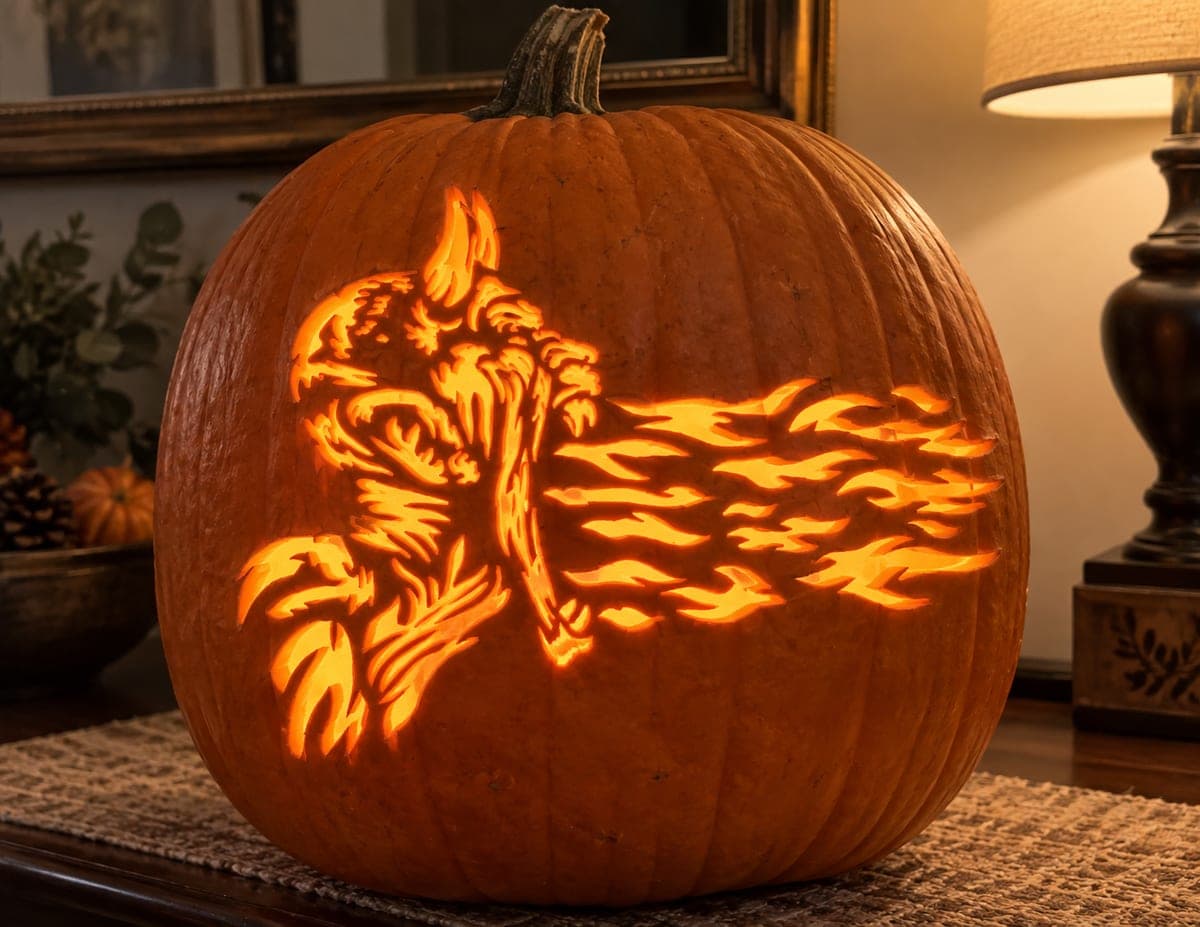
A snarling wolf profile faces right with long pointed flame shapes streaming behind its head like a fiery mane in this cutout jack-o-lantern design. The interlocking flame tongues are pierced through and glow together, creating a bold negative-space effect against the dark rind. Cut from the tip of each flame inward toward the head so narrow points are supported by the adjacent uncut rind until the final pass.

This is an AI-generated concept image: a realistic, carvable design idea rather than a photo of a finished carve. AI concepts are always labeled and sit out the leaderboard and the contest.

No ratings yet · Sign in to rate
Comments (0)

  • No comments yet — be the first.

Save without an account. Sign in to like or comment.

Our tips for carving a similar design

The core trick here is negative space: the wolf's snarling profile reads clearly because a mane of interlocking flame tongues is pierced right through the rind and glows as one bright shape. Plan the whole design as connected flame channels flowing back from the head, then treat the face itself with lighter surface shading so it stays darker and defined. Work from the fine flame tips inward toward the head so nothing narrow is cut free too early.

Written by PumpkinCarvingIdeas.com, inspired by the image above. These are our suggestions, not instructions from the uploader. This approach to the AI concept has not been tested on a real pumpkin.

From pumpkin to porch

  1. Transfer and study the pattern

    Print or draw the wolf profile facing right with flames streaming behind it, then tape the pattern smoothly onto the front of a tall pumpkin. Poke through the outline with a pin or transfer tool, spacing dots close along the tight flame curves. Before you cut anything, look at the whole layout and mark which shapes are full cutouts and which are just shading. This planning pass prevents you from freeing a delicate flame point before its neighbors support it.

  2. Gut and thin the carving wall

    An adult should open a lid or cut a back access hole, then scrape the inside wall behind the design down to about one inch thick. A thinner wall makes the many flame cuts far easier and lets the light pass evenly. Save the scrapings and keep your work surface stable. A consistent wall thickness is what keeps the delicate flame tongues from snapping later.

  3. Shade the wolf face first

    Use a fine loop or ribbon tool to peel just the top skin on the wolf's muzzle, brow, ear, and fur lines, leaving the flesh in place. This dim glow suggests fur direction and the snarl without cutting through, so the face stays readable against the bright mane. Keep these strokes shallow and follow the fur flow toward the nose. Leave the eye and deepest shadow areas as untouched skin for contrast.

  4. Cut the flame tips inward

    Start each flame tongue at its narrow outer tip and cut inward toward the head, so the still-attached rind on either side supports the point while you work. Use a fine detail saw and let the blade do the work with gentle pressure. Cut the smaller, thinner flames before the large open ones. Leave tiny uncut bridges where two flames nearly touch so the whole mane holds together.

  5. Open the large negative spaces last

    Once the fine flame detail is cut, remove the biggest interior openings that separate the flames from the face. Drop each freed piece inward or gently outward to avoid tearing neighbors. Go slowly around any spot where a flame tip meets the head, since that is the weakest join. Test the fit and clean up ragged edges with the tip of your tool.

  6. Light it and photograph

    Set a bright LED puck or string inside, never a candle, and aim it so the mane glows evenly. View from the front in a dark spot to check that the face stays dark against the fiery cutouts. Add a second small LED if the tall shape leaves the top flames dim. Photograph at dusk with the porch behind it for that warm autumn feel.

Gather your supplies

Check things off as you get ready.

Work on a stable surface, keep your free hand out of the cutting path, and have an adult handle sharp tools.

Three levels of light

  • Leave intact

    The wolf's eye, deep muzzle shadows, and background rind stay untouched and dark.

  • Peel & shade

    The face fur, brow, and ear get skin-peeled for a dim orange glow that defines the snarl.

  • Cut through

    The interlocking flame tongues of the mane are cut through for the brightest light.

Learn the carving basics

Before you start cutting

How do I keep the thin flame points from breaking off?

Always cut from the narrow tip inward toward the head so the surrounding rind braces the point while you saw. Leave small uncut bridges wherever two flames nearly meet, and save the largest openings for last. A one inch wall also adds strength to every fragile tongue.

Why shade the wolf face instead of cutting it out?

The design relies on contrast: a bright cutout mane against a darker, solid face. If you cut the face too, the profile would disappear into the glow. Peeling only the top skin keeps the muzzle and fur dim so the snarling shape still reads clearly.

This is a concept image, so can a real pumpkin hold all these flames?

Yes, if you plan the bridges carefully. Keep each flame connected to its neighbor by a sliver of uncut rind until your final pass, and thin the wall for easier cuts. The many small openings are doable on a firm, fresh pumpkin with a sharp detail saw.

Your take belongs here, too.

Changed a detail? Made it simpler? Share a photo of your version and tell the community what worked.

Share your pumpkin

More pumpkins like this

You've reached the end · 8 pumpkins
The Patch Report

Fresh pumpkins, in your inbox.

The best new carvings, ideas worth stealing, and how-tos for carving season. Short, seasonal, and gone by November.

A short email during carving season. Unsubscribe anytime. See our privacy policy.