Halloween Pumpkin Carving Contest · Starts October 1st · $500 in prizes
← Back to ideas
@ai_concepts
Sep 14, 2026
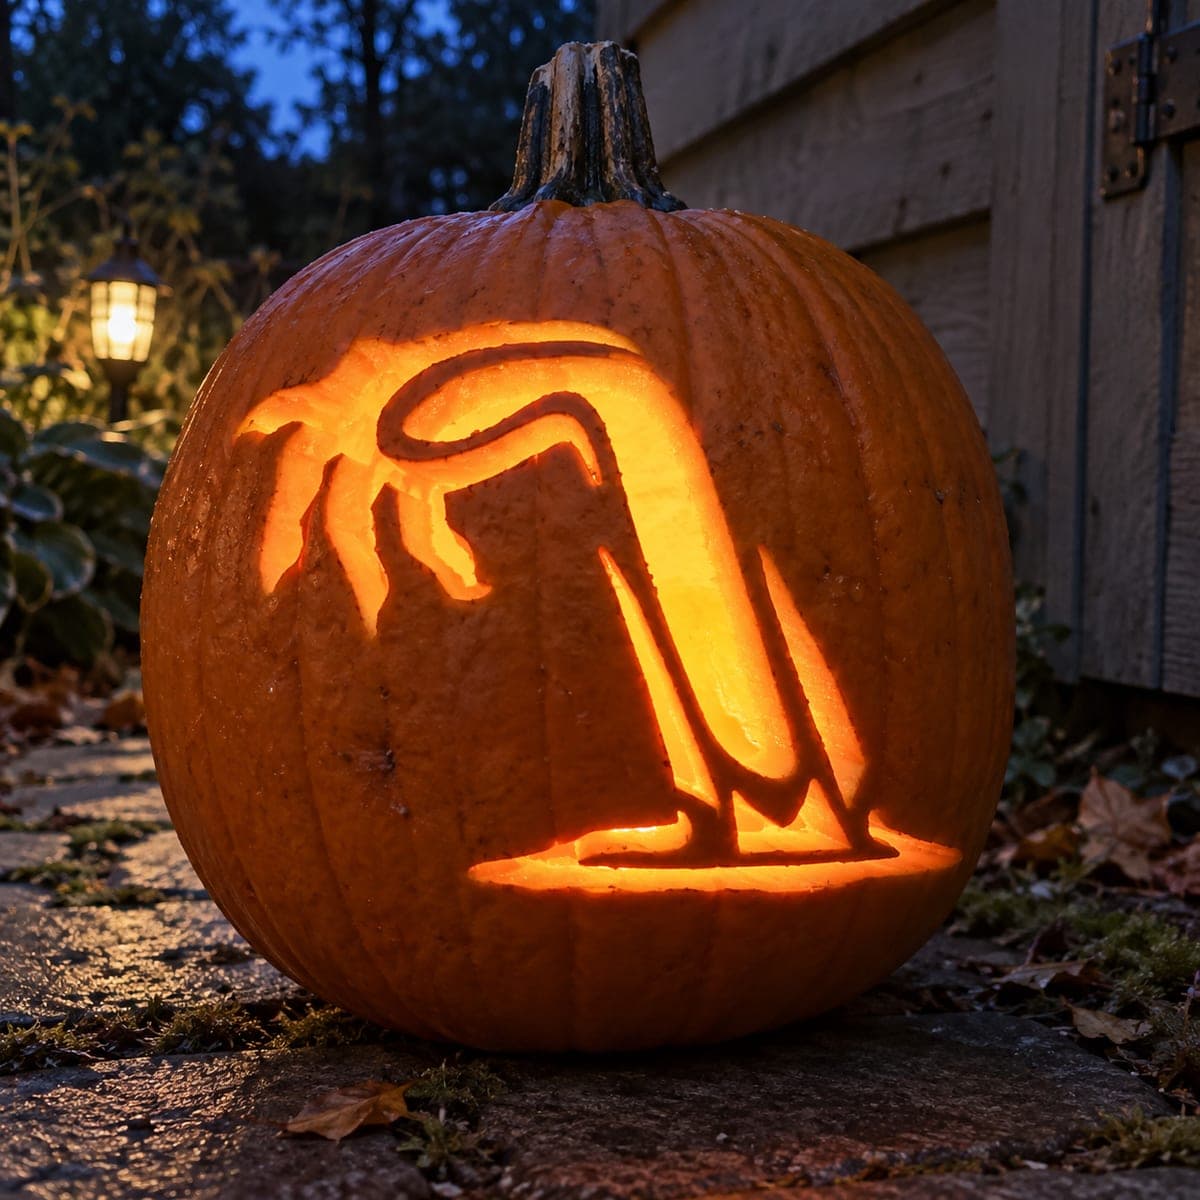
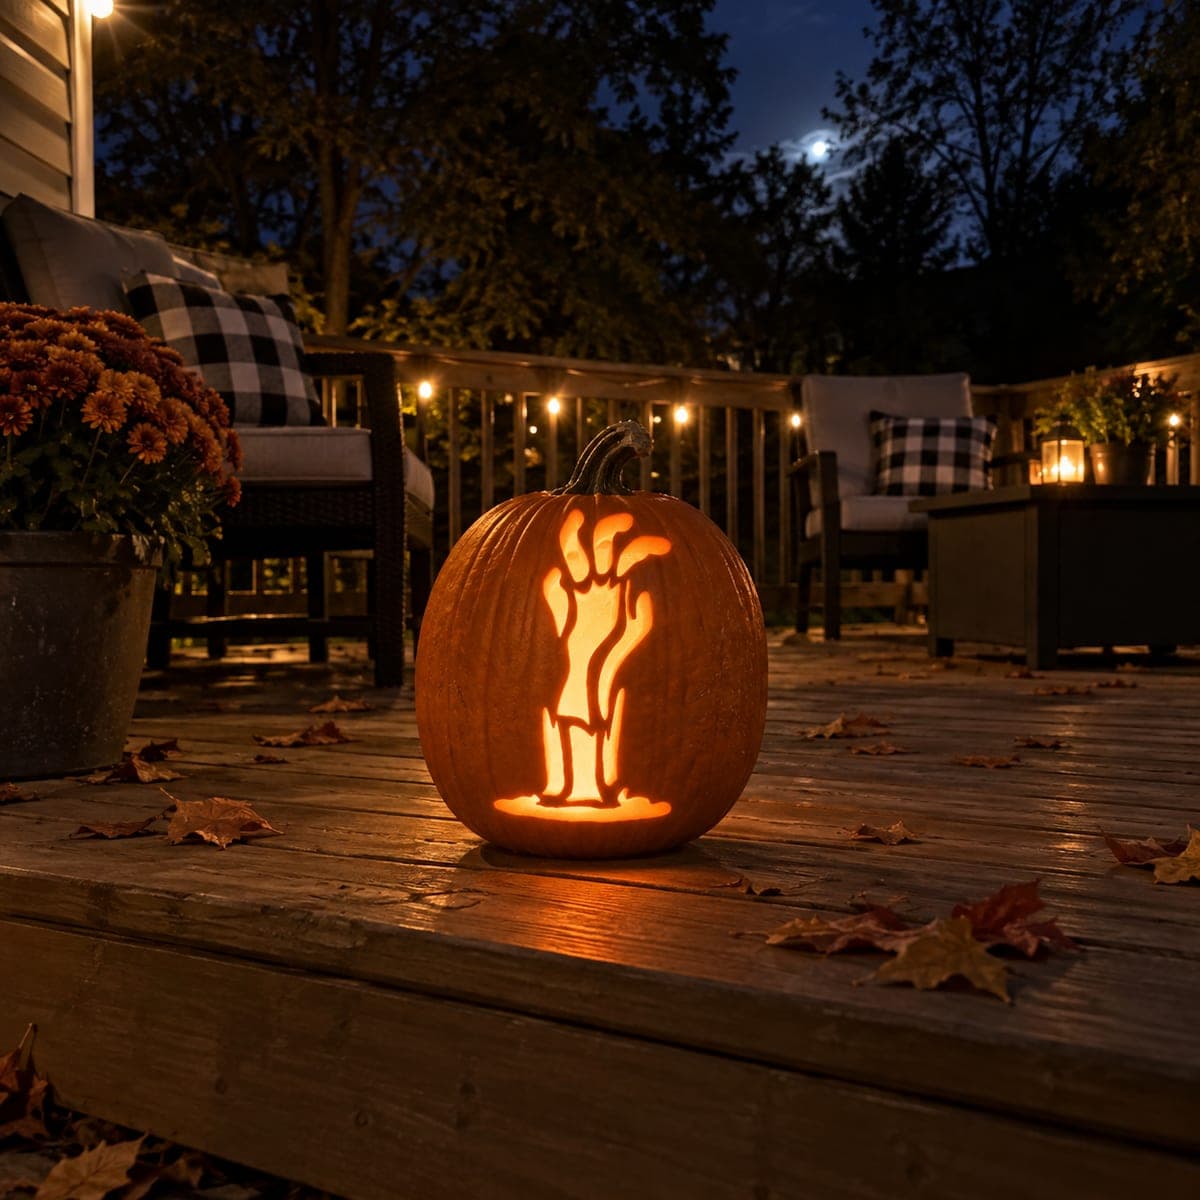
Bent Zombie Arm Emerging From Ground PumpkinAI
0

Bent Zombie Arm Emerging From Ground Pumpkin

A bent zombie forearm emerges from ground-level on the left, curves at a sharp elbow, and ends in a drooping hand with spread fingers that hang downward toward the base. The arm, hand, and finger shapes are all cut through in this medium-difficulty cutout carving, with the glowing interior visible through the silhouette gaps. Cut the upper arm section first while the wall is still rigid, then work down through the bent elbow and into each individual drooping finger to keep control of the saw in the curved section.

This is an AI-generated concept image: a realistic, carvable design idea rather than a photo of a finished carve. AI concepts are always labeled and sit out the leaderboard and the contest.

No ratings yet · Sign in to rate
Comments (0)

  • No comments yet — be the first.

Save without an account. Sign in to like or comment.

Our tips for carving a similar design

The whole effect here comes from a single bold silhouette: a bent forearm rising from the base, curving at the elbow, and ending in a drooping hand with spread fingers. Everything readable is a full cutout, so the glow behind the pumpkin wall does the work while the untouched skin frames the shape. The trick is cutting the thick, stable upper arm first and saving the thin, curved fingers for last so the wall stays rigid as long as possible.

Written by PumpkinCarvingIdeas.com, inspired by the image above. These are our suggestions, not instructions from the uploader. This approach to the AI concept has not been tested on a real pumpkin.

From pumpkin to porch

  1. Prep the pumpkin and plan your opening

    Pick a tall pumpkin with a wide, flat front panel so the whole arm fits without wrapping around the curve. Cut a lid in the back or bottom rather than the top so the front stays clean, then scrape the inside wall behind the design down to about one inch thick. A thinner wall cuts more easily and lets more light through. Work over newspaper and keep a towel handy for slippery hands.

  2. Transfer the arm silhouette

    Tape your stencil flat against the front and poke the outline with a pin or a dull pencil, following the elbow bend and each finger. Space your dots closer together on the tight curves so the line stays smooth when you connect them. Peel the paper and lightly trace the dots so you can see the full shape before any cutting. Double check that the base of the arm sits low enough to look like it is rising from the ground.

  3. Cut the upper arm while the wall is rigid

    Start with the thick upper arm section near the top of the shape, where the pumpkin is strongest. Hold the saw straight in and out and let it do the work with gentle pressure, no forcing. Cutting this large piece first removes tension while the surrounding wall still supports it. Push the freed piece gently inward and out.

  4. Work through the bent elbow

    Move down into the sharp elbow curve, making short, controlled strokes and rotating the pumpkin instead of twisting your wrist. Curves are where saws bind, so ease off the pressure and take your time. Keep the removed sections small in the tightest part of the bend. Clear each piece as you go so it does not crowd your blade.

  5. Cut the drooping fingers last

    Finish with the individual fingers hanging down toward the base, cutting each one as its own narrow slot. Because these are the thinnest, most fragile openings, saving them for last keeps the wall from flexing while you carve. Leave a little pumpkin skin between fingers so they read as separate shapes and the wall does not weaken all at once. Trim the inside edges at a slight bevel to brighten the glow.

  6. Light it and photograph at dusk

    Drop in a battery LED, not a candle, since the deep cutouts and cool evening air make a flame unreliable. Set the pumpkin low, near a step or the ground, so the arm truly looks like it is reaching up out of the earth. Shoot at dusk when the sky is still faintly blue for that eerie contrast. Mist the surface lightly for a damp, freshly dug look.

Gather your supplies

Check things off as you get ready.

Work on a stable surface, keep your free hand out of the cutting path, and have an adult handle sharp tools.

Three levels of light

  • Leave intact

    The untouched orange skin surrounding the arm, which keeps the silhouette dark and readable.

  • Peel & shade

    Optional shallow skin-peeling just inside the finger gaps for a dimmer glow that softens the edges.

  • Cut through

    The full arm, elbow, hand, and finger openings cut clean through for the brightest interior glow.

Learn the carving basics

Before you start cutting

How do I keep the thin fingers from breaking off?

Cut them dead last, after the arm and elbow are done, so the wall stays rigid the whole time. Leave a small band of skin between each finger rather than joining them into one big hole. If a finger feels wobbly, you can leave a tiny uncut bridge at its base and trim it once everything else is finished.

This is an AI concept image, so can a real pumpkin actually look like this?

Yes, the shape is realistic to carve because it is one connected silhouette with generous gaps. Keep each finger opening a reasonable width, around a finger's thickness, so the surrounding skin can support it. Avoid making the fingers razor thin and they will hold up fine outdoors.

Should I carve this on the top or the side of the pumpkin?

Use the flattest front face and position the base of the arm low on the pumpkin. Setting it near the bottom sells the illusion that the hand is rising from the ground. Cut your access lid in the back or the base to keep the front surface unbroken.

Your take belongs here, too.

Changed a detail? Made it simpler? Share a photo of your version and tell the community what worked.

Share your pumpkin

More pumpkins like this

You've reached the end · 8 pumpkins
The Patch Report

Fresh pumpkins, in your inbox.

The best new carvings, ideas worth stealing, and how-tos for carving season. Short, seasonal, and gone by November.

A short email during carving season. Unsubscribe anytime. See our privacy policy.