Halloween Pumpkin Carving Contest · Starts October 1st · $500 in prizes
← Back to ideas
@ai_concepts
Sep 14, 2026
Simple Raised Zombie Hand PumpkinAI
0

Simple Raised Zombie Hand Pumpkin

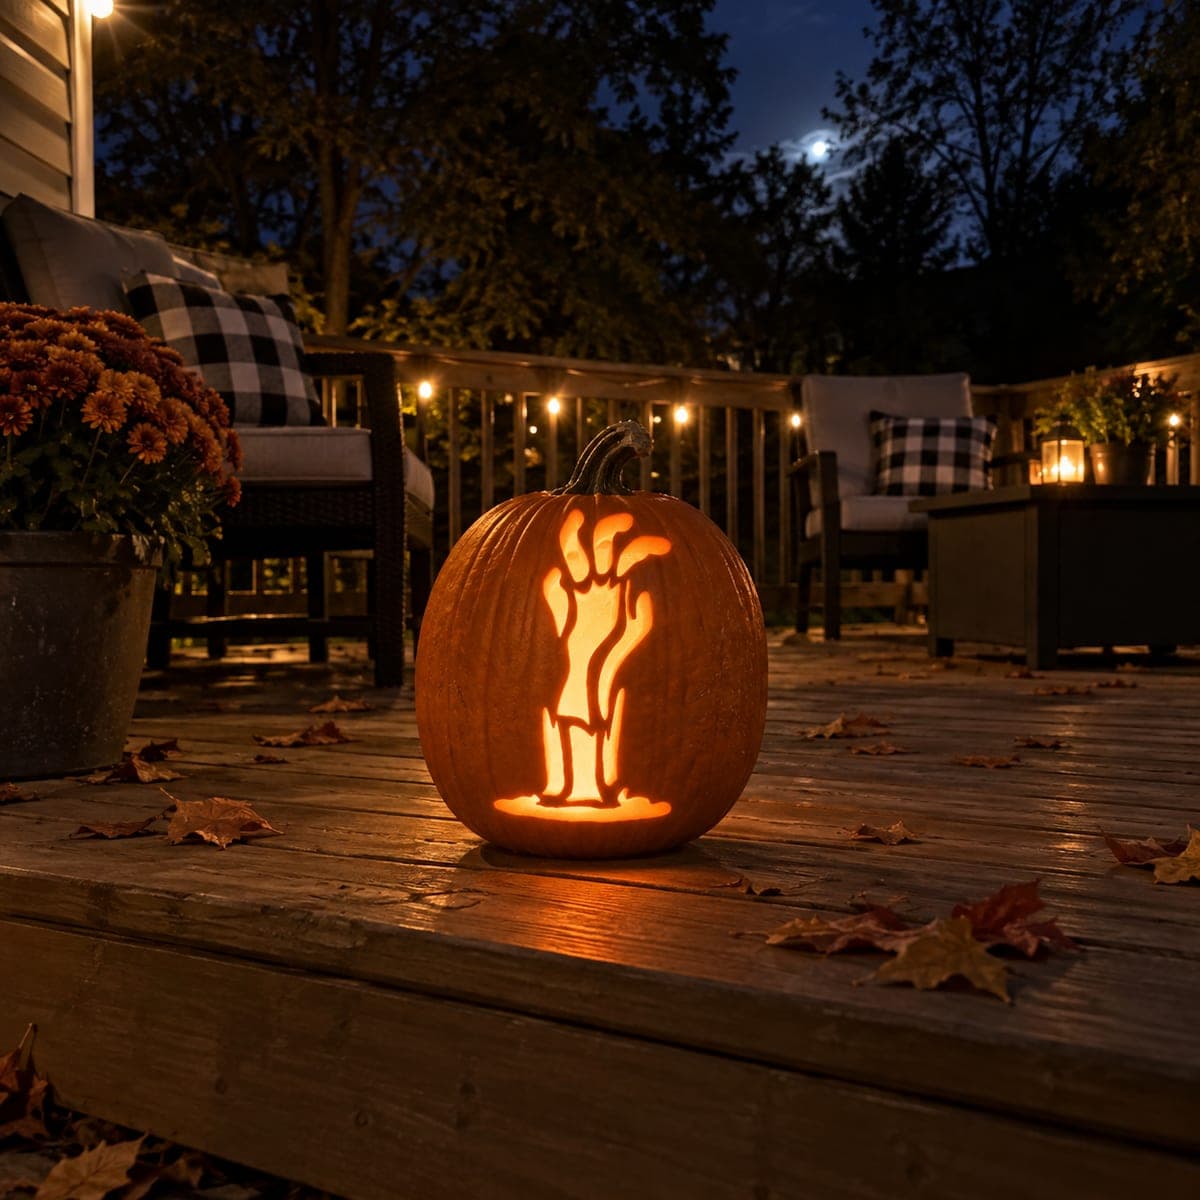
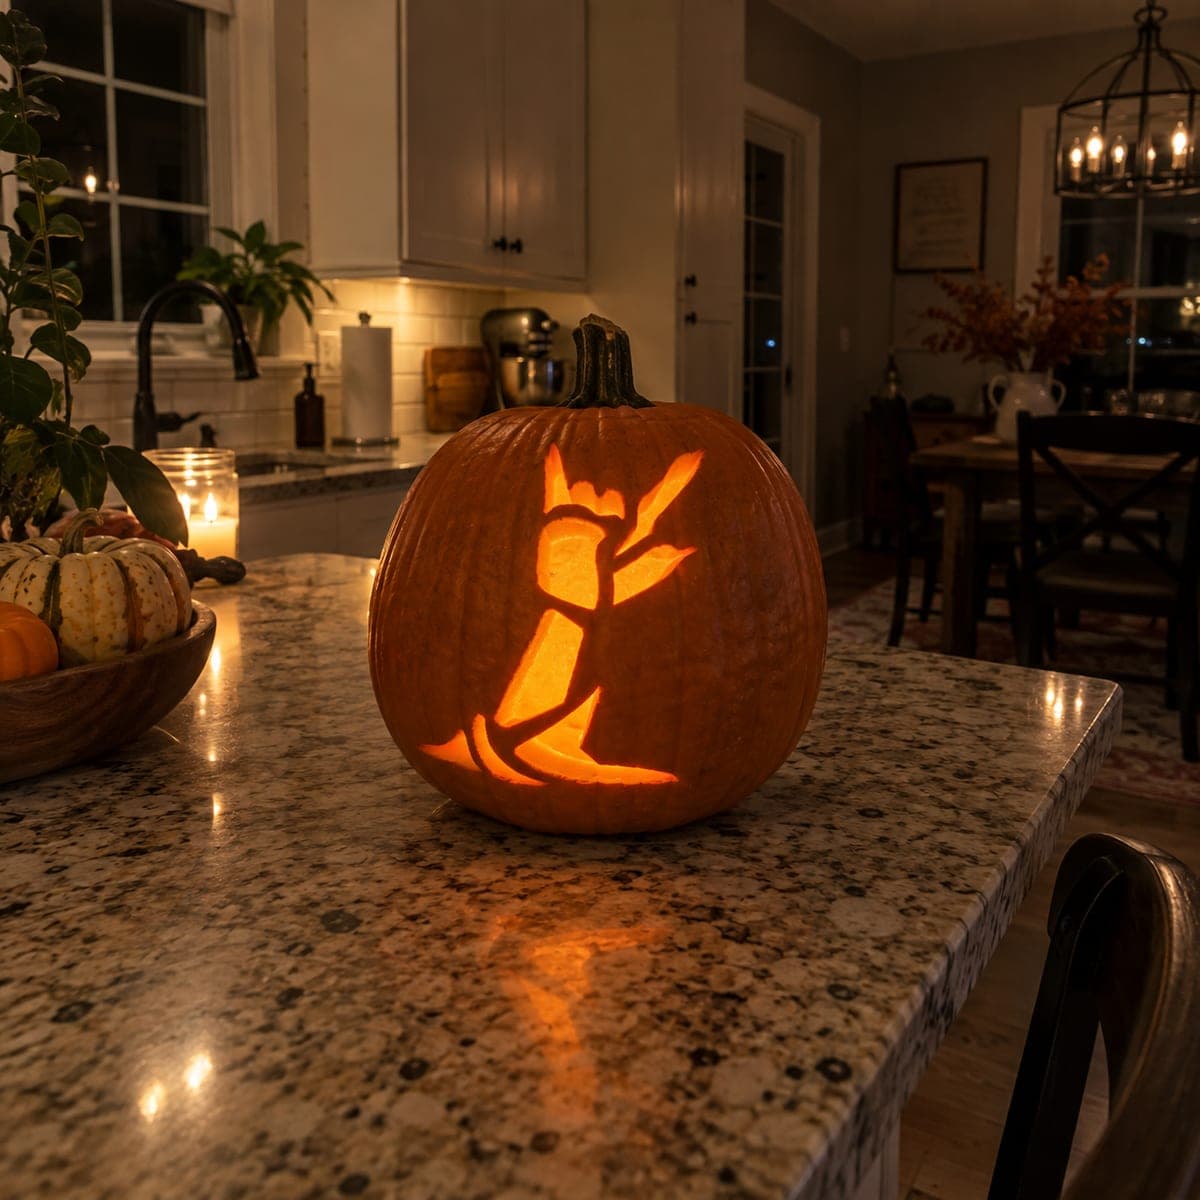
A decayed forearm and hand with long grasping fingers rises straight up from a shallow ground line, the whole shape glowing orange against a dark outdoor deck. The arm and fingers are fully cut through so the backlit shape reads as a clean silhouetted zombie hand pumpkin carving idea. Leave a short uncut tab at the base of the wrist where it meets the ground line until the finger cuts are finished, then remove that tab last to keep the design anchored while you work through the narrow spaces between fingers.

This is an AI-generated concept image: a realistic, carvable design idea rather than a photo of a finished carve. AI concepts are always labeled and sit out the leaderboard and the contest.

No ratings yet · Sign in to rate
Comments (0)

  • No comments yet — be the first.

Save without an account. Sign in to like or comment.

Our tips for carving a similar design

The core trick here is a single high-contrast silhouette: the whole zombie hand and forearm are cut clean through so the light behind reads as a sharp black shape. The plan is to keep everything connected while you work by leaving a small tab at the wrist and saving the tightest finger gaps for last. Because this is one big cutout rather than layered shading, it stays forgiving even if your lines wobble a little.

Written by PumpkinCarvingIdeas.com, inspired by the image above. These are our suggestions, not instructions from the uploader. This approach to the AI concept has not been tested on a real pumpkin.

From pumpkin to porch

  1. Pick and prep the pumpkin

    Choose a pumpkin with a wide, fairly flat front face so the tall hand has room to stand upright without curving out of view. Cut a lid from the back or the bottom instead of the top so the front stays clean and uninterrupted. Scoop the walls on the carving side down to about one inch thick so your blade passes through easily. A thinner wall also lets more light escape through the cutout.

  2. Transfer the hand pattern

    Print or draw a forearm and hand with long grasping fingers rising straight up from a short horizontal ground line at the base. Tape the paper flat and poke the outline with a pushpin or a poking tool, spacing dots close together around the narrow finger gaps. Peel the paper and connect the dots lightly with a marker so you can see the shape. Double check that each finger has enough space between it and its neighbor for your blade to turn.

  3. Leave a wrist tab and score the gaps

    Before any full cuts, plan a short uncut tab at the base of the wrist where it meets the ground line so the design stays anchored while you carve. Use a fine detail saw to gently score the inner edges of the spaces between the fingers first. Working the tightest interior gaps early, while the surrounding pumpkin is still solid, keeps everything stable. Make slow, straight up-and-down passes and let the tool do the work instead of forcing it.

  4. Cut through the fingers and arm

    Now cut fully through along your outline, starting with the small negative spaces between the fingers and working outward to the long edges of the forearm. Support the piece you are removing with your free hand so it does not snap a fingertip off as it comes loose. Push the waste pieces out gently toward the outside of the pumpkin. Clean up any ragged edges with light passes so each finger reads as a crisp point.

  5. Remove the wrist tab last

    With all the finger cuts finished, carefully cut away the short wrist tab you left at the ground line. Removing it last means the hand stayed braced through the delicate work and now drops into its final open silhouette. Trim the base opening so the arm looks like it rises straight out of the ground. Test-fit the shape and smooth any thin spots that look fragile.

  6. Light it and photograph

    Set a battery LED light or two inside and never a real candle, since the thin cut walls can scorch. Place the pumpkin on a dark deck or table so the glowing hand pops against the shadows. Shoot slightly below eye level to make the fingers look like they are reaching up at the viewer. If the center of the hand looks dim, nudge the LED closer to the front wall.

Gather your supplies

Check things off as you get ready.

Work on a stable surface, keep your free hand out of the cutting path, and have an adult handle sharp tools.

Three levels of light

  • Leave intact

    The untouched skin around the arm stays dark and frames the silhouette against the night.

  • Peel & shade

    Skin-peel a faint ground line or a few knuckle creases if you want a dim orange hint of texture on the hand.

  • Cut through

    The forearm, palm, and long fingers are cut fully through for the brightest glow and the clean reaching shape.

Learn the carving basics

Before you start cutting

How do I keep the long fingers from breaking off?

Carve the narrow gaps between fingers first while the rest of the pumpkin is still solid, and support each piece as you remove it. Keep the wall around one inch thick so fingers are not too thin. Leaving the wrist tab in place until the very end also braces the whole shape while you work.

Should I cut the lid from the top or somewhere else?

Cut it from the back or the bottom so the tall front face stays uninterrupted for the hand. A back opening lets you reach in to scoop and to place the LED without a hole competing with the design. It also keeps the ground line at the base looking continuous.

The middle of the hand looks dark when lit. How do I fix it?

Wide solid areas like the palm and forearm can read flat if the light is too far back. Move the LED closer to the front wall or add a second light to spread the glow. You can also thin that section of the inner wall slightly so more light comes through.

Your take belongs here, too.

Changed a detail? Made it simpler? Share a photo of your version and tell the community what worked.

Share your pumpkin

More pumpkins like this

You've reached the end · 8 pumpkins
The Patch Report

Fresh pumpkins, in your inbox.

The best new carvings, ideas worth stealing, and how-tos for carving season. Short, seasonal, and gone by November.

A short email during carving season. Unsubscribe anytime. See our privacy policy.