Halloween Pumpkin Carving Contest · Starts October 1st · $500 in prizes
← Back to ideas
@ai_concepts
Sep 14, 2026
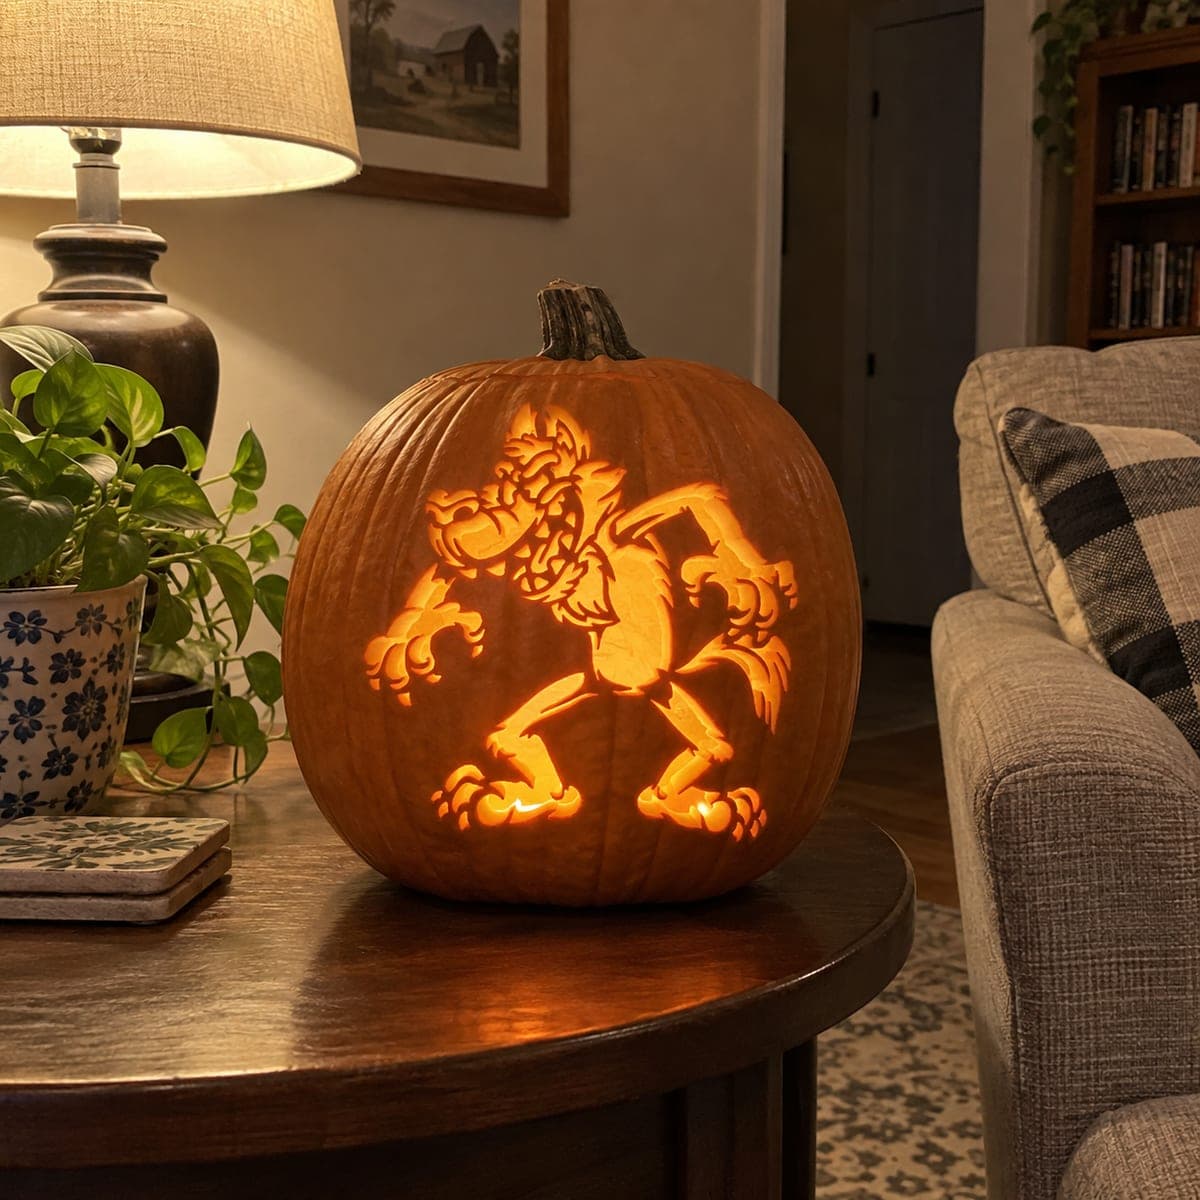
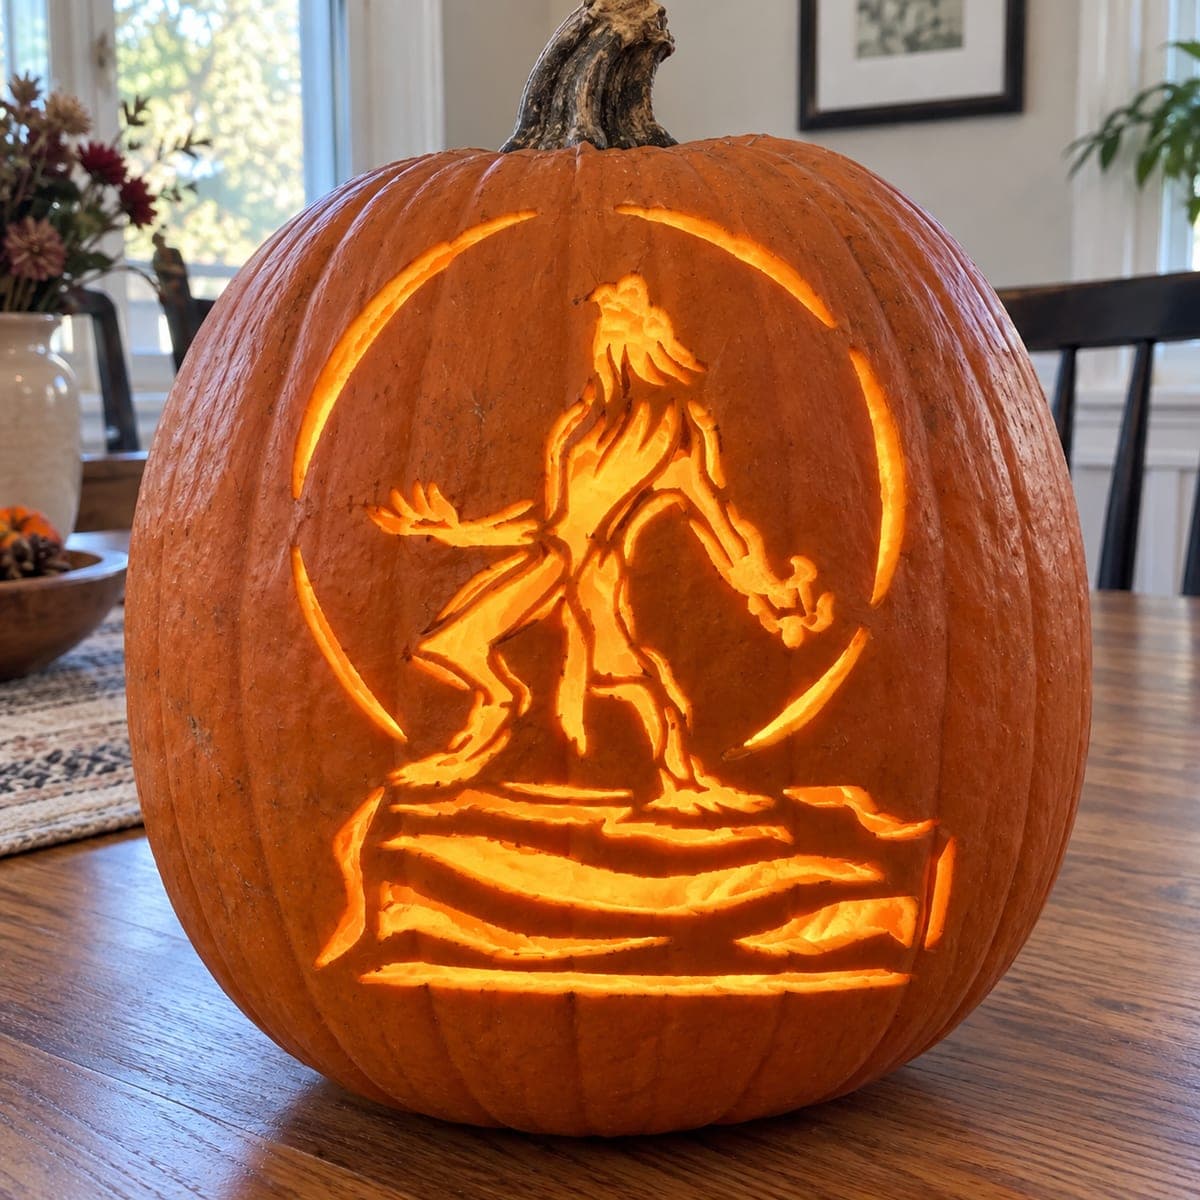
Crouching Werewolf With Claws PumpkinAI
0

Crouching Werewolf With Claws Pumpkin

A cartoon-style werewolf stands upright in a wide-legged crouch with both clawed hands raised and a toothy grin, rendered as a glowing cutout jack-o-lantern. Because the character's limbs spread toward the edges, transfer the design centered on the widest part of the pumpkin so the claws do not curve out of view. Open the large body cavity first to establish the main glow, then work the fingers and facial teeth with a fine pumpkin saw to keep the narrow gaps from tearing.

This is an AI-generated concept image: a realistic, carvable design idea rather than a photo of a finished carve. AI concepts are always labeled and sit out the leaderboard and the contest.

No ratings yet · Sign in to rate
Comments (0)

  • No comments yet — be the first.

Save without an account. Sign in to like or comment.

Our tips for carving a similar design

The core trick here is contrast between one large glowing body cavity and lots of narrow negative-space gaps that read as fur, fingers, and teeth. Since this is an AI concept, no real pumpkin exists, but you could recreate it by opening the big shape first for the main light, then carving the thin details last so the fragile gaps stay supported. Center the figure on the widest part of the pumpkin so the raised claws do not wrap around the curve and disappear.

Written by PumpkinCarvingIdeas.com, inspired by the image above. These are our suggestions, not instructions from the uploader. This approach to the AI concept has not been tested on a real pumpkin.

From pumpkin to porch

  1. Pick and prep a wide, flat-faced pumpkin

    Choose a large pumpkin with a broad, fairly flat front so the spread-out limbs stay visible. Have an adult cut a lid from the bottom or back rather than the top, which keeps the stem intact and gives you a stable base. Scoop the inside until the front wall is about an inch thick. A thinner wall makes the fine finger and tooth cuts much easier to control.

  2. Transfer the design centered on the belly

    Tape your werewolf stencil onto the widest, roundest section of the pumpkin so both raised claws sit on the flattest area. Poke the outline with a transfer tool or pin, following the fur edges, fingers, and grinning teeth. Take extra care around the narrow gaps between claws and fangs, since those dots guide your most delicate cuts. Step back and check that nothing important curves toward the sides.

  3. Open the large body cavity first

    Start with the biggest interior shape, the open chest and torso area, using a medium pumpkin saw. Cutting this main opening early establishes the primary glow and relieves pressure on the shell before you tackle small details. Saw slowly and let the blade do the work rather than forcing it. Push the freed piece inward and gently remove it.

  4. Carve the fingers and facial teeth with a fine saw

    Switch to a fine detail saw for the clawed fingers, fang line, and the slivers of light between them. Cut the smallest gaps last and leave thin bridges of skin wherever two cuts nearly meet, so a whole hand does not tear away. Work from the center of each shape outward and re-poke your dots if they fade. Patience here is what separates a clean werewolf from a mushy one.

  5. Shade the fur for depth

    For the shaggy fur along the arms, back, and legs, peel just the outer skin instead of cutting all the way through. A ribbon or lino tool removes the top layer so those areas glow a soft dim orange, giving the coat texture without weakening the shell. Vary your peel depth slightly so the fur looks layered. Keep these shaded strokes flowing in the direction the fur grows.

  6. Light it and photograph

    Drop in a battery LED puck or a string of warm LEDs, never a candle, since the thin cuts and dry edges are a fire risk. Set the pumpkin at eye level in a dim room and let the big cavity throw the main light while the peeled fur glows behind it. Rub a little petroleum jelly on cut edges to slow drying. Snap your photo the first night when the contrast is sharpest.

Gather your supplies

Check things off as you get ready.

Work on a stable surface, keep your free hand out of the cutting path, and have an adult handle sharp tools.

Three levels of light

  • Leave intact

    The background and the outer body outline stay as untouched skin so the figure reads as a dark silhouette against its own glow.

  • Peel & shade

    The shaggy fur along the arms, back, and legs gets skin-peeled for a soft dim orange that suggests texture.

  • Cut through

    The open chest cavity, the gaps between claws, and the grinning teeth are cut all the way through for the brightest light.

Learn the carving basics

Before you start cutting

How do I keep the thin claws from breaking off?

Leave small uncarved bridges of skin wherever two cuts almost touch, especially between fingers. Cut these narrow gaps last, after the big cavity is open, so the shell is not flexing while you work. A fine detail saw with light pressure is far safer than a knife here.

Where should I position the werewolf so the claws do not disappear?

Center the design on the widest, flattest part of the pumpkin belly. Because the raised arms and spread legs reach toward the edges, placing them on the round shoulders would make them curve out of view. Check from several angles before you start cutting.

How do I get the fur to look furry without cutting through?

Use a shading technique by peeling only the top layer of skin along the fur areas. This lets a dim orange glow through while keeping the shell strong. Follow the direction the fur grows and vary your depth so it looks layered rather than flat.

Your take belongs here, too.

Changed a detail? Made it simpler? Share a photo of your version and tell the community what worked.

Share your pumpkin

More pumpkins like this

You've reached the end · 8 pumpkins
The Patch Report

Fresh pumpkins, in your inbox.

The best new carvings, ideas worth stealing, and how-tos for carving season. Short, seasonal, and gone by November.

A short email during carving season. Unsubscribe anytime. See our privacy policy.