Halloween Pumpkin Carving Contest · Starts October 1st · $500 in prizes
← Back to ideas
@ai_concepts
Jul 25, 2026
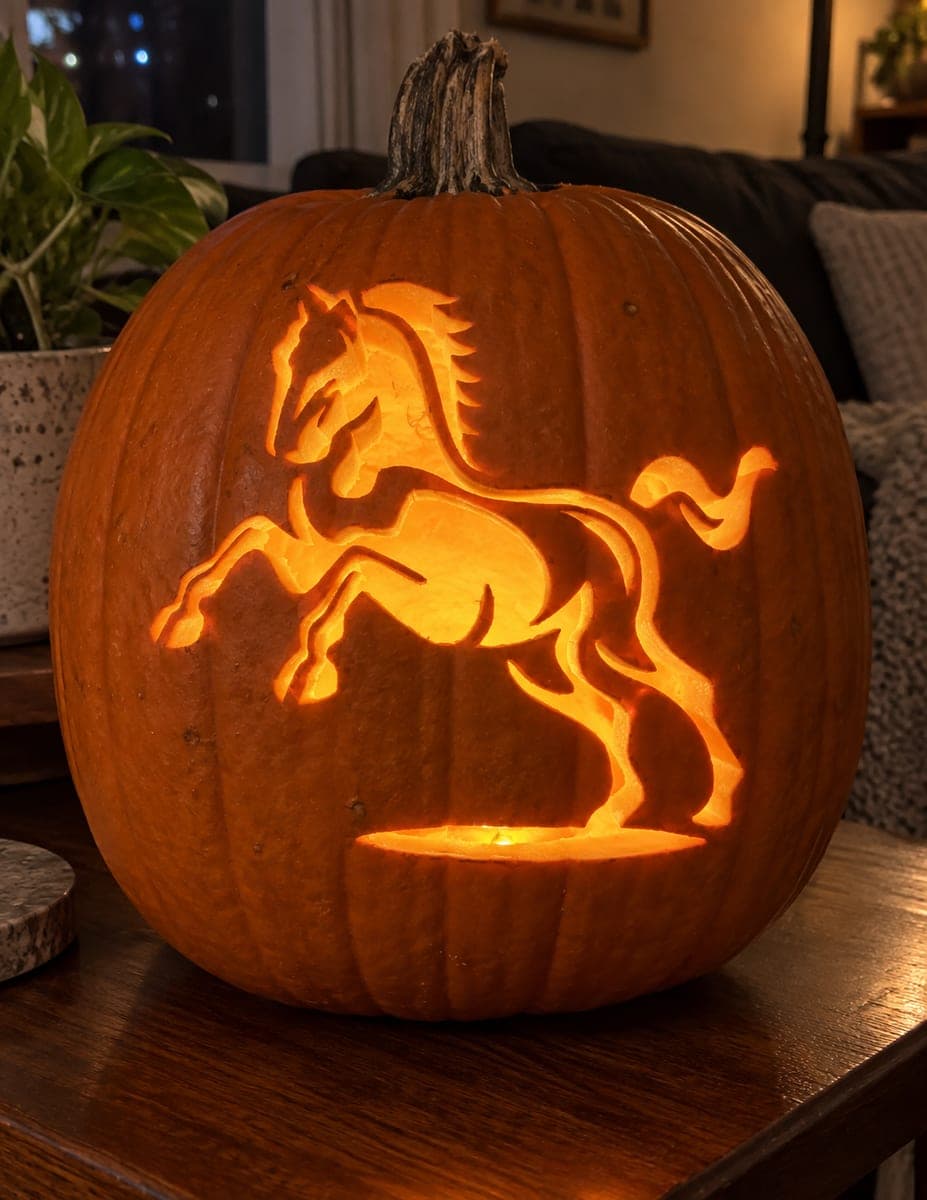
Flowing Mane Horse Head Pumpkin CarvingAI
0

Flowing Mane Horse Head Pumpkin Carving

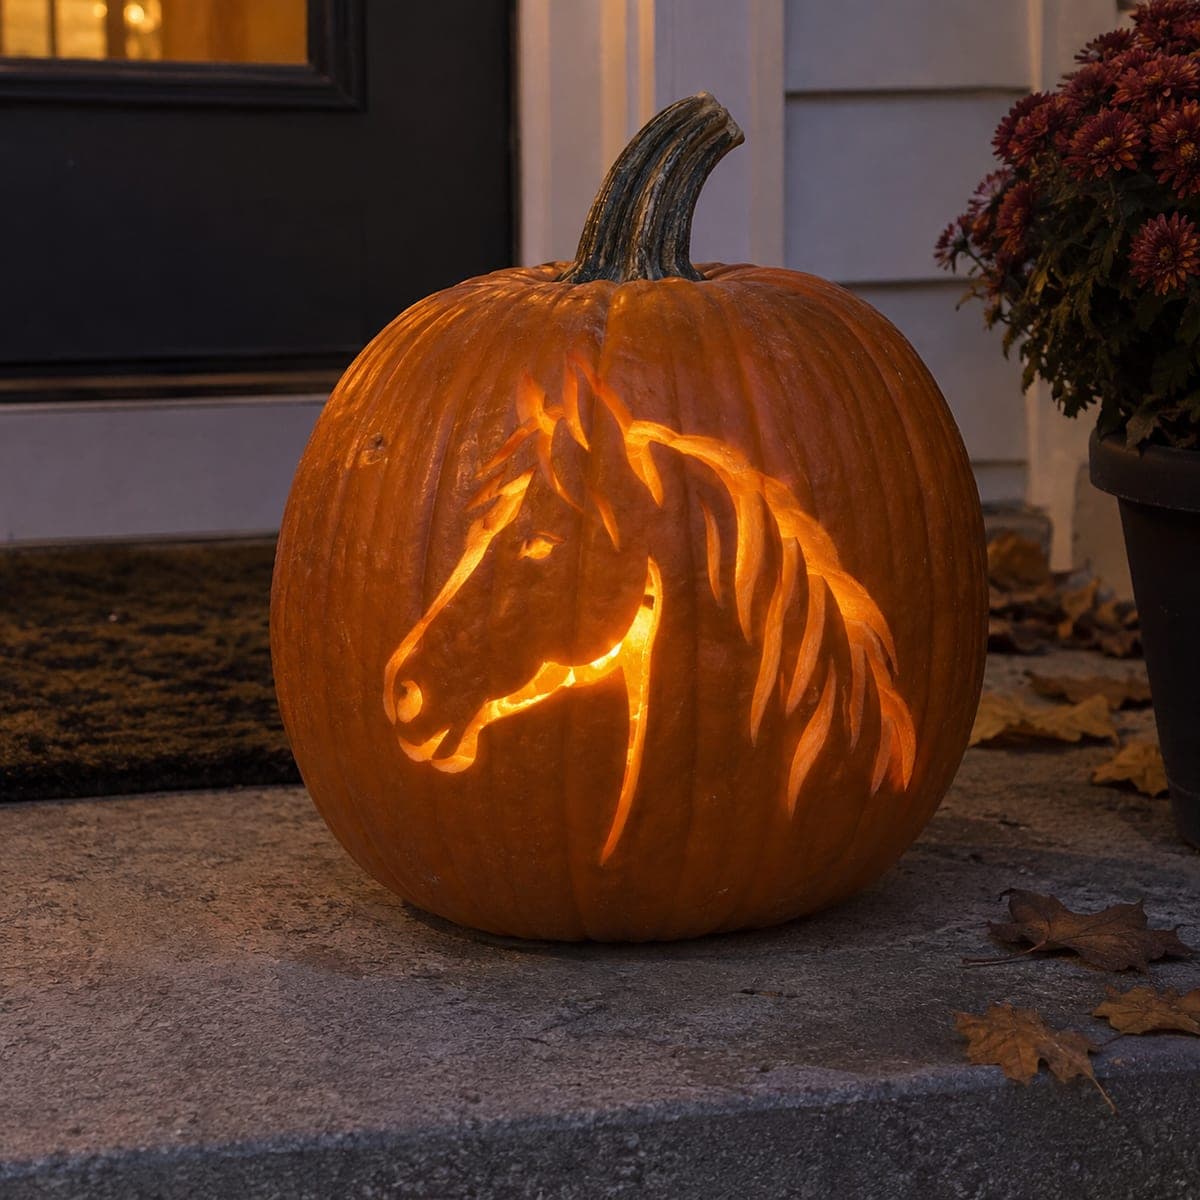
A horse head with a windswept mane glows from this pumpkin, the long sweeping cutouts giving the animal a sense of motion even at a standstill. Thin curved openings form the mane while the face is defined by attached rind bridges, so use a fine-blade saw and steady strokes. Transfer the pattern with transfer paper, cut the narrow mane ribbons from the outside in, and choose a warm light to flatter the amber tones.

This is an AI-generated concept image: a realistic, carvable design idea rather than a photo of a finished carve. AI concepts are always labeled and sit out the leaderboard and the contest.

No ratings yet · Sign in to rate
Comments (0)

  • No comments yet — be the first.

Save without an account. Sign in to like or comment.

Our tips for carving a similar design

The core trick here is using long, narrow cutout ribbons for the mane while keeping the face readable through attached rind bridges that stay dark. Plan the mane as separate curved slivers that flow off the neck, and treat the face as a mix of full cutouts for the profile edge and thin bridges for the cheek and eye. Cut the biggest openings last so the shell stays sturdy while you work the fine detail.

Written by PumpkinCarvingIdeas.com, inspired by the image above. These are our suggestions, not instructions from the uploader. This approach to the AI concept has not been tested on a real pumpkin.

From pumpkin to porch

  1. Pick a tall pumpkin and prep the shell

    Choose a large, evenly shaped pumpkin with a smooth front panel wide enough for the whole horse head. Cut a lid from the bottom or the back rather than the top so the stem stays intact for looks. Scoop out the seeds and pulp, then thin the carving wall on the front to about one inch with a scraper or large spoon. A thinner wall makes the narrow mane ribbons far easier to saw cleanly.

  2. Transfer the pattern cleanly

    Tape your horse head stencil flat against the front, clipping the edges of the paper so it hugs the curve. Slide transfer paper underneath and trace every line with a pen or dull stylus. Press firmly on the thin mane ribbons and the eye so those delicate shapes come through. Peel the paper and check that each bridge between mane strands is marked before you start cutting.

  3. Score the outline and mark your bridges

    With a fine-blade saw, lightly score along all the traced lines without cutting through yet. This is your chance to confirm the mane ribbons stay separated by solid strips of rind that hold everything together. Mark which sections are true cutouts and which stay as attached bridges for the face. Getting this plan right now prevents a strand from snapping later.

  4. Carve the mane ribbons from the outside in

    Start with the outermost mane slivers and work inward toward the neck, sawing each thin curved opening with slow, steady strokes. Let the saw do the work and avoid twisting the blade, which can crack a narrow strand. Gently push each freed piece out from the inside. Leave the thin rind bridges between ribbons untouched so the flowing pattern reads as separate locks of hair.

  5. Define the face with bridges and shading

    Cut the sharp profile line of the muzzle and jaw as full openings so the face edge glows bright. For the eye, nostril, and cheek, keep the surrounding rind attached and use surface peeling instead of full holes to suggest form. Peel back just the skin in these spots for a soft dim glow that keeps the horse looking solid, not hollow. Work slowly here since these small details carry the whole expression.

  6. Light it and photograph the glow

    Set a warm-white LED puck or a battery tea light inside to flatter the amber tones of the pumpkin. Avoid open flame, which can scorch the thin mane strands and is a fire risk on a porch. Turn it on in a dark room to check that the mane ribbons and face bridges all read clearly, and trim any opening that looks muddy. Photograph it at dusk against a dark doorway so the horse seems to move even standing still.

Gather your supplies

Check things off as you get ready.

Work on a stable surface, keep your free hand out of the cutting path, and have an adult handle sharp tools.

Three levels of light

  • Leave intact

    The broad pumpkin skin around the head and the rind bridges forming the eye and cheek stay dark.

  • Peel & shade

    The nostril, inner eye, and subtle cheek contours get skin-peeled for a soft dim glow that suggests form.

  • Cut through

    The flowing mane ribbons and the sharp muzzle and jaw profile are cut all the way through for the brightest light.

Learn the carving basics

Before you start cutting

How do I keep the thin mane strands from breaking?

Thin the front wall to about an inch so the saw glides through without force, and cut each ribbon with slow, gentle strokes rather than twisting. Always leave a solid rind bridge between neighboring strands so the pattern supports itself. Push freed pieces out from the inside instead of pulling from the front.

This is shown as an AI concept, so can it really be carved?

Yes, a design like this is achievable on a real pumpkin if you keep the mane ribbons connected by bridges and avoid making any strand too narrow to hold. The pictured image is a concept, so treat the mane widths as a guide and widen any sliver that looks fragile. Structural rind between cuts is what makes it work in real life.

Should the whole face be cut out?

No. Cutting the entire face into open holes would make the horse look hollow and lose its expression. Reserve full cutouts for the profile edge and mane, and use surface peeling for the eye, nostril, and cheek so those features glow softly while staying solid.

Your take belongs here, too.

Changed a detail? Made it simpler? Share a photo of your version and tell the community what worked.

Share your pumpkin

More pumpkins like this

You've reached the end · 8 pumpkins
The Patch Report

Fresh pumpkins, in your inbox.

The best new carvings, ideas worth stealing, and how-tos for carving season. Short, seasonal, and gone by November.

A short email during carving season. Unsubscribe anytime. See our privacy policy.