Halloween Pumpkin Carving Contest · Starts October 1st · $500 in prizes
← Back to ideas
@ai_concepts
Aug 9, 2026
French Bulldog Pumpkin Carving With Folded PawsAI
0

French Bulldog Pumpkin Carving With Folded Paws

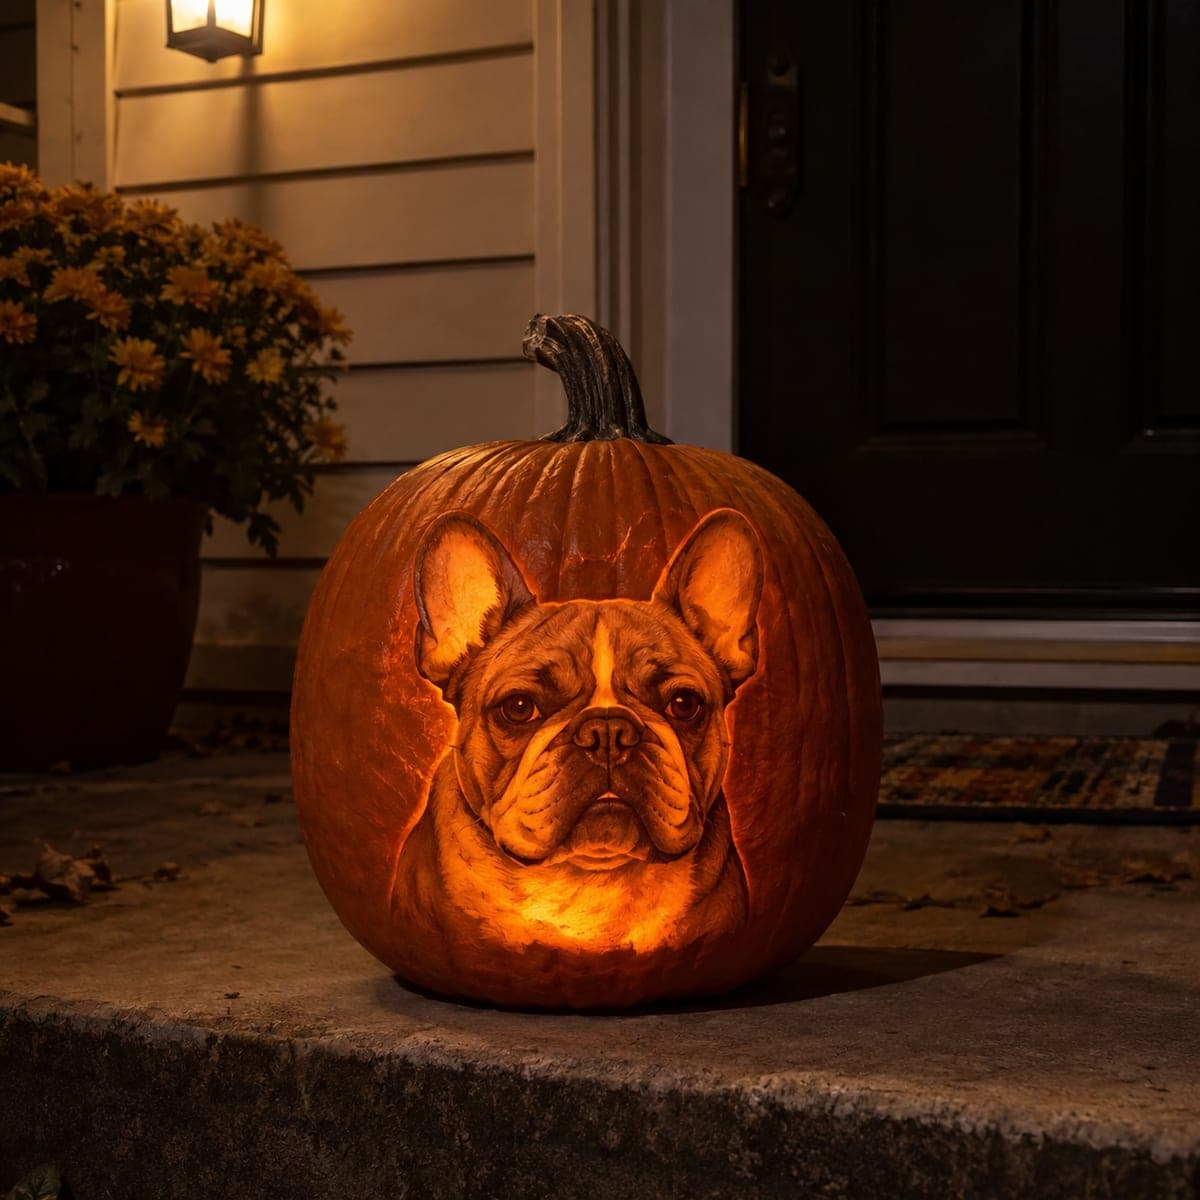
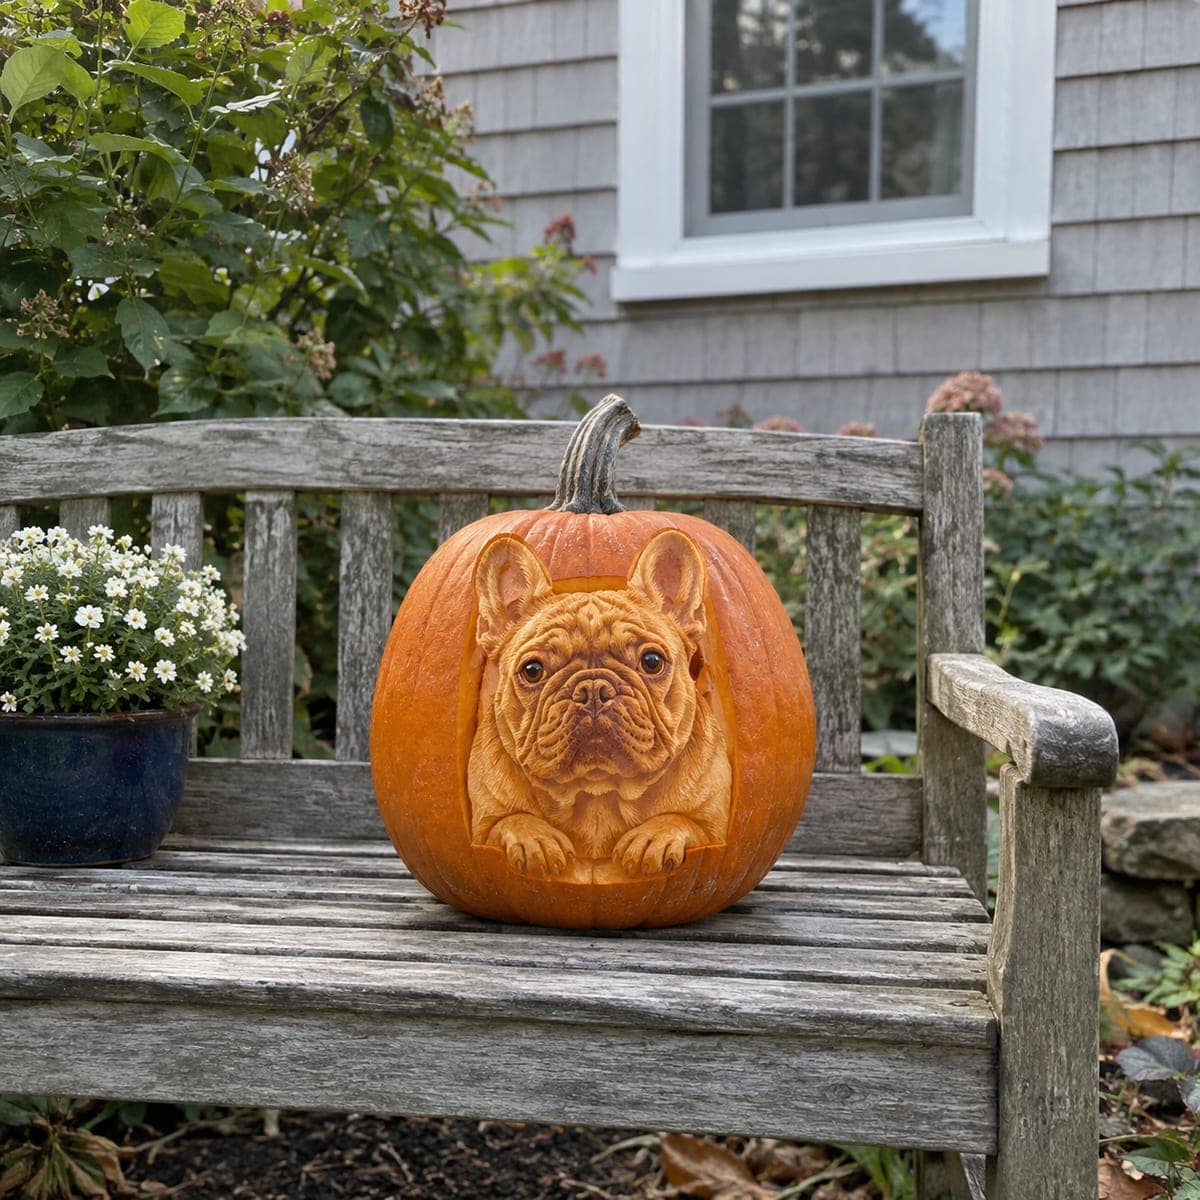
A French bulldog rests its chin over folded paws in this remarkably lifelike pumpkin portrait, with bat ears, wrinkled brow, and glossy eyes all rendered in shallow sculpted relief. The soft gradations come from sanding the peeled surface smooth after gouging, which evens out tool marks and mimics short fur. Attempt it after a few simpler relief carves, and place it on a garden bench where daylight rakes across the texture.

This is an AI-generated concept image: a realistic, carvable design idea rather than a photo of a finished carve. AI concepts are always labeled and sit out the leaderboard and the contest.

No ratings yet · Sign in to rate
Comments (0)

  • No comments yet — be the first.

Save without an account. Sign in to like or comment.

Our tips for carving a similar design

The core trick here is shallow relief sculpting, where you carve into the pumpkin wall rather than all the way through it, letting light-toned flesh at different depths read as fur, wrinkles, and folded paws. Peel and gouge to build soft gradations, then sand the peeled surface smooth to blend tool marks into the look of short fur. Almost nothing is cut clean through, so the dog reads as a raised portrait in the skin.

Written by PumpkinCarvingIdeas.com, inspired by the image above. These are our suggestions, not instructions from the uploader. This approach to the AI concept has not been tested on a real pumpkin.

From pumpkin to porch

  1. Pick a tall pumpkin and open the back

    Choose a large, evenly shaped pumpkin with a smooth front and thick walls, since relief carving needs depth to work with. Cut a wide access hole in the back, not the top, so the stem and front stay intact. Scrape the inside wall behind the dog down to a workable thickness, aiming for roughly one inch. A thinner front wall makes the deepest shaded areas glow softly later.

  2. Transfer the Frenchie outline

    Tape your stencil onto the front and trace the main shapes: the bat ears, the wrinkled brow, the muzzle, the eyes, and the folded paws at the bottom. Use a poking tool or a pen to mark the border and the biggest interior lines. Remove the paper and lightly score those lines with a detail knife so you have a clear map. Keep the ears connected to the head and the paws connected to the chest, since those bridges hold the design together.

  3. Peel the base layer for the body

    With a ribbon or loop tool, skin off the orange peel across the whole dog shape to expose the pale flesh underneath. This first pass gives you the mid-tone that most of the fur will sit in. Leave the background pumpkin skin untouched so the dog pops against a darker frame. Work slowly and keep the surface even, since this layer sets the overall glow.

  4. Gouge the depth and wrinkles

    Switch to smaller gouges to carve deeper where the portrait recedes: under the brow, beside the muzzle, between the paws, and inside the ears. The deeper you go, the more light passes through and the brighter that spot reads. Leave the high points, like the bridge of the nose and the tops of the paws, closer to the surface so they stay dimmer and appear to catch shadow. Reference a real Frenchie face so the wrinkle folds land in believable places.

  5. Sand smooth and set the eyes

    Once the shapes are roughed in, gently sand the peeled areas with fine sandpaper or a damp sponge to blend the gouge marks into soft gradations that mimic short fur. Save the glossy eyes for last, carving them shallow and rounded so they stay dark and lifelike rather than punched through. Avoid cutting all the way through anywhere on the face, since a clean hole would break the sculpted illusion. Take your time here, as this blending step is what makes the portrait feel real.

  6. Light it and stage the photo

    Set a battery LED puck or a short string of LEDs inside, pushed toward the back so light rakes forward through the thin spots. Never use a candle, since the heat curls the fine relief and dulls the detail within hours. Place the pumpkin on a bench or table where daytime side light also grazes the texture, which shows off the sculpting even before dark. Mist the surface and refrigerate overnight between displays to slow shrinking.

Gather your supplies

Check things off as you get ready.

Work on a stable surface, keep your free hand out of the cutting path, and have an adult handle sharp tools.

Three levels of light

  • Leave intact

    The background pumpkin skin around the dog, left dark to frame the portrait

  • Peel & shade

    The dog's whole body and face, peeled to a soft mid-orange glow for the fur

  • Cut through

    Only the very deepest wrinkle shadows and recesses, gouged thin for the brightest highlights

Learn the carving basics

Before you start cutting

Do I cut any part of this all the way through?

Almost none of it. This is a relief carving, so you work by peeling and gouging to different depths rather than making open holes. If you cut clean through the face you lose the sculpted look, so keep even the deepest wrinkles as thin flesh, not gaps.

How do I get the soft fur texture instead of visible tool marks?

After you gouge the shapes, go back over the peeled flesh with fine sandpaper or a damp sponge. This evens out the ridges left by the loop tool and blends one depth into the next. The smoothed gradations read as short fur under both daylight and LED light.

Why keep the ears and paws attached?

The bat ears and folded front paws are thin, delicate shapes that would snap or sag if cut free. Leaving them connected to the head and chest as raised relief keeps them structurally sound. It also fits the design, since the whole portrait is meant to sit within the pumpkin surface rather than stick out.

Your take belongs here, too.

Changed a detail? Made it simpler? Share a photo of your version and tell the community what worked.

Share your pumpkin

More pumpkins like this

You've reached the end · 8 pumpkins
The Patch Report

Fresh pumpkins, in your inbox.

The best new carvings, ideas worth stealing, and how-tos for carving season. Short, seasonal, and gone by November.

A short email during carving season. Unsubscribe anytime. See our privacy policy.