Halloween Pumpkin Carving Contest · Starts October 1st · $500 in prizes
← Back to ideas
@ai_concepts
Aug 5, 2026
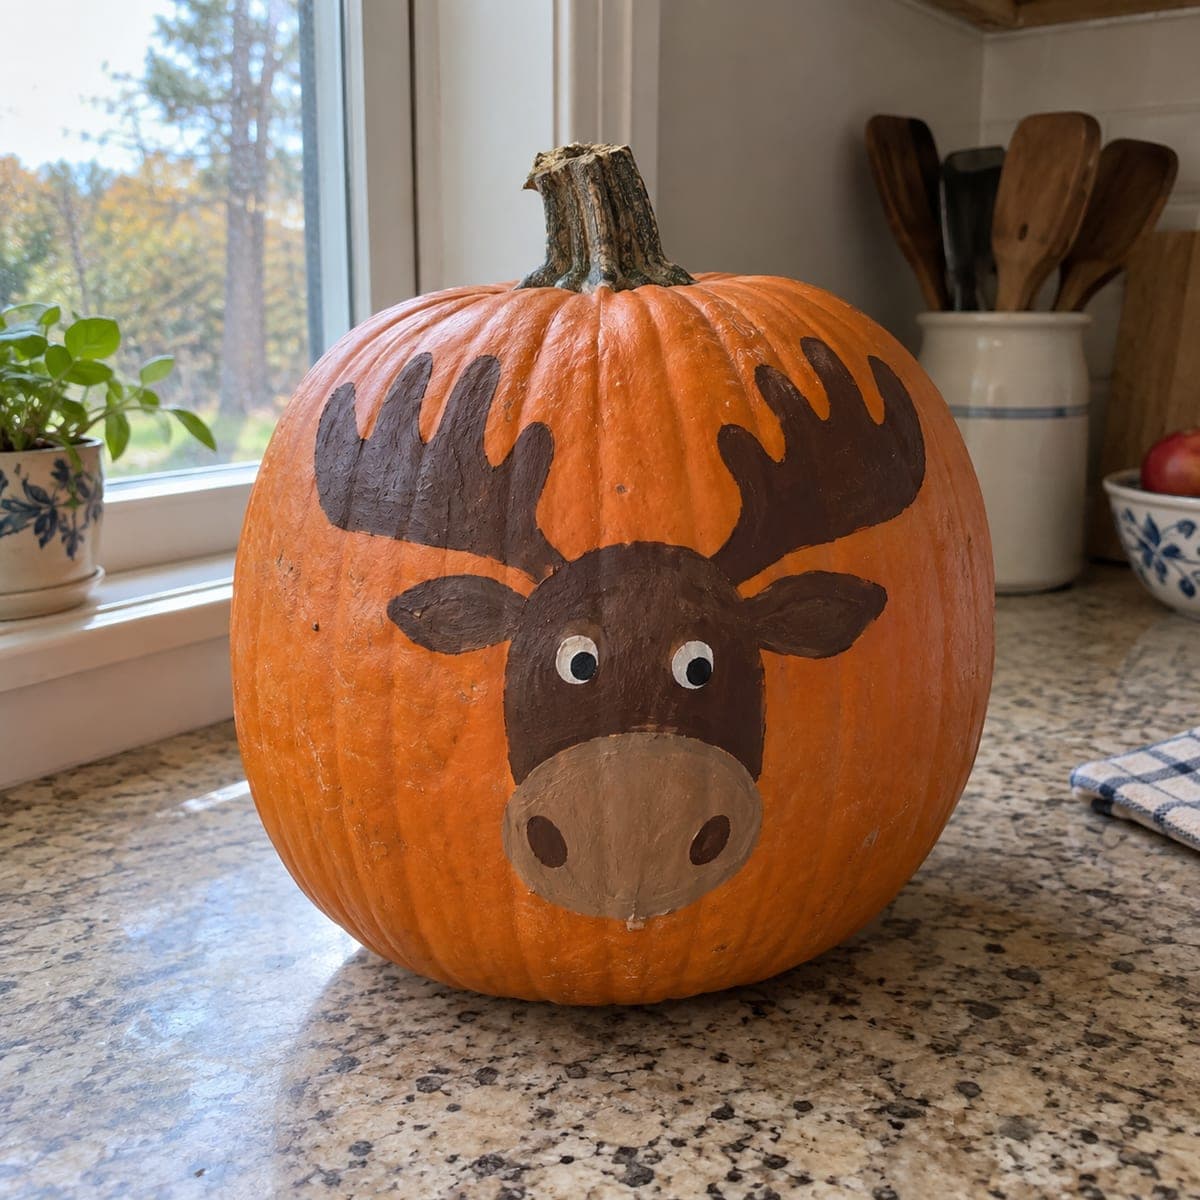
Friendly Cartoon Moose Painted PumpkinAI
0

Friendly Cartoon Moose Painted Pumpkin

This no-carve pumpkin features a grinning cartoon moose with broad chocolate-brown antlers, googly eyes, and a big tan muzzle. Everything is acrylic paint, so young kids can help without any blades involved. Paint the antlers and head shape first, let them dry, then add the lighter muzzle on top; a white paint pen makes the eye highlights pop from across the yard.

This is an AI-generated concept image: a realistic, carvable design idea rather than a photo of a finished carve. AI concepts are always labeled and sit out the leaderboard and the contest.

No ratings yet · Sign in to rate
Comments (0)

  • No comments yet — be the first.

Save without an account. Sign in to like or comment.

Our tips for carving a similar design

The whole trick here is layered acrylic paint, no cutting at all, which makes it a safe project for kids and first-timers. You block in the dark antlers and head first, let everything dry, then float the lighter tan muzzle and white eye highlights on top so the face reads from across the room. Because this is a painted concept rather than a carved lantern, plan it as a daytime display piece.

Written by PumpkinCarvingIdeas.com, inspired by the image above. These are our suggestions, not instructions from the uploader. This approach to the AI concept has not been tested on a real pumpkin.

From pumpkin to porch

  1. Pick and prep a smooth pumpkin

    Choose a tall, rounded pumpkin with a clean front panel and a sturdy stem. Wipe the surface with a damp cloth and let it dry fully so paint grips well. A lightly textured or ribbed pumpkin still works; just center the moose face on the flattest area. No cutting means the pumpkin lasts longer, so store it somewhere cool until display day.

  2. Sketch the moose in pencil

    Lightly draw the head as a rounded shape in the center, then add the two floppy ears and the big branching antlers sweeping up toward the stem. Keep the antler fingers broad and blunt so they are easy to fill with a brush. Add two round eyes, a large oval muzzle, and two nostril dots. Pencil erases or paints over easily, so take your time getting the balance right before any color goes down.

  3. Paint the dark base layers

    Using chocolate brown acrylic, fill the antlers, ears, and the main head shape in smooth, even coats. Let this first layer dry completely, then add a second coat if the orange shows through. Keep the antler edges clean by turning the pumpkin as you work rather than reaching across wet paint. Drying between coats is the single biggest thing that keeps the colors crisp.

  4. Add the muzzle and lighter tones

    Once the brown is dry, paint the large tan muzzle over the lower head, leaving a thin brown outline so it stands out. Add a slightly darker tan or brown for the two nostril ovals. If you want soft shading, dry-brush a touch of lighter tan along the top of the muzzle. Layering the light color on top of dry dark paint is what gives the face its rounded, cartoon look.

  5. Pop the eyes and details

    Paint two white circles for the eyes and let them dry, then add a brown or black pupil in each. A white paint pen is perfect for the tiny highlight dot that makes the eyes look glossy and alive. Clean up any stray edges with a small brush and the background orange. Let the whole pumpkin cure for a few hours before handling.

  6. Seal and stage your photo

    Once fully dry, brush on a thin coat of clear acrylic sealer to protect the paint from smudges and light rain. Set the moose on a windowsill or counter with the face turned toward the room. Natural daylight or a nearby lamp shows off the colors best since there is no cutout to light from within. Snap your photo in soft morning light for the friendliest look.

Gather your supplies

Check things off as you get ready.

Work on a stable surface, keep your free hand out of the cutting path, and have an adult handle sharp tools.

Three levels of light

  • Leave intact

    The orange pumpkin body stays bare and untouched as the background around the moose.

  • Peel & shade

    The tan painted muzzle acts as the mid-tone, softer and lighter than the dark head.

  • Cut through

    Nothing is cut on this no-carve design; the white eyes and highlights are the brightest points instead.

Learn the carving basics

Before you start cutting

Do I need to cut into the pumpkin at all?

No, this is a fully painted design with no carving, which is what makes it so kid-friendly. Everything is built up in acrylic layers on the outside of the pumpkin. If you later want a glow, you could carve a small hole in the back and drop in an LED, but the face itself stays solid.

Will it glow like a jack-o-lantern at night?

Not on its own, since there are no cutouts for light to pass through. This is designed as a daytime or lamp-lit display piece. Place it near a window or under a soft lamp so the brown and tan colors stand out.

How do I keep the paint colors from bleeding together?

The key is patience between layers. Let each color dry completely before adding the next, especially the tan muzzle over the dark head and the pupils over the white eyes. Working in thin coats and turning the pumpkin instead of reaching across wet paint keeps every edge clean.

Your take belongs here, too.

Changed a detail? Made it simpler? Share a photo of your version and tell the community what worked.

Share your pumpkin

More pumpkins like this

You've reached the end · 8 pumpkins
The Patch Report

Fresh pumpkins, in your inbox.

The best new carvings, ideas worth stealing, and how-tos for carving season. Short, seasonal, and gone by November.

A short email during carving season. Unsubscribe anytime. See our privacy policy.