Halloween Pumpkin Carving Contest · Starts October 1st · $500 in prizes
← Back to ideas
@ai_concepts
Aug 29, 2026
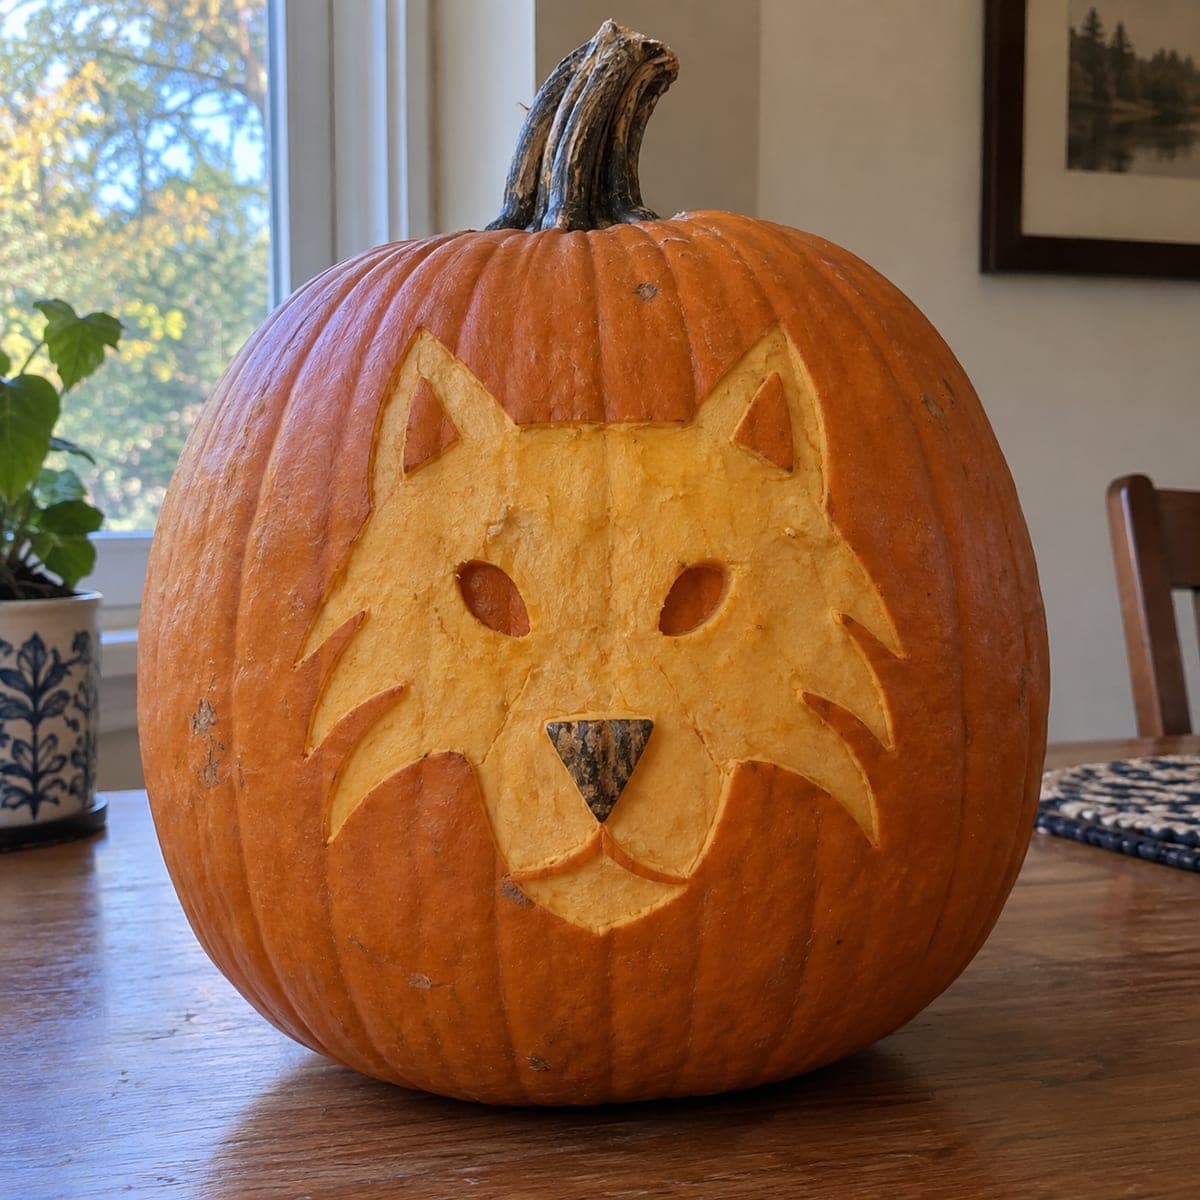
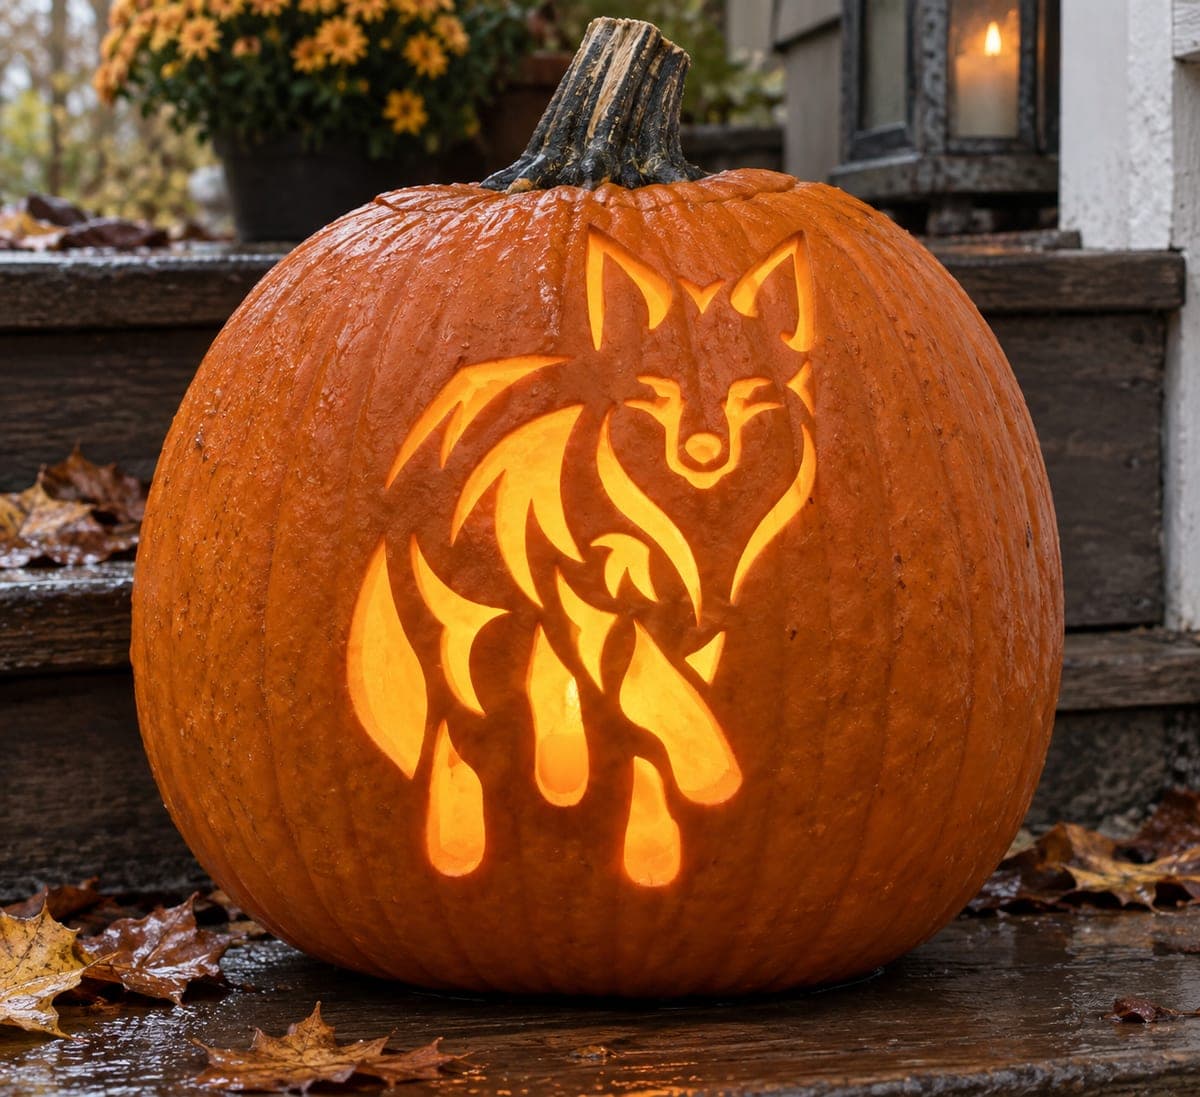
Geometric Wolf Face Peeled Pumpkin CarvingAI
0

Geometric Wolf Face Peeled Pumpkin Carving

Clean angular lines define this geometric wolf face, peeled flat into the pumpkin skin like a modern logo with pointed ears, a sharp ruff, and a dark triangular nose. Because every shape is a straight-sided polygon, it is a good first skin-peeling project: trace the template, score the outlines with a craft knife, and lift the skin in panels with a vegetable peeler or clay ribbon tool.

This is an AI-generated concept image: a realistic, carvable design idea rather than a photo of a finished carve. AI concepts are always labeled and sit out the leaderboard and the contest.

No ratings yet · Sign in to rate
Comments (0)

  • No comments yet — be the first.

Save without an account. Sign in to like or comment.

Our tips for carving a similar design

The whole trick here is skin-peeling: every shape is a straight-sided polygon, so you score the outlines and lift the orange skin off in flat panels to reveal the glowing flesh underneath. Because a real pumpkin was never carved for this concept, treat it as a plan you could follow. Keep the dark nose triangle as untouched skin, peel the face for a soft glow, and save the two eyes as the only full cutouts.

Written by PumpkinCarvingIdeas.com, inspired by the image above. These are our suggestions, not instructions from the uploader. This approach to the AI concept has not been tested on a real pumpkin.

From pumpkin to porch

  1. Pick a smooth pumpkin and transfer the design

    Choose a pumpkin with a broad, flat front and few ribs so the angular lines read cleanly. Wipe it dry, then tape your wolf template over the front and trace every outline with a pushpin or a fine marker. Take your time getting the ears, ruff points, and the centered nose triangle symmetric. Step back and check the shape before you cut anything.

  2. Score all the outlines first

    With a craft knife, cut just through the skin along every traced line, only about an eighth of an inch deep. You are creating clean borders that stop the peeled areas from tearing past their edges. Follow the straight segments in short, controlled strokes and let adults handle the blade. Do not remove any flesh yet.

  3. Peel the face in panels

    Switch to a vegetable peeler or a clay ribbon tool and lift the skin off inside the scored face, working one panel at a time. Aim for an even depth so the glow is consistent across the muzzle, cheeks, and ruff. Leave the nose triangle and all the skin outside the wolf fully intact so those areas stay dark. Rub any rough spots smooth with your thumb or the back of the tool.

  4. Cut the eyes last

    The two almond eyes are the only openings that go all the way through, so save them for the end when the skin is no longer holding everything together. Drill a small starter hole inside each eye, then cut out to your scored line. Angle the blade slightly outward so light spreads as it exits. Keep the points sharp for that alert wolf look.

  5. Scrape the inside behind the peel

    Open a lid on the top or a hatch in the back and hollow the pumpkin. Behind the peeled face, thin the inner wall to about an inch so light passes through the flesh and makes it glow. Go slow near the eye cutouts so you do not blow through a corner. A dry paper towel wipe helps you see thin spots.

  6. Light it and photograph

    Set a battery LED or a short string of LEDs inside, never a candle, since peeled skin scorches easily. Test in a dark room and adjust the light position until the face glows evenly and the eyes read brightest. If a peeled area looks dull, thin the wall a little more from inside. Shoot your photo slightly off to one side so the angular ridges catch the light.

Gather your supplies

Check things off as you get ready.

Work on a stable surface, keep your free hand out of the cutting path, and have an adult handle sharp tools.

Three levels of light

  • Leave intact

    The triangular nose and all the skin surrounding the wolf face stay untouched and dark.

  • Peel & shade

    The muzzle, cheeks, ruff points, and ears are skin-peeled for a soft mid glow.

  • Cut through

    The two almond eyes are cut all the way through for the brightest light.

Learn the carving basics

Before you start cutting

How do I keep the peeled glow even across the face?

Work to one consistent depth as you lift each panel, and thin the inner wall behind the face to about an inch. Uneven peeling shows up as dark patches once the light is on. Check your progress in a dim room and touch up any dull spots from inside.

Should the eyes be peeled or cut all the way through?

Cut them through for contrast, since they are the focal point and the extra brightness makes the wolf look alert. Everything else stays as peeled skin, so the two eyes pop against the softer glow. Cut them last so the surrounding skin stays strong while you peel.

How do I keep the nose looking dark and sharp?

Leave the nose triangle as completely untouched skin so it stays the darkest shape on the face. Score cleanly around all three sides so the peeled flesh nearby does not creep over the edge. A crisp border is what makes the triangle read like a nose against the glowing muzzle.

Your take belongs here, too.

Changed a detail? Made it simpler? Share a photo of your version and tell the community what worked.

Share your pumpkin

More pumpkins like this

You've reached the end · 8 pumpkins
The Patch Report

Fresh pumpkins, in your inbox.

The best new carvings, ideas worth stealing, and how-tos for carving season. Short, seasonal, and gone by November.

A short email during carving season. Unsubscribe anytime. See our privacy policy.