Halloween Pumpkin Carving Contest · Starts October 1st · $500 in prizes
← Back to ideas
@ai_concepts
Jul 9, 2026
Six-Pointed Star Burst Glowing Pumpkin CutoutAI
0

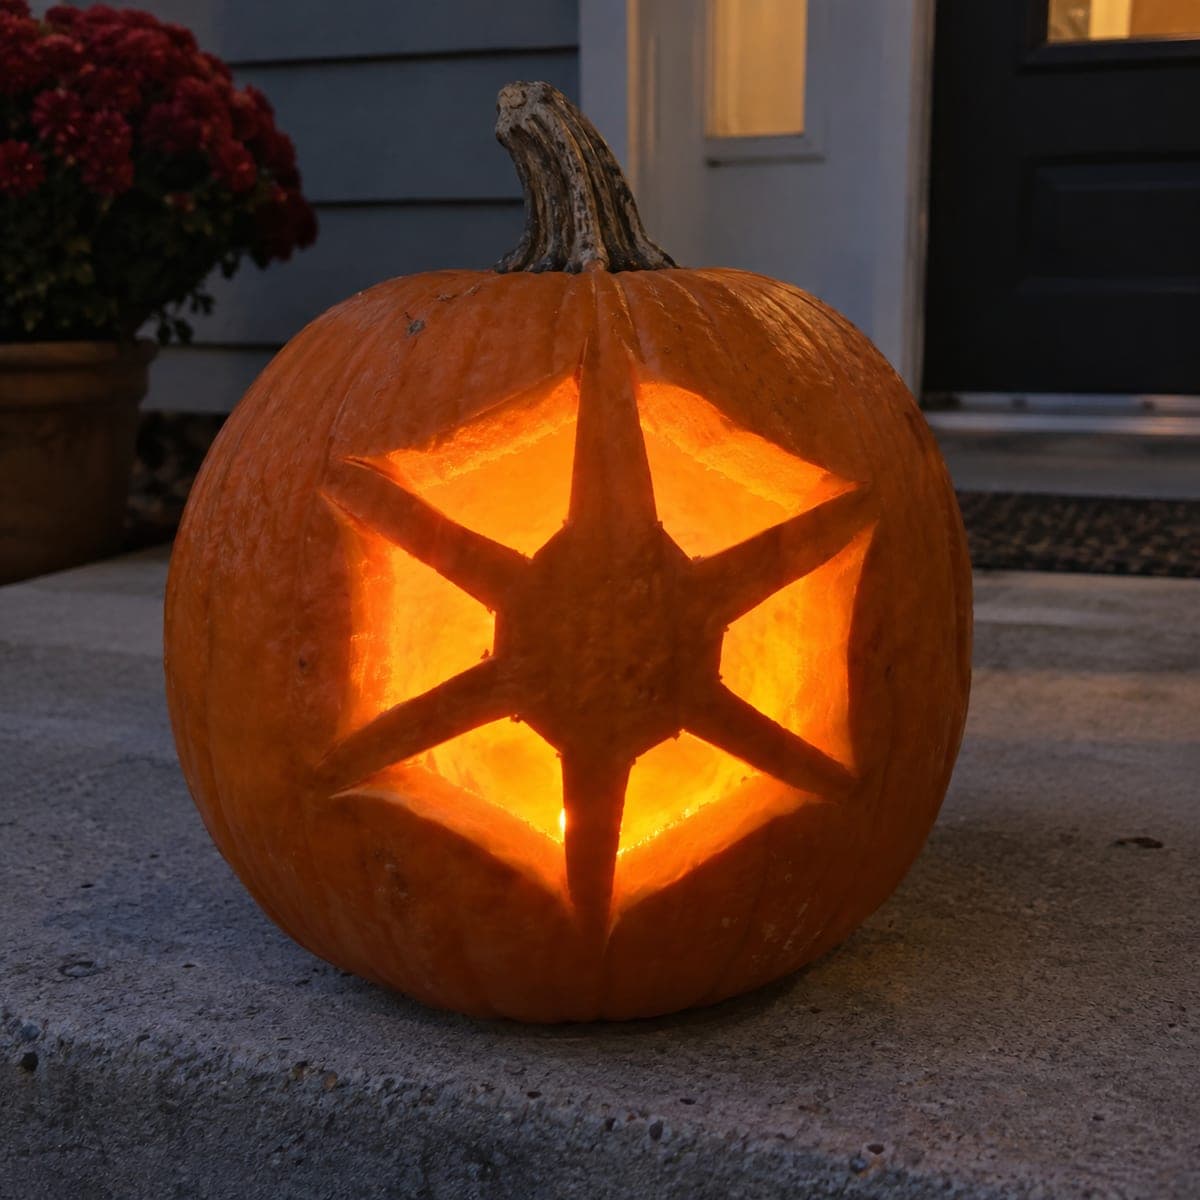
Six-Pointed Star Burst Glowing Pumpkin Cutout

A large six-pointed star made from two overlapping triangles is carved all the way through the pumpkin, each triangular segment glowing intensely orange from the candle inside. The bold, graphic geometry means this pumpkin carving idea is suitable for beginners who want a striking result with just six straight cuts. Mark the star points by dividing the pumpkin circumference into six equal sections with a ruler, then connect them to draw the triangles before cutting. The clean geometric form looks equally appealing on a front stoop, a window ledge, or clustered with other geometric pumpkins for a modern fall display.

This is an AI-generated concept image: a realistic, carvable design idea rather than a photo of a finished carve. AI concepts are always labeled and sit out the leaderboard and the contest.
No ratings yet · Sign in to rate

Comments (0)

  • No comments yet — be the first.

Save without an account. Sign in to like or comment.

Our tips for carving a similar design

The whole effect comes from one graphic trick: two overlapping triangles that read as a single six-pointed star burst when the light pours through. You map the six points evenly around the front of the pumpkin, connect them into two triangles, then cut those triangular openings all the way through. Because every line is straight, this design forgives shaky hands and still lands a striking result.

Written by PumpkinCarvingIdeas.com, inspired by the image above. These are our suggestions, not instructions from the uploader. This approach to the AI concept has not been tested on a real pumpkin.

From pumpkin to porch

  1. Pick a smooth pumpkin and open the lid

    Choose a round pumpkin with a flat, blemish-free front panel so the star sits clean and centered. Cut a lid from the bottom or the back rather than the top, since a solid top keeps the star shape unbroken. Have an adult make the opening with a serrated pumpkin saw, angling the cut inward so the piece rests without falling in. Scoop the insides and thin the front wall to about one inch so light passes easily.

  2. Divide the front into six equal points

    Wrap a strip of paper or a flexible ruler around the widest part of the front panel and mark six evenly spaced points. Transfer those marks onto the skin with a washable marker or a pin. Think of them as the tips of a star, three forming an upward triangle and three forming a downward one. Take your time here, since even spacing is what makes the star look balanced.

  3. Draw the two overlapping triangles

    Connect every other point to draw the first triangle, then connect the remaining three points for the second triangle laid over it. Where the two triangles cross you will see the classic six-pointed star with an open center. Step back and check that the points are roughly equal in length before you commit. Darken the final outline so you can follow it cleanly while cutting.

  4. Cut the small inner segments first

    Start with the tighter triangular gaps near the center, where the two shapes overlap, using a small saw and short, steady strokes. Cutting these smaller pieces before the big star points keeps the wall stable and gives you control. Let the tool do the work and avoid forcing it through thick spots. Push each freed piece out gently from the inside.

  5. Open the six star points last

    Now cut the longer triangular points that reach outward, saving these bigger openings for the end so the pumpkin stays rigid as long as possible. Keep the ridges of pumpkin between segments intact, since those thin bars are what define the star lines against the glow. Clean up any ragged edges with a paring cut. If a point wall feels weak, leave a touch more thickness rather than trimming it razor thin.

  6. Light it and photograph the burst

    Drop in a bright LED light, warm-white or amber, and set it low so the glow spreads evenly across all six openings. Skip real candles, since the deep cutouts pull air and a flame is a fire risk on a porch. Shoot at dusk with your camera slightly below the star so the light reads as intense orange. Cluster it with other simple geometric pumpkins for a modern fall grouping.

Gather your supplies

Check things off as you get ready.

Work on a stable surface, keep your free hand out of the cutting path, and have an adult handle sharp tools.

Three levels of light

  • Leave intact

    The outer pumpkin skin and the thin bars between star segments stay dark, tracing the star's edges.

  • Peel & shade

    Shave a shallow border just outside the points if you want a soft halo of dim orange framing the burst.

  • Cut through

    The six triangular star segments are cut fully through for the brightest, most intense glow.

Learn the carving basics

Before you start cutting

How do I keep the six points even?

Measure rather than eyeball it. Wrap a paper strip around the front, mark six equal spaces, and transfer those to the skin. Even spacing is the single biggest factor in whether the star looks balanced.

Will the thin bars between segments break?

They can if cut too narrow, so keep those separating strips at least half an inch wide and leave the front wall about an inch thick. Cut the small inner gaps before the large outer points to keep the pumpkin rigid. If a bar feels flimsy, thicken it rather than trimming.

This is a concept image, so can a real pumpkin glow this brightly?

Yes, deep full cutouts like these let a lot of light escape, which is exactly why they glow so strongly. Use a bright LED set low inside so the light fills every segment evenly. Real pumpkin walls hold this simple straight-line shape well as long as you keep the bars a sensible width.

Your take belongs here, too.

Changed a detail? Made it simpler? Share a photo of your version and tell the community what worked.

Share your pumpkin

More pumpkins like this

You've reached the end · 8 pumpkins
The Patch Report

Fresh pumpkins, in your inbox.

The best new carvings, ideas worth stealing, and how-tos for carving season. Short, seasonal, and gone by November.

A short email during carving season. Unsubscribe anytime. See our privacy policy.