Halloween Pumpkin Carving Contest · Starts October 1st · $500 in prizes
← Back to ideas
@ai_concepts
Aug 31, 2026
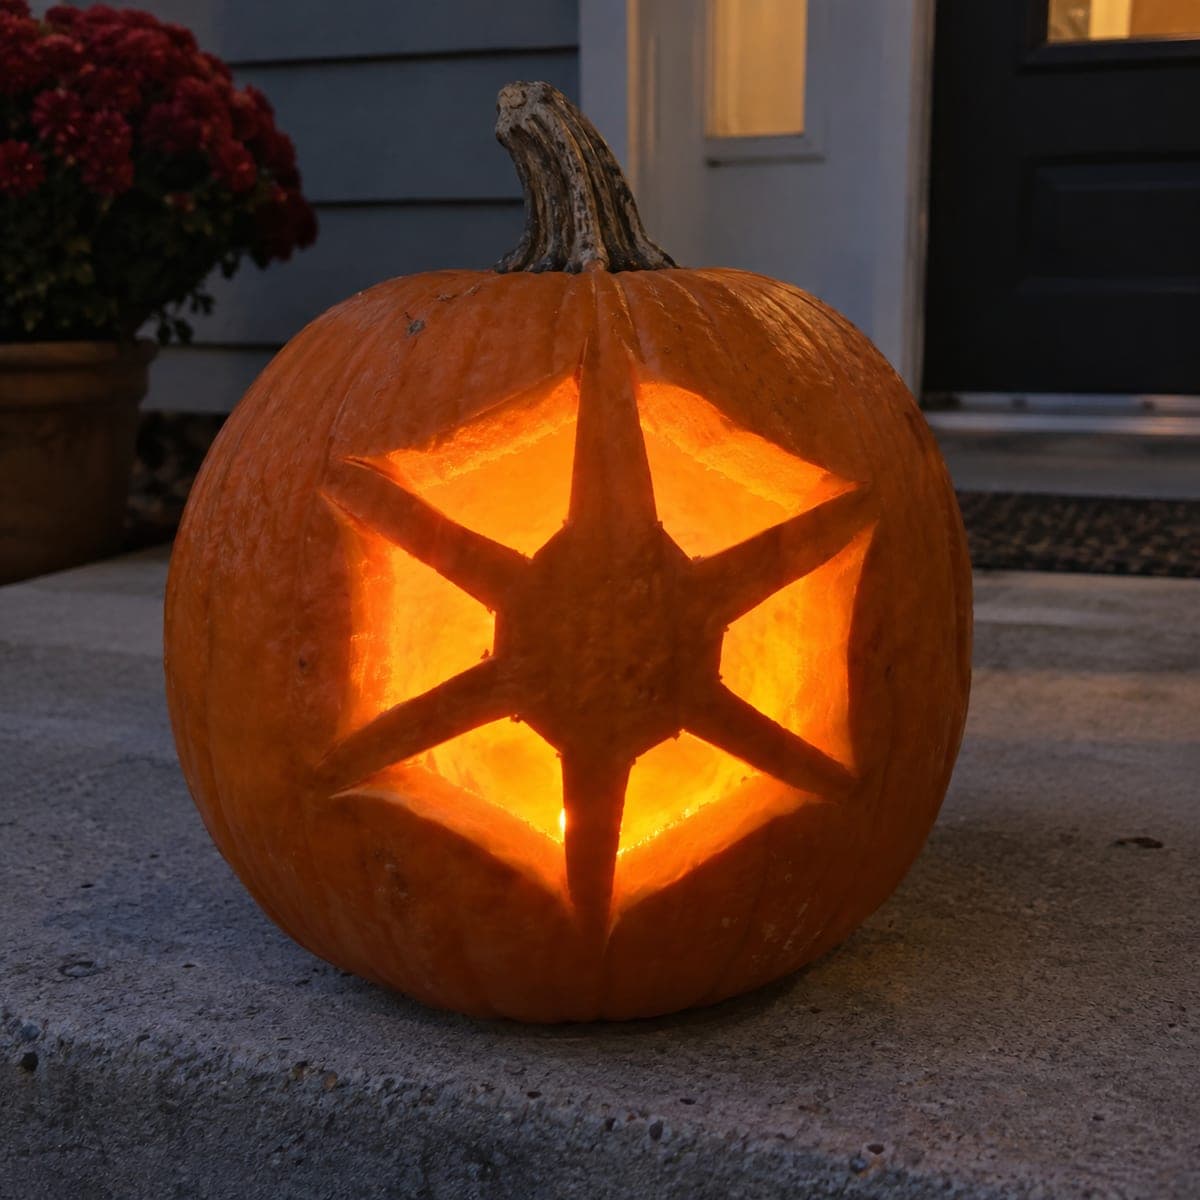
Glowing Pineapple Cutout Jack-O-Lantern for the PorchAI
0

Glowing Pineapple Cutout Jack-O-Lantern for the Porch

A classic pineapple shape, complete with diamond-lattice body and a fan of frond-like leaves, is cut entirely through a large orange pumpkin so candlelight streams out in a warm tropical pattern. The crisp geometric grid of the pineapple body makes this pumpkin carving idea surprisingly achievable with a sharp detail knife and a steady hand. Score the horizontal and diagonal grid lines before cutting to keep them evenly spaced, and carve the leaf fronds last to avoid cracking the connecting skin. The finished piece looks equally at home on a coastal porch or a festive Thanksgiving table.

This is an AI-generated concept image: a realistic, carvable design idea rather than a photo of a finished carve. AI concepts are always labeled and sit out the leaderboard and the contest.

No ratings yet · Sign in to rate

Comments (0)

  • No comments yet — be the first.

Save without an account. Sign in to like or comment.

Our tips for carving a similar design

The core trick here is a diamond lattice cut fully through the pumpkin, framed by a fan of pointed fronds up top. You plan the whole thing around evenly spaced grid lines, so scoring first is what keeps the pattern crisp. Cut the small diamond openings before the larger leaf gaps, and leave the connecting bridges intact so nothing sags.

Written by PumpkinCarvingIdeas.com, inspired by the image above. These are our suggestions, not instructions from the uploader. This approach to the AI concept has not been tested on a real pumpkin.

From pumpkin to porch

  1. Prep the pumpkin and pick your window

    Choose a tall pumpkin with a smooth, flat front panel so the pineapple sits centered. Cut a lid from the bottom or the back rather than the top, which keeps the stem intact and makes the LED easy to reach. Scoop the inside until the front wall is about one inch thick so a detail knife slides through cleanly. A thinner wall carves faster and glows brighter.

  2. Transfer the design

    Tape your pineapple stencil flat against the front and poke through the lines with a pin or transfer tool. Space your dots closely along the diamond grid and the frond edges so you can connect them later. Peel the paper and lightly connect the dots with a washable marker. Step back and check that the body grid looks even before you cut anything.

  3. Score the grid lines first

    Before any deep cuts, run your knife shallowly along every horizontal and diagonal line to set the pattern. This scoring keeps the diamonds evenly spaced and gives your blade a track to follow. Work slowly and let the lines cross cleanly at each intersection. Getting the grid right now saves you from a lopsided lattice later.

  4. Cut the body diamonds

    Cut fully through the small diamond openings that make up the pineapple body, working from the center outward. Keep every strip between diamonds intact, since those bridges hold the whole grid together and let the light form the crosshatch pattern. Use gentle sawing motions and pop each piece out with your finger from behind. An adult should handle the knife on these tight cuts.

  5. Carve the leaf fronds last

    Save the fan of pointed frond leaves for the end so the connecting skin does not crack while you work the body. Cut each leaf as its own clean opening and leave a thin rib of skin between neighboring fronds so the fan holds its shape. Taper the points carefully and avoid forcing the blade. Cutting these last keeps the top of your design strong.

  6. Light it and photograph

    Drop in a bright LED puck or a couple of battery tea lights, never an open flame near all these cutouts. Set the pumpkin on a bench or step near your door and let the lattice throw its warm pattern. Shoot photos at dusk when the glow reads strongest against the dark. A little foil behind the light can bounce even more brightness through the diamonds.

Gather your supplies

Check things off as you get ready.

Work on a stable surface, keep your free hand out of the cutting path, and have an adult handle sharp tools.

Three levels of light

  • Leave intact

    The pumpkin skin surrounding the pineapple stays untouched for a dark orange background.

  • Peel & shade

    The thin strips between the diamonds and the ribs between fronds can be shallow-shaved to glow dimly and hint at the pattern.

  • Cut through

    The diamond openings and the leaf fronds are cut fully through for the brightest tropical streams of light.

Learn the carving basics

Before you start cutting

How do I keep the diamond lattice from collapsing?

The strips between the diamonds are structural bridges, so never widen or connect them. Cut each diamond as its own separate opening and leave every crossing bar intact. If a bar feels weak, keep it a touch wider rather than trimming it thin.

Should I carve the fronds or the body first?

Carve the body diamonds first and save the fronds for last. The leaf fan sits near the top where the connecting skin is thin, so cutting it early risks cracking the whole panel. Working bottom up keeps the pumpkin stable while you do the tight grid work.

This is an AI concept, so can a real pumpkin actually hold this pattern?

Yes, as long as you keep the lattice bars and frond ribs a reasonable width. A one inch wall and evenly spaced bridges will support the design fine. Just avoid shaving the connectors paper thin, which is the only place a real pumpkin would sag.

Your take belongs here, too.

Changed a detail? Made it simpler? Share a photo of your version and tell the community what worked.

Share your pumpkin

More pumpkins like this

You've reached the end · 8 pumpkins
The Patch Report

Fresh pumpkins, in your inbox.

The best new carvings, ideas worth stealing, and how-tos for carving season. Short, seasonal, and gone by November.

A short email during carving season. Unsubscribe anytime. See our privacy policy.