Halloween Pumpkin Carving Contest · Starts October 1st · $500 in prizes
← Back to ideas
@ai_concepts
Aug 19, 2026
Tropical Pineapple Painted No-Carve PumpkinAI
0

Tropical Pineapple Painted No-Carve Pumpkin

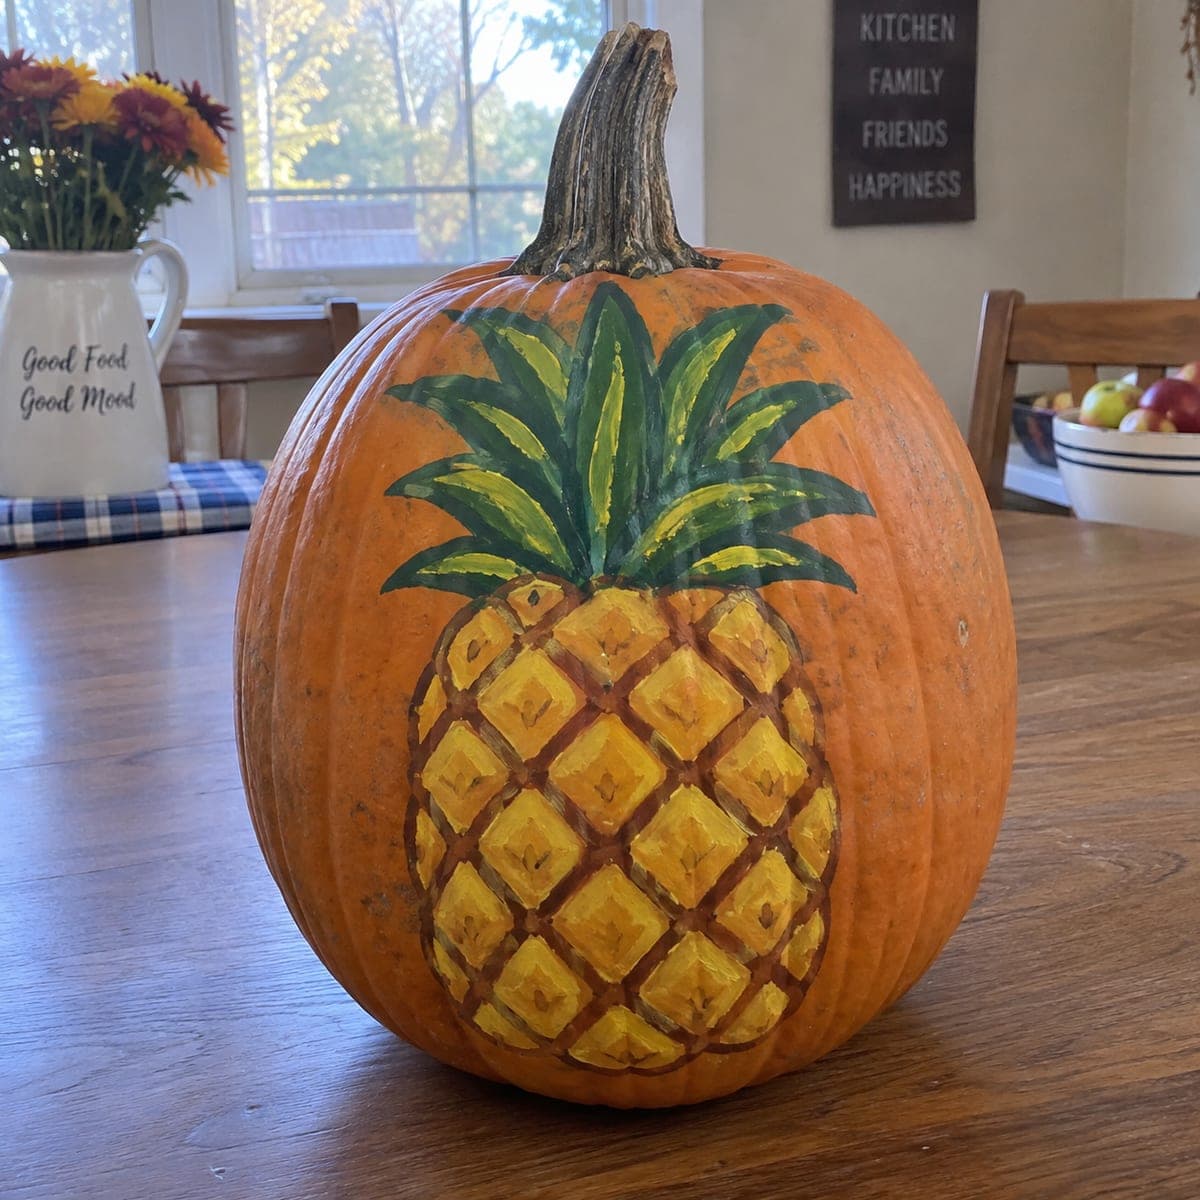
Golden diamond segments and a crown of deep green leaves turn this pumpkin into a hand-painted pineapple, a cheerful no-carve idea that bridges summer and fall decor. The crosshatch pattern is simpler than it looks: paint the yellow oval base, add the brown diagonal grid in both directions, then dot each diamond's center. Finish with long tapered leaf strokes in two greens for depth, and display it on a kitchen table where the colors can shine.

This is an AI-generated concept image: a realistic, carvable design idea rather than a photo of a finished carve. AI concepts are always labeled and sit out the leaderboard and the contest.

No ratings yet · Sign in to rate
Comments (0)

  • No comments yet — be the first.

Save without an account. Sign in to like or comment.

Our tips for carving a similar design

The core trick here is a painted crosshatch grid that reads as a pineapple's diamond skin without any cutting. You could build it in layers: a yellow oval body, a brown diagonal lattice in both directions, dotted diamond centers, then a crown of tapered green leaves. Because nothing is carved, the whole thing stays sturdy and lasts for weeks on a table.

Written by PumpkinCarvingIdeas.com, inspired by the image above. These are our suggestions, not instructions from the uploader. This approach to the AI concept has not been tested on a real pumpkin.

From pumpkin to porch

  1. Prep and sketch the shapes

    Wipe the pumpkin clean and dry so paint grips well. Lightly pencil an upright oval on the front for the pineapple body, leaving room above it for the leafy crown. Keep the oval centered and a little taller than it is wide. A soft pencil line is easy to paint over later.

  2. Block in the yellow base

    Fill the oval with two coats of warm yellow acrylic, letting each coat dry fully. Use a flat brush and follow the pumpkin's curve so coverage stays even. Do not worry about the pattern yet; you just want a solid golden field to work on. A second coat hides the orange skin underneath.

  3. Paint the crosshatch grid

    Once the yellow is dry, draw thin brown diagonal lines running one way, then cross them the other way to form a diamond lattice. Keep the spacing roughly even, but small wobbles look natural and hand-done. Use a liner brush and a light touch so the lines stay slim. Let it dry before adding detail.

  4. Shade and dot the diamonds

    Add a small brown or tan dot or tiny cross in the center of each diamond to suggest the pineapple's texture. Brush a faint shadow along the lower edge of each diamond for a quilted, three dimensional look. Work top to bottom so your hand does not smudge finished rows. Keep these marks tiny so the yellow still dominates.

  5. Build the leafy crown

    Above the body, paint long tapered leaves fanning upward and outward with a dark green. While that is drying, layer a few brighter lime green strokes down the centers of some leaves for depth. Vary the leaf lengths so the crown looks full and lively. Let the greens overlap the top edge of the yellow oval slightly so the crown feels attached.

  6. Seal and stage the display

    Once everything is dry, brush on a clear matte or satin sealer to protect the paint. Set the pumpkin on a kitchen table or shelf where daylight shows off the colors. If you want an evening glow, tuck a small battery LED puck beside it rather than inside, since this design is not hollowed out. Snap your photo in bright, even light to catch the golden tones.

Gather your supplies

Check things off as you get ready.

Work on a stable surface, keep your free hand out of the cutting path, and have an adult handle sharp tools.

Three levels of light

  • Leave intact

    The orange pumpkin skin around the pineapple stays bare and dark, framing the painted fruit.

  • Peel & shade

    This is a no-carve design, so there is no peeled midtone; the painted yellow body simply reads as the bright area instead.

  • Cut through

    Nothing is cut through here. If you want a glow, set a small LED beside the pumpkin rather than carving openings into the painted panel.

Learn the carving basics

Before you start cutting

Do I need to carve anything for this pineapple?

No, this is a fully painted no-carve design, so you never open the pumpkin. That keeps it sturdy and lets it last for weeks. It also means kids can help with the painting parts safely.

How do I keep the crosshatch grid even?

Sketch the diagonal lines in pencil first, spacing them by eye across the yellow oval, then paint over them with a liner brush. Draw one full set of diagonals before starting the crossing set so the diamonds line up. Small irregularities actually make it look more like real pineapple skin.

Can I do this on a real pumpkin or should I use a foam one?

Either works. A real pumpkin gives you that authentic texture and the warm orange border, while a craft foam pumpkin lets you reuse the design every year. On a real one, add a coat of sealer so the paint holds up on the waxy skin.

Your take belongs here, too.

Changed a detail? Made it simpler? Share a photo of your version and tell the community what worked.

Share your pumpkin

More pumpkins like this

You've reached the end · 8 pumpkins
The Patch Report

Fresh pumpkins, in your inbox.

The best new carvings, ideas worth stealing, and how-tos for carving season. Short, seasonal, and gone by November.

A short email during carving season. Unsubscribe anytime. See our privacy policy.