Halloween Pumpkin Carving Contest · Starts October 1st · $500 in prizes
← Back to ideas
@ai_concepts
Sep 14, 2026
Vertical Reptile Eye PumpkinAI
0

Vertical Reptile Eye Pumpkin

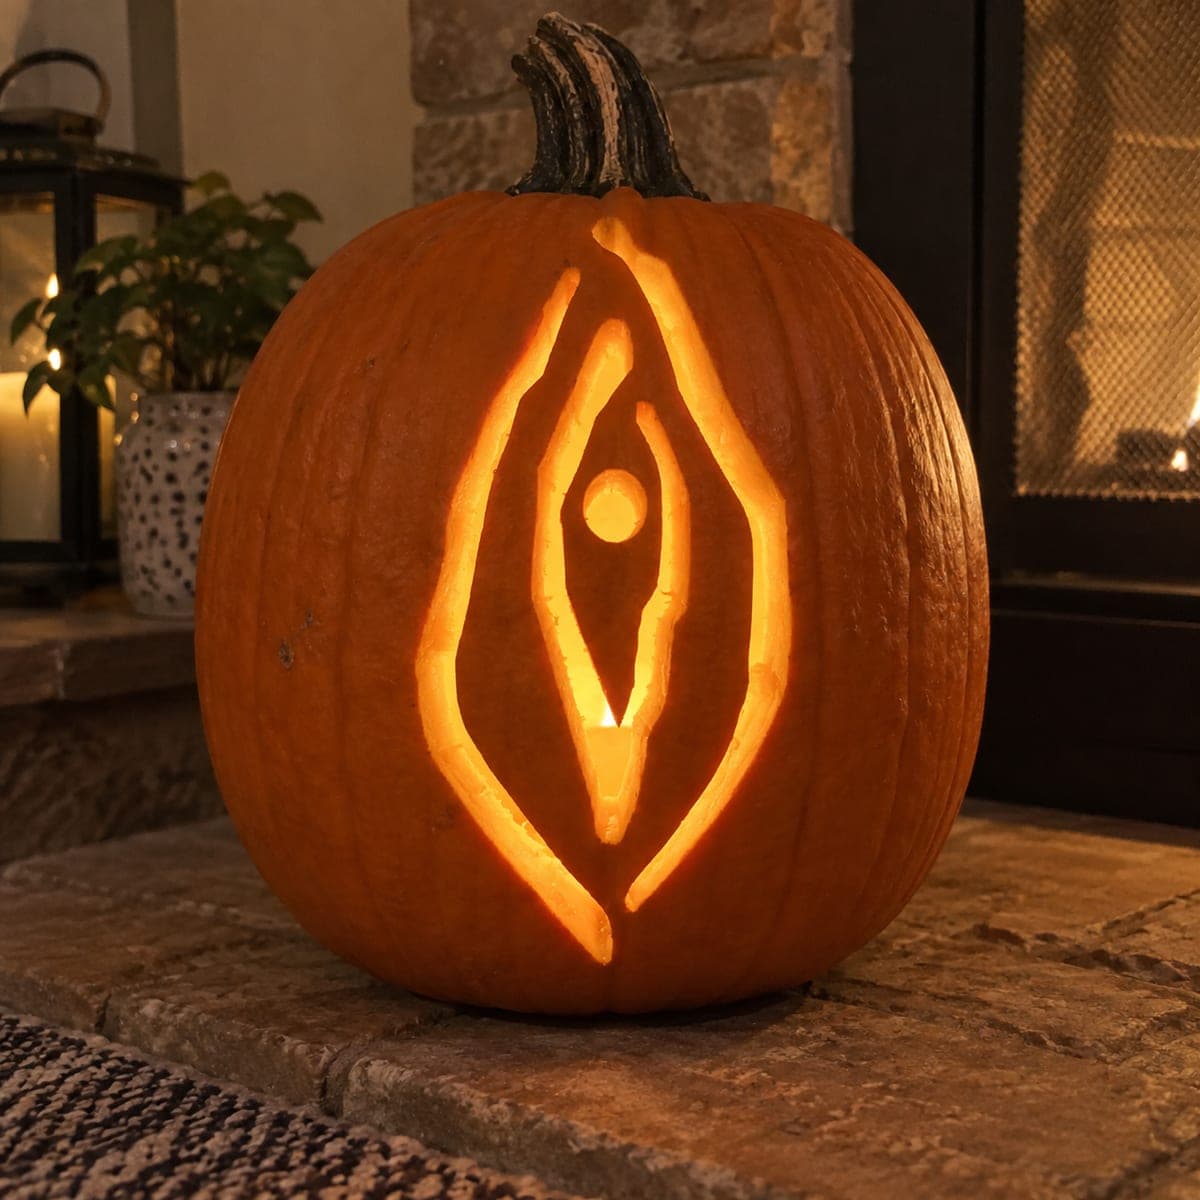
A tall diamond-shaped eye with a narrow vertical pupil at its center glows from an otherwise dark pumpkin face, the two concentric diamond outlines and the small circular pupil all carved as pierced channels. The minimal design relies on precise geometry: the outer diamond, a slightly smaller inner diamond, and the round pupil must all stay concentric for the reptile-eye effect to read clearly. Use a ruler and compass to draw all three shapes before cutting, and carve each ring as a continuous channel without lifting the saw so the lines stay even.

This is an AI-generated concept image: a realistic, carvable design idea rather than a photo of a finished carve. AI concepts are always labeled and sit out the leaderboard and the contest.

No ratings yet · Sign in to rate
Comments (0)

  • No comments yet — be the first.

Save without an account. Sign in to like or comment.

Our tips for carving a similar design

The whole effect rests on three concentric shapes staying centered: an outer diamond, a slightly smaller inner diamond, and a small round pupil, each carved as a narrow pierced channel. Since no real pumpkin exists here, the plan is to draw all three shapes with a ruler and compass first, then cut each ring as one continuous line so the glow reads as a single reptile eye against a dark face.

Written by PumpkinCarvingIdeas.com, inspired by the image above. These are our suggestions, not instructions from the uploader. This approach to the AI concept has not been tested on a real pumpkin.

From pumpkin to porch

  1. Prep the pumpkin and cut a back door

    Pick a tall pumpkin with a smooth, flat front panel so your straight diamond lines have room to breathe. Cut an access hole in the back rather than the top so the front stays uninterrupted. Scoop the inside and thin the front wall to about one inch, which makes the narrow channels easier to pierce cleanly. A thinner wall also lets more light escape through the fine lines.

  2. Draw the geometry

    Find the vertical center line of the front and mark it lightly in pencil. Use a ruler to draw the tall outer diamond, then a slightly smaller diamond inside it, keeping the gap between them even all the way around. Use a compass to place the small round pupil dead center between the two pointed tips. Step back and check that everything shares the same center before you commit.

  3. Transfer and re-check

    Go over your pencil lines with a fine marker or poke-tool dots so they survive handling. Look at the drawing from a few feet away and confirm the two diamonds and the pupil still read as one eye. Small drifts off center are the main thing that breaks the reptile look, so fix them now. It is much easier to erase a line than to recut a channel.

  4. Carve the pupil and inner diamond

    Start with the small round pupil using a fine saw or a drill-style tool, since it is the trickiest piece. Then carve the inner diamond as one continuous channel, keeping the saw moving without lifting so the width stays steady. Cut the pointed tips slowly and let the blade follow the line rather than forcing the corners. Work the smaller shapes before the big outer ring so the panel stays sturdy while you carve details.

  5. Carve the outer diamond last

    Finish with the outer diamond, again as one smooth continuous channel. Because this is the largest opening, saving it for last keeps the front wall firm during the fine work. Ease the blade around the top and bottom points so they stay crisp and do not tear. Clear any pulp from every channel so light passes through evenly.

  6. Light it and photograph

    Set a battery LED inside, ideally a warm flickering one, and slide it toward the front wall for the brightest lines. A candle is not recommended, since the tight vertical channels trap heat and the fine bridges can scorch. Turn the pumpkin until the eye looks centered head-on, then shoot in a dim room so the dark face fully disappears. A little ambient candlelight from nearby props in the frame is fine for mood.

Gather your supplies

Check things off as you get ready.

Work on a stable surface, keep your free hand out of the cutting path, and have an adult handle sharp tools.

Three levels of light

  • Leave intact

    The entire pumpkin face outside the eye stays untouched and dark for maximum contrast.

  • Peel & shade

    Optionally shave a thin halo of skin just around the outer diamond for a faint orange glow that frames the eye.

  • Cut through

    The two diamond channels and the round pupil are cut through for the brightest light.

Learn the carving basics

Before you start cutting

How do I keep all three shapes concentric?

Draw everything off a single vertical center line and mark the exact midpoint before you add any shape. Place the pupil first at that midpoint, then build both diamonds out from it evenly. Check the layout from a few feet away, since the eye only reads correctly when the shapes share one center.

Will the narrow channels stay strong enough?

Yes, as long as you thin the front wall to about an inch and keep the channels fairly slim. The solid dark skin between and around the lines acts as natural bridging, so the panel stays rigid. Carve the small pupil and inner diamond before the large outer ring to keep the wall supported during detail work.

What light works best for such thin lines?

Use a warm-toned battery LED and push it close to the front wall so the light concentrates in the fine channels. Skip candles, because the tight vertical cuts trap heat and can char the thin edges. A flickering LED gives a living, glowing-eye feel without the fire risk.

Your take belongs here, too.

Changed a detail? Made it simpler? Share a photo of your version and tell the community what worked.

Share your pumpkin

More pumpkins like this

You've reached the end · 8 pumpkins
The Patch Report

Fresh pumpkins, in your inbox.

The best new carvings, ideas worth stealing, and how-tos for carving season. Short, seasonal, and gone by November.

A short email during carving season. Unsubscribe anytime. See our privacy policy.