Halloween Pumpkin Carving Contest · Starts October 1st · $500 in prizes
← Back to ideas
@ai_concepts
Aug 31, 2026
Single Giant Eye Cutout Pumpkin CarvingAI
0

Single Giant Eye Cutout Pumpkin Carving

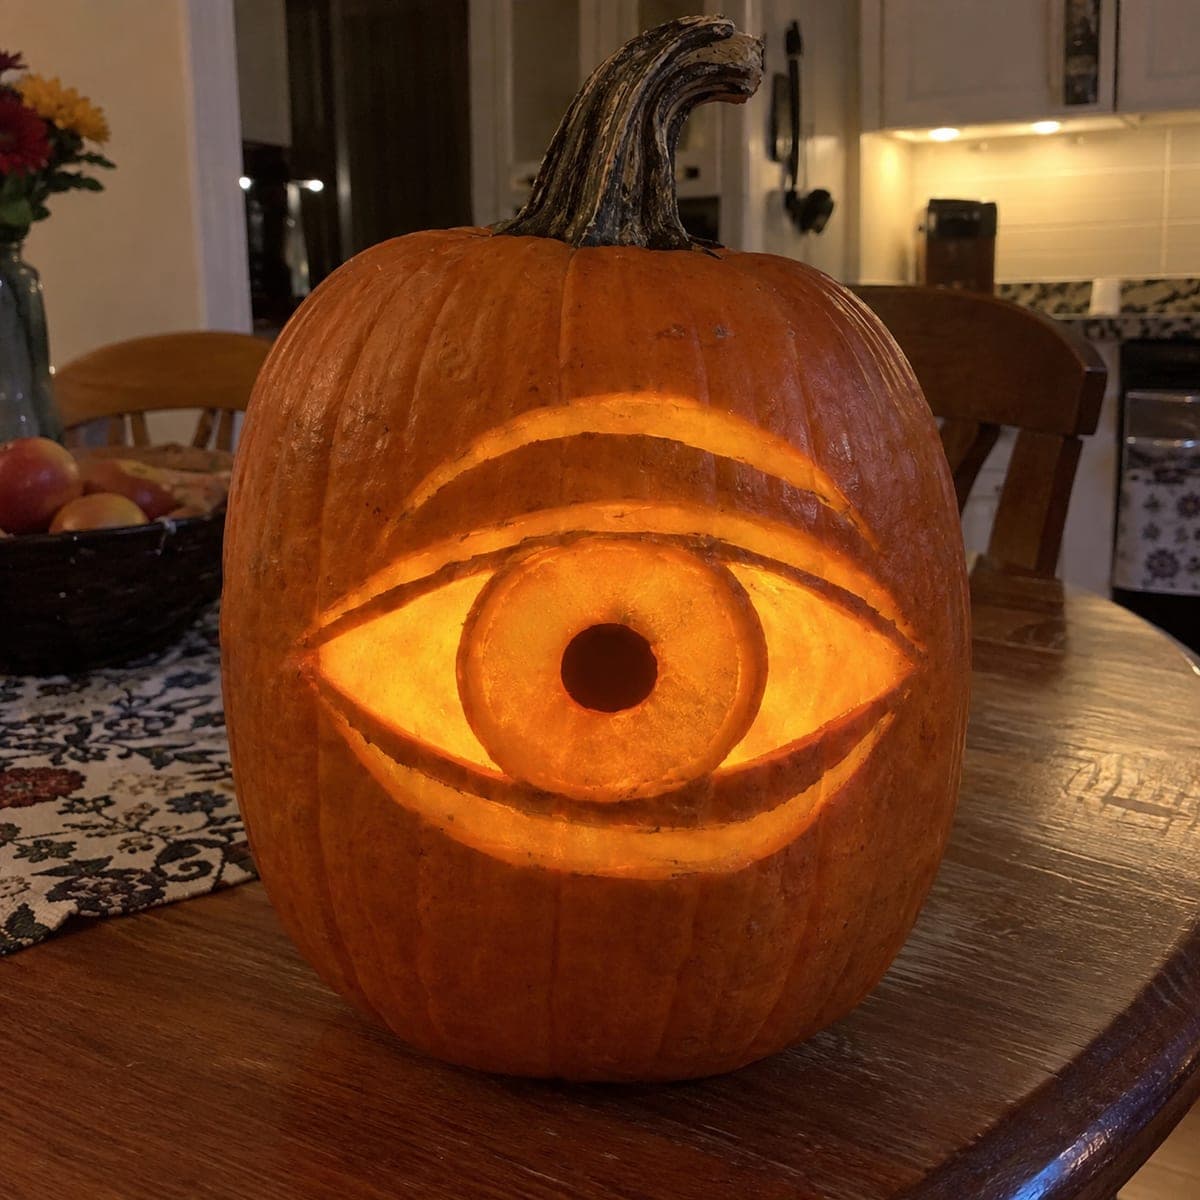
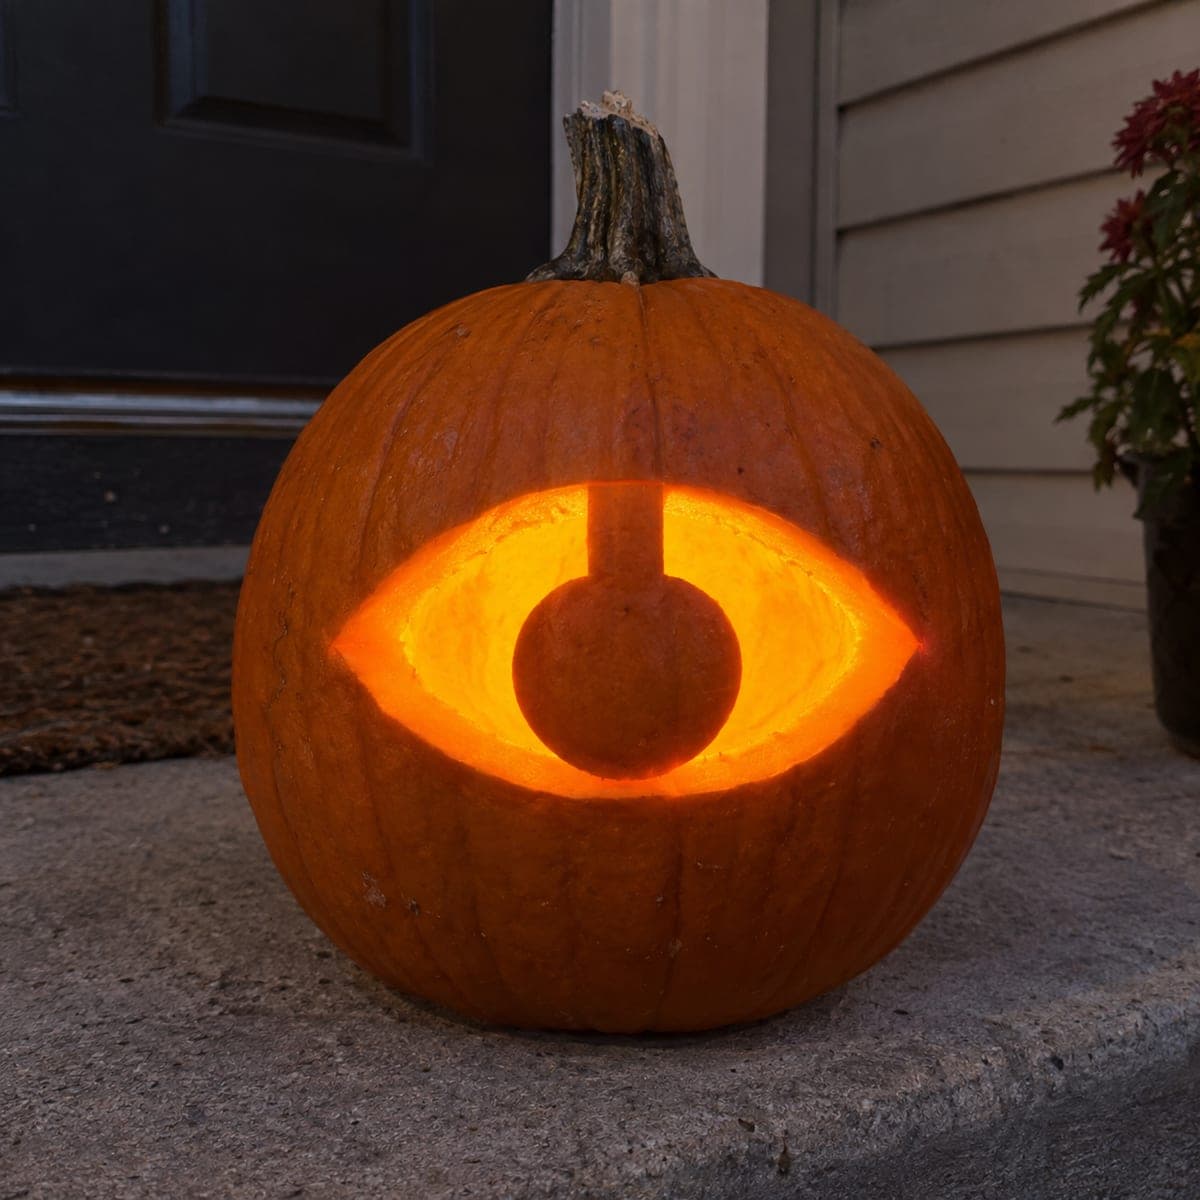
One oversized human eye with a carved iris ring and a round pupil cutout dominates the front of this pumpkin, creating an unsettling and unforgettable pumpkin carving idea. The minimalist design relies on a large oval cutout for the white of the eye, a shallower scraped ring for the iris, and a centered circular hole for the pupil so multiple levels of light emit at once. Etch the iris ring to a medium depth to let only a soft glow show through while the pupil blazes brightest. Grouping several of these single-eye pumpkins in a row on a staircase multiplies the creepy effect dramatically.

This is an AI-generated concept image: a realistic, carvable design idea rather than a photo of a finished carve. AI concepts are always labeled and sit out the leaderboard and the contest.
No ratings yet · Sign in to rate

Comments (0)

  • No comments yet — be the first.

Save without an account. Sign in to like or comment.

Our tips for carving a similar design

The whole effect comes from three light levels stacked inside one shape: a wide open almond for the white of the eye, a medium scraped ring for the iris, and a small full hole for the pupil. The trick is to leave the iris ring as raised, thinned skin so it glows softer than everything around it. Plan the eye large and centered, then work from shallow to deep so you do not blow out the delicate iris ring by accident.

Written by PumpkinCarvingIdeas.com, inspired by the image above. These are our suggestions, not instructions from the uploader. This approach to the AI concept has not been tested on a real pumpkin.

From pumpkin to porch

  1. Pick a tall pumpkin and open the back

    Choose a smooth, upright pumpkin with a flat front area big enough for a hand-sized eye. Cut a lid or a round access hole in the back, not the top, so the front face stays uninterrupted. Scoop the insides and thin the front wall from behind to about one inch so light passes through evenly. A thinner wall makes the scraped iris ring glow much more easily.

  2. Transfer the eye outline

    Tape your stencil flat over the front and poke the almond eye shape, the two brow and lower lid lines, the iris circle, and the small pupil dot. Keep the iris centered inside the almond so the finished eye looks balanced. Mark clearly which zones are full cutouts and which are scrape-only. Step back and check the eye reads correctly before any blade touches the skin.

  3. Scrape the iris ring to a medium depth

    Using a loop or ribbon tool, shave only the skin off the iris ring so pale flesh shows but no hole opens. Aim for a consistent medium depth across the whole ring so the glow stays even. Leave the raised iris slightly proud of the eye white for a layered, three-dimensional look. This shallow zone is what gives you that soft middle glow, so take your time and do not cut through.

  4. Cut the pupil first, then the eye white

    An adult should make the small round pupil cutout in the center first while the surface is still stable. Then cut the large almond openings for the white of the eye, working slowly around the iris so you do not undercut it. Save these big openings for last because a large hole weakens the surrounding wall. Keep the brow line and lower lid as thin skin bridges rather than full cuts if you want them to glow instead of gape.

  5. Clean the edges and test the light

    Bevel the inside edges of every cutout slightly outward so more light escapes and the shapes look crisp. Drop in an LED puck or a battery tea light, never a candle, and check that the pupil reads brightest, the eye white is open and bright, and the iris ring shows only a soft haze. Adjust the wall thickness from behind if any zone looks too dark. Wipe away loose pulp so nothing blocks the glow.

  6. Stage and photograph

    Set the pumpkin at eye level on a step or shelf so the stare hits viewers head on. If you carved several, line them up in a row for that repeating, watchful effect. Shoot in a dark room with the LED as your only light and hold the camera steady for a clean nighttime photo. A dab of petroleum jelly on the cut edges slows drying and keeps the eye looking fresh longer.

Gather your supplies

Check things off as you get ready.

Work on a stable surface, keep your free hand out of the cutting path, and have an adult handle sharp tools.

Three levels of light

  • Leave intact

    The pumpkin skin outside the eye and the thin brow and lower lid lines stay dark to frame the shape.

  • Peel & shade

    The scraped iris ring glows a soft, muted orange for the middle light level.

  • Cut through

    The almond eye white and the small center pupil are cut fully through and shine brightest.

Learn the carving basics

Before you start cutting

How do I keep the raised iris from breaking when I cut the eye white around it?

Cut the large almond openings last, after the pupil and after the iris scraping are finished. Work in short strokes and leave a small margin of flesh where the iris meets the opening so it stays anchored. The iris is a scrape-only zone, so it should remain connected to the wall all the way around.

Why does my iris ring look as bright as the cutouts?

You likely scraped too deep or thinned the wall too much in that spot. The iris should be medium depth so light struggles through it, giving a haze rather than a blaze. If it is already too thin, back the area with a scrap of pumpkin flesh from the inside to dim it.

This is a concept image, so what size should I actually make the eye?

Since no real pumpkin exists here, scale the eye to fill most of the front of your chosen pumpkin, roughly the width of your spread hand. A big eye reads better from a distance and gives you room to separate the three light levels. Keep the pupil small and round so it stays the sharpest point of light.

Your take belongs here, too.

Changed a detail? Made it simpler? Share a photo of your version and tell the community what worked.

Share your pumpkin

More pumpkins like this

You've reached the end · 8 pumpkins
The Patch Report

Fresh pumpkins, in your inbox.

The best new carvings, ideas worth stealing, and how-tos for carving season. Short, seasonal, and gone by November.

A short email during carving season. Unsubscribe anytime. See our privacy policy.