Halloween Pumpkin Carving Contest Β· Starts October 1st Β· $500 in prizes
← Back to ideas
@ai_concepts
Sep 11, 2026
Bloodshot Eyeball Painted No-Carve PumpkinAI
0

Bloodshot Eyeball Painted No-Carve Pumpkin

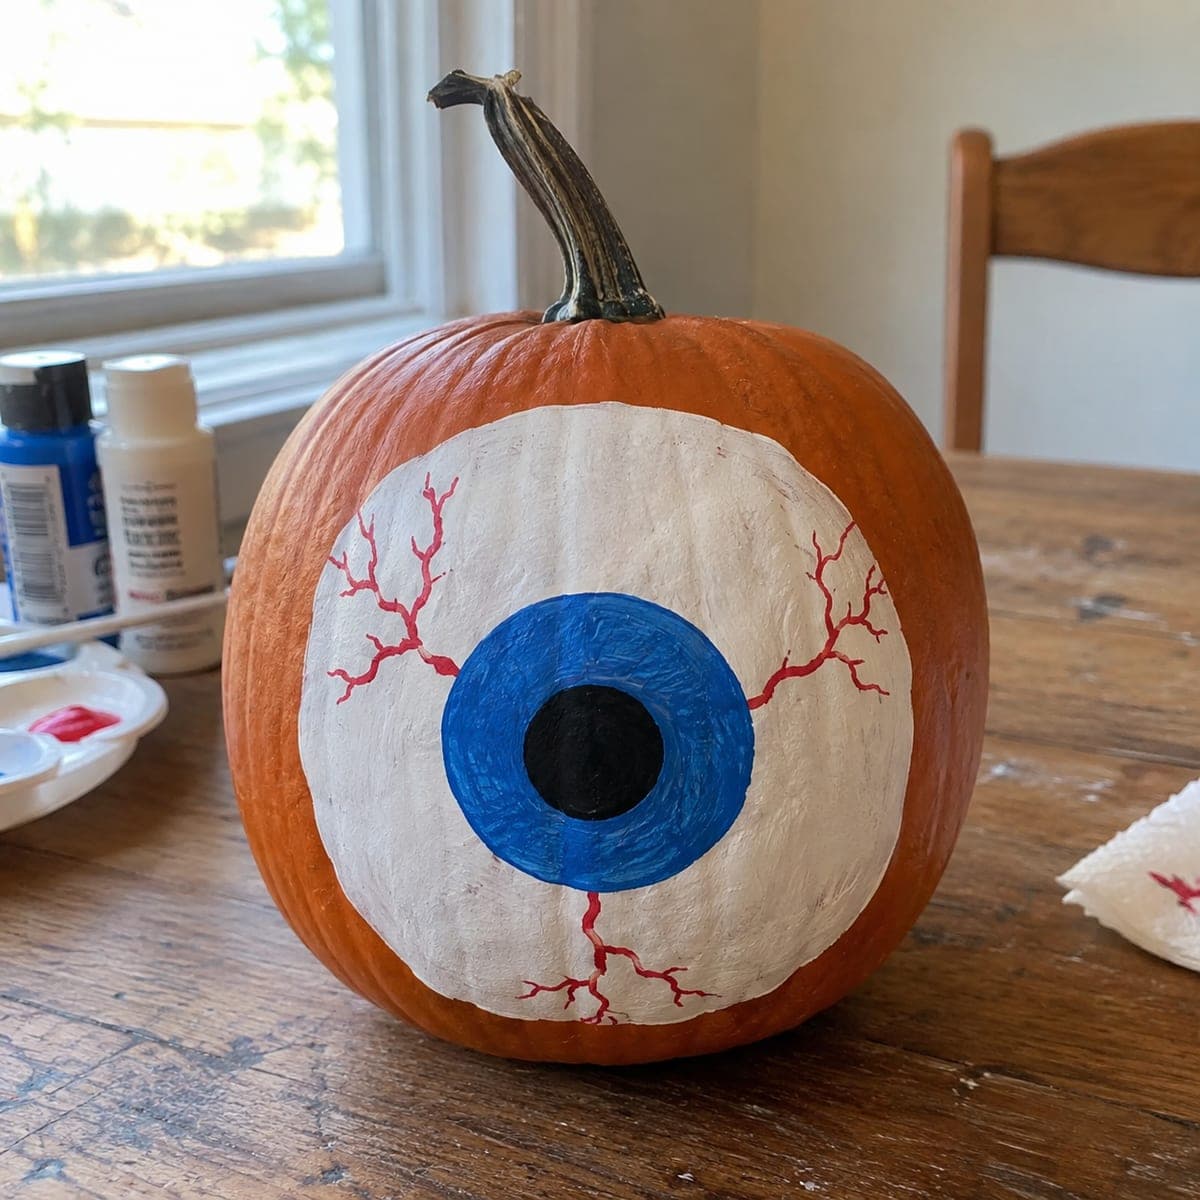
A large painted eyeball with a blue iris, black pupil, and red-veined sclera takes up most of the face of this small no-carve pumpkin, giving it a wonderfully creepy look with zero cutting required. Acrylic craft paint in white, blue, black, and red is all you need; paint the white base first and let it cure before adding the iris and veins with a fine liner brush. The red veins radiate outward from the iris in thin branching lines that are easy to freehand. Grouping several of these in different iris colors on a doorstep creates an instant haunted look.

This is an AI-generated concept image: a realistic, carvable design idea rather than a photo of a finished carve. AI concepts are always labeled and sit out the leaderboard and the contest.

No ratings yet Β· Sign in to rate

Comments (0)

  • No comments yet β€” be the first.

Save without an account. Sign in to like or comment.

Our tips for carving a similar design

The whole trick here is layered acrylic paint on an uncut pumpkin: a big white sclera, a bold blue iris, a solid black pupil, and thin red veins branching out from the center. Since this is an AI concept image, treat it as a plan for how you could paint a similar one rather than a copy of a real pumpkin. Work from the largest shapes to the smallest details and let each layer dry fully so colors stay crisp.

Written by PumpkinCarvingIdeas.com, inspired by the image above. These are our suggestions, not instructions from the uploader. This approach to the AI concept has not been tested on a real pumpkin.

From pumpkin to porch

  1. Clean and plan the face

    Wipe the pumpkin down so the skin is dust free and dry, which helps paint grip. Pick the flattest, roundest side to face out and lightly sketch a large circle for the sclera with a pencil or washable marker. Mark a smaller centered circle for the iris and a tiny one inside that for the pupil. Keeping everything centered makes the finished eye look intentional and creepy.

  2. Paint the white sclera base

    Fill your big outer circle with white acrylic craft paint using a medium flat brush. Expect to need two thin coats for solid, even coverage, letting the first dry before adding the second. Keep the edge of the circle as smooth as you can since it frames the whole design. Let this base cure fully, ideally an hour or more, before touching it again.

  3. Add the blue iris

    Once the white is dry, paint your middle circle with blue. Use short strokes radiating from the center outward to hint at iris texture, and leave the very center open for the pupil. A slightly darker blue ring around the outer edge of the iris adds depth if you want it. Let the blue dry before moving on so it does not smear into the black.

  4. Fill the black pupil

    Paint the small center circle solid black and give it two coats for a deep, flat look. Keep the pupil edge round and crisp where it meets the blue. A clean circular pupil is what sells the eyeball, so take your time or trace a bottle cap for the outline. Let it dry completely.

  5. Freehand the red veins

    Load a fine liner brush with red and start each vein near the outer edge of the iris, pulling outward in a thin branching line. Let the branches split into smaller and smaller forks like little lightning bolts, and vary their length so they look natural. Keep the lines delicate; less paint on the brush gives thinner, spookier veins. Add a few short veins near the bottom too for balance.

  6. Seal and stage it

    Once everything is bone dry, brush on a light coat of clear matte sealer to protect the paint outdoors. Set the pumpkin on a doorstep and, if you want a glow, place a battery LED puck beside it rather than inside, since this piece is not hollowed. Snap your photo in soft evening light so the red veins pop against the white. Group two or three with different iris colors for an eerie crowd.

Gather your supplies

Check things off as you get ready.

Work on a stable surface, keep your free hand out of the cutting path, and have an adult handle sharp tools.

Three levels of light

  • Leave intact

    The bare orange skin around the sclera stays untouched as the dark frame.

  • Peel & shade

    The white sclera reads as the soft mid tone that catches ambient light.

  • Cut through

    The blue iris is the brightest focal point since there are no cutouts on this no-carve piece.

Learn the carving basics

Before you start cutting

Do I need to carve or hollow this pumpkin at all?

No, this is a fully no-carve design done entirely with paint. That makes it safe for kids to help and it lasts longer since the pumpkin is not opened up. If you want a glow, set a battery LED beside it rather than trying to light it from within.

How do I keep the red veins thin and natural looking?

Use a fine liner brush and wipe off most of the paint so the line starts thin. Begin near the iris and drag outward, letting each vein fork into smaller branches. Practice a couple of strokes on paper first, and remember uneven, wandering lines actually look more like real veins.

Will the paint hold up if I set it outside?

Acrylic craft paint is fairly durable once fully cured, and a coat of clear matte sealer adds weather protection. Keep the pumpkin out of direct rain and bring it in during heavy weather to be safe. On a covered porch it should stay crisp for a couple of weeks.

Your take belongs here, too.

Changed a detail? Made it simpler? Share a photo of your version and tell the community what worked.

Share your pumpkin

More pumpkins like this

You've reached the end Β· 8 pumpkins
The Patch Report

Fresh pumpkins, in your inbox.

The best new carvings, ideas worth stealing, and how-tos for carving season. Short, seasonal, and gone by November.

A short email during carving season. Unsubscribe anytime. See our privacy policy.