Halloween Pumpkin Carving Contest · Starts October 1st · $500 in prizes
← Back to ideas
@ai_concepts
Aug 2, 2026
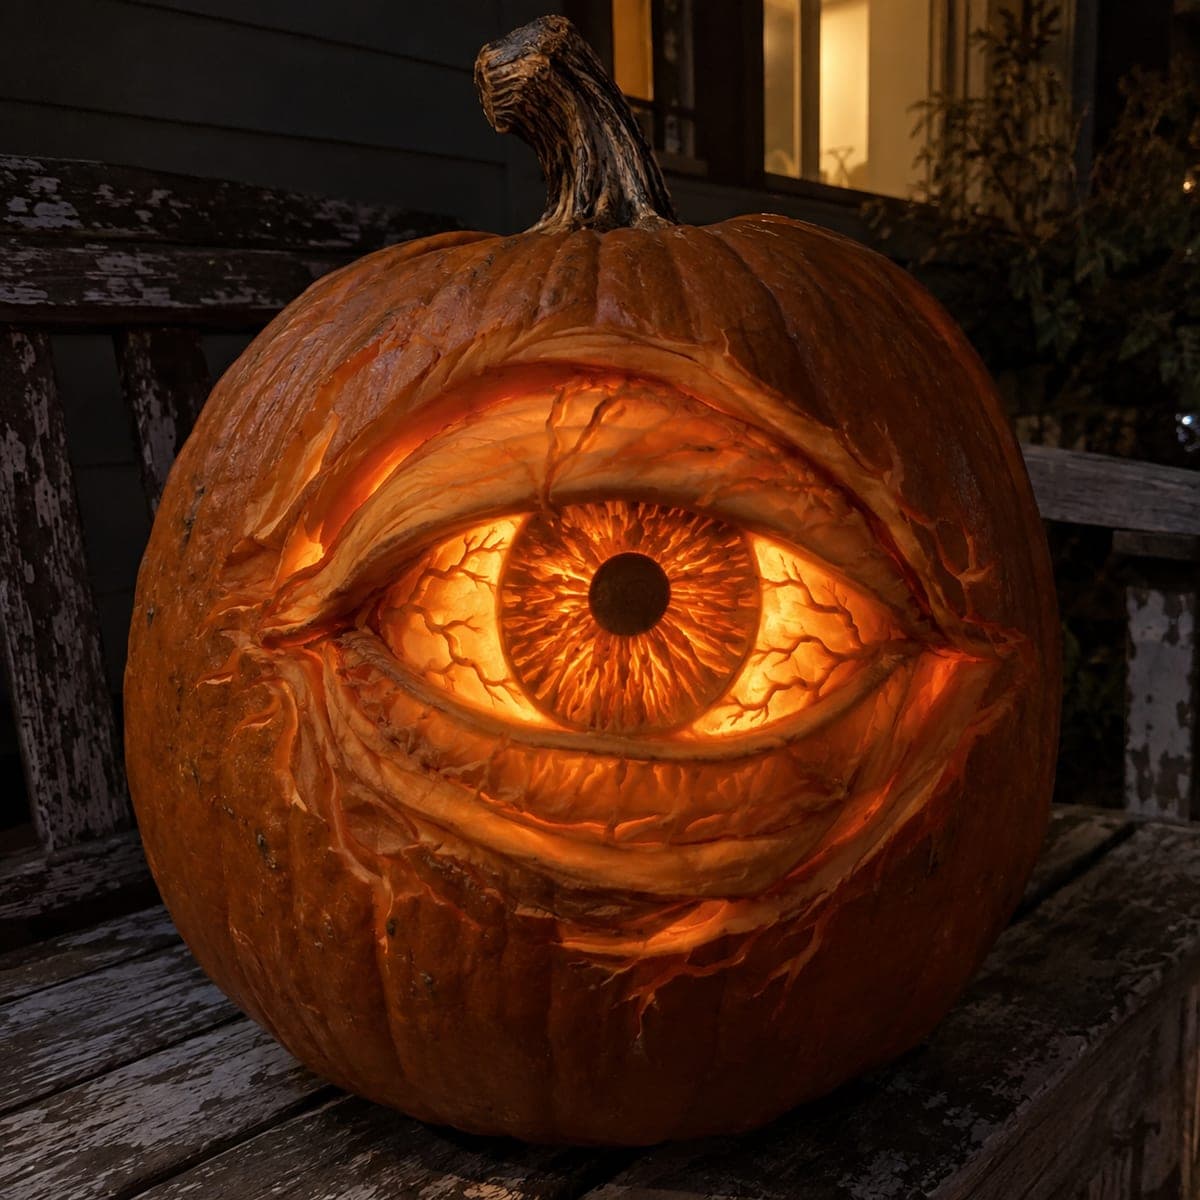
Giant Bloodshot Eyeball Pumpkin CarvingAI
0

Giant Bloodshot Eyeball Pumpkin Carving

One enormous bloodshot eye stares out of this pumpkin, with sculpted lids, branching veins, and an iris etched thin enough to blaze around a dark carved pupil. It is deeply unsettling in the best way, and the veined lids hold up to close inspection. Carve the iris in radial strokes for that fibrous look, keep the pupil as raised dark relief, and use a steady bright light so the glow stays even.

This is an AI-generated concept image: a realistic, carvable design idea rather than a photo of a finished carve. AI concepts are always labeled and sit out the leaderboard and the contest.

No ratings yet · Sign in to rate
Comments (0)

  • No comments yet — be the first.

Save without an account. Sign in to like or comment.

Our tips for carving a similar design

The whole trick here is depth from shading rather than open cuts, so almost nothing is cut clean through. You sculpt the lids and veins by peeling skin at different depths, etch the iris in fine radial strokes so it glows, and leave the pupil as a raised dark button in the middle. Plan the eye large and centered on the flattest face of the pumpkin so the curved lids read clearly.

Written by PumpkinCarvingIdeas.com, inspired by the image above. These are our suggestions, not instructions from the uploader. This approach to the AI concept has not been tested on a real pumpkin.

From pumpkin to porch

  1. Pick and prep the pumpkin

    Choose a tall, wide pumpkin with a smooth, flat front face and pale, even skin. Cut a wide access hole in the back, not the top, so the lit face stays uninterrupted. Scrape the inside wall behind the eye down to about one inch thick so light passes through when you shade it. An adult should handle all the blades, and work on a stable, well-lit table.

  2. Transfer the eye map

    Tape your stencil over the flat face and mark the outer lid outline, the almond opening, the iris circle, and the pupil dot. Poke the main lines with a pin or transfer tool so you have a guide once the paper comes off. Keep the iris centered and the lids sweeping symmetrically to each corner. Double check the layout is large enough to fill most of the front before you commit.

  3. Sculpt the lids and veins

    Using a loop or gouge, peel just the top skin off the lid folds so they read as raised, wrinkled flesh. Carve the branching veins as shallow channels that peel to the thin pale layer, tapering them toward the corners so they look organic. Vary your depth: deeper peels glow brighter, shallow scratches stay dim. Take your time here, since these fine veins are what hold up to close inspection.

  4. Etch the iris in radial strokes

    Peel the whole iris ring down thin so it will blaze, then drag your fine tool outward from the center in tight radial lines for that fibrous look. Keep a clean, slightly deeper ring at the outer edge of the iris to define it. Leave the pupil in the very center as a raised, untouched dark button of skin so it stays solid black against the glow. Do not cut the pupil through, since the dark relief is what sells the stare.

  5. Open the whites last

    Peel the whites of the eye, the area between iris and lids, thin for a steady mid glow, or cut a couple of narrow slots there if you want it brighter. Save any true cutouts for last so the face stays strong while you carve the delicate parts. Clean up ragged edges with a small detail knife. Test the wall thickness by holding the pumpkin up to a lamp before you finish.

  6. Light it and photograph

    Set a bright battery LED, not a candle, inside and aim it toward the eye so the iris and whites glow evenly. If the center looks dim, prop the light closer to the front wall or add a second LED. Shoot at dusk against a dark porch background so the veins and pupil stand out. Rub a little petroleum jelly on cut edges to slow drying and keep the detail crisp for a few extra days.

Gather your supplies

Check things off as you get ready.

Work on a stable surface, keep your free hand out of the cutting path, and have an adult handle sharp tools.

Three levels of light

  • Leave intact

    The outer eyelid folds, the surrounding pumpkin face, and the raised central pupil stay as untouched skin so they read dark and solid.

  • Peel & shade

    The branching veins and the whites of the eye are peeled to varying thin depths for a soft, uneven mid glow.

  • Cut through

    The thinned iris ring, etched in radial strokes, and any narrow slots in the whites blaze brightest around the dark pupil.

Learn the carving basics

Before you start cutting

How do I keep the pupil dark instead of glowing?

Leave the pupil as a small raised button of untouched skin right in the center of the iris. Because you never peel or cut it, no light passes through and it stays black against the bright iris. Just carve a clean ring around it so its edge stays sharp.

Do I need to cut all the way through anywhere?

Mostly no. This design lives on shading, so you peel skin to different depths rather than opening big holes. You can cut a few narrow slots in the whites for extra brightness, but save those for last and keep them small so the lids and veins stay structurally strong.

How thin should the iris be to glow like that?

Peel the iris down until only a thin, translucent layer of flesh remains, roughly an eighth of an inch. Hold the pumpkin up to a lamp as you go to check the glow is even. Etch your radial strokes into that thinned layer rather than digging all the way through.

Your take belongs here, too.

Changed a detail? Made it simpler? Share a photo of your version and tell the community what worked.

Share your pumpkin

More pumpkins like this

You've reached the end · 8 pumpkins
The Patch Report

Fresh pumpkins, in your inbox.

The best new carvings, ideas worth stealing, and how-tos for carving season. Short, seasonal, and gone by November.

A short email during carving season. Unsubscribe anytime. See our privacy policy.