Halloween Pumpkin Carving Contest · Starts October 1st · $500 in prizes
← Back to ideas
@ai_concepts
Jul 29, 2026
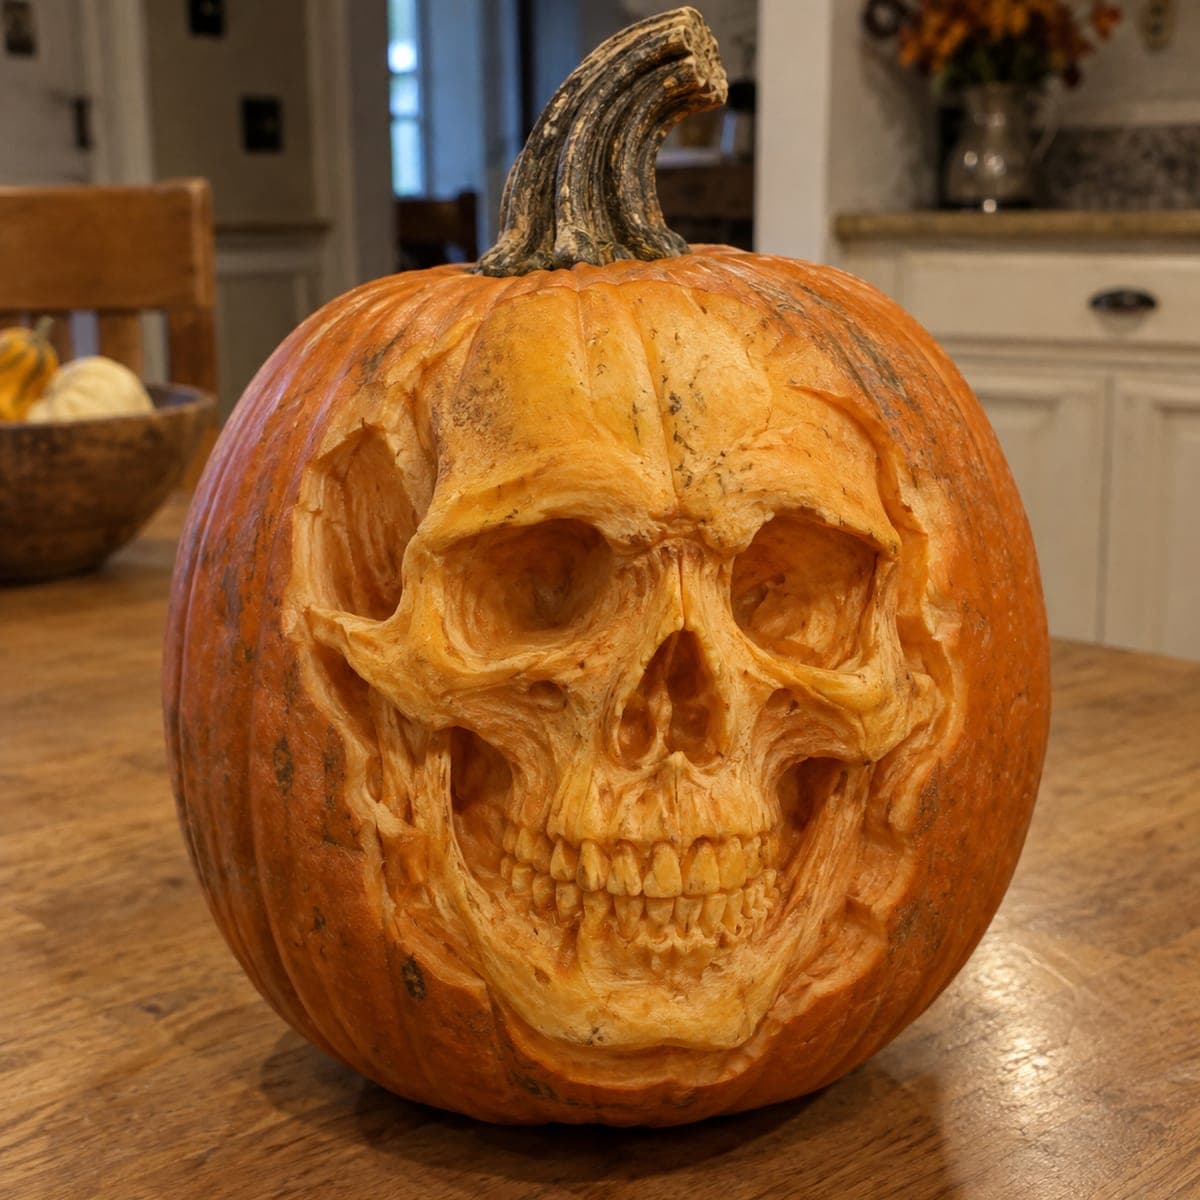
Realistic Human Skull Emerging From a PumpkinAI
0

Realistic Human Skull Emerging From a Pumpkin

A full human skull pushes out of this pumpkin in startling three-dimensional relief, with sunken eye sockets, cheekbones, and two complete rows of individually carved teeth. Carved entirely from the thick outer flesh, it needs no light at all to stop people mid-step. Rough the skull as an egg shape first, sink the sockets and nasal cavity deep for shadow, and save the teeth for the very end with a fine knife.

This is an AI-generated concept image: a realistic, carvable design idea rather than a photo of a finished carve. AI concepts are always labeled and sit out the leaderboard and the contest.

No ratings yet · Sign in to rate
Comments (0)

  • No comments yet — be the first.

Save without an account. Sign in to like or comment.

Our tips for carving a similar design

The whole trick here is sculpting instead of cutting through: the skull is shaped entirely from the thick outer flesh so it reads in three dimensions even with no light behind it. You rough out an egg shape, then carve depth into the sockets and nasal cavity so shadow does the heavy lifting, and leave the teeth for last. Because this is a concept image and no real pumpkin exists, treat it as a target to work toward and keep every thin ridge backed by solid flesh.

Written by PumpkinCarvingIdeas.com, inspired by the image above. These are our suggestions, not instructions from the uploader. This approach to the AI concept has not been tested on a real pumpkin.

From pumpkin to porch

  1. Pick a big pumpkin and plan the skull

    Choose a large pumpkin with a thick, firm wall, since all the detail lives in the outer flesh. Do not cut a lid or gut it fully, because a hollow shell will not support deep relief. Sketch an egg-shaped skull outline on the front with a washable marker, centering the eye sockets, nose, and jaw. Keep the design well inside the widest part of the pumpkin so you have flesh to spare.

  2. Rough out the egg shape

    With a ribbon or loop tool, shave down the skin and top layer of flesh all around your marked outline so the skull begins to stand proud of the background. Work slowly and keep the surface rounded like a real cranium, not flat. Step back often to check symmetry between the two sides. Sweep away shavings so you can read your progress.

  3. Sink the sockets and nasal cavity

    Carve the two eye sockets deep and steep-walled, since their shadow is what makes the face read as a skull. Angle the tool inward so the openings darken as they recede, but stop before you break through the wall. Carve the triangular nasal cavity between and just below them, keeping its edges crisp. Leave a raised ridge between the sockets for the brow and nasal bone.

  4. Shape the cheekbones and brow

    Round the cheekbones outward from below the sockets and pull thin shadow lines under them to suggest hollow cheeks. Define the temples and the ridge of the brow so the forehead catches light. Use a smaller detail tool for the fine transitions where bone meets shadow. Keep every ridge attached to solid flesh underneath so nothing snaps off.

  5. Carve the teeth last with a fine knife

    Mark the upper and lower rows, then carve each tooth individually with a fine, sharp knife handled by an adult. Leave narrow slivers of flesh between teeth as natural bridges so the rows stay strong. Cut shallow grooves rather than punching all the way through, which keeps the jaw sturdy. Save this step for the very end when your hand is warmed up.

  6. Clean up and light it

    Brush out debris, then sharpen any soft shadow lines around the sockets and cheeks. Wipe the carved flesh with a little lemon water to slow browning. This design needs no interior light, but a low warm LED set to the side will deepen the socket shadows for a photo. Shoot it in a dim room so the relief pops.

Gather your supplies

Check things off as you get ready.

Work on a stable surface, keep your free hand out of the cutting path, and have an adult handle sharp tools.

Three levels of light

  • Leave intact

    The uncarved orange skin around the skull and the deepest socket interiors stay dark to frame the face.

  • Peel & shade

    The broad cranium, cheekbones, and brow are shaved to a pale glow that reads as bone.

  • Cut through

    Keep true cutouts minimal; only the very back of the nasal cavity or a hidden side vent should open fully for optional light.

Learn the carving basics

Before you start cutting

Do I need to hollow out the pumpkin for this?

No, and you should not fully hollow it. The skull is sculpted from the thick outer flesh, so a solid wall gives you the depth and support you need. If you want a faint glow, carve a small hidden vent on the side rather than gutting the whole interior.

How do I keep the teeth from breaking off?

Carve them as shallow grooves rather than cutting all the way through, and leave thin slivers of flesh between each tooth as natural bridges. Work with a fine, sharp knife and let an adult handle it. Save the teeth for the very end so the surrounding jaw stays firm while you work everything else.

This is an expert piece. What if my relief looks flat?

Flatness almost always means the sockets and cheek hollows are not deep enough. Shadow is what creates the illusion of bone, so keep sinking the eye sockets and nasal cavity steeper and darker. Step back frequently and view it from a few feet away, since relief reads very differently up close.

Your take belongs here, too.

Changed a detail? Made it simpler? Share a photo of your version and tell the community what worked.

Share your pumpkin

More pumpkins like this

You've reached the end · 8 pumpkins
The Patch Report

Fresh pumpkins, in your inbox.

The best new carvings, ideas worth stealing, and how-tos for carving season. Short, seasonal, and gone by November.

A short email during carving season. Unsubscribe anytime. See our privacy policy.