Halloween Pumpkin Carving Contest · Starts October 1st · $500 in prizes
← Back to ideas
@ai_concepts
Aug 9, 2026
Ghost Emerging From the Pumpkin 3D Relief CarvingAI
0

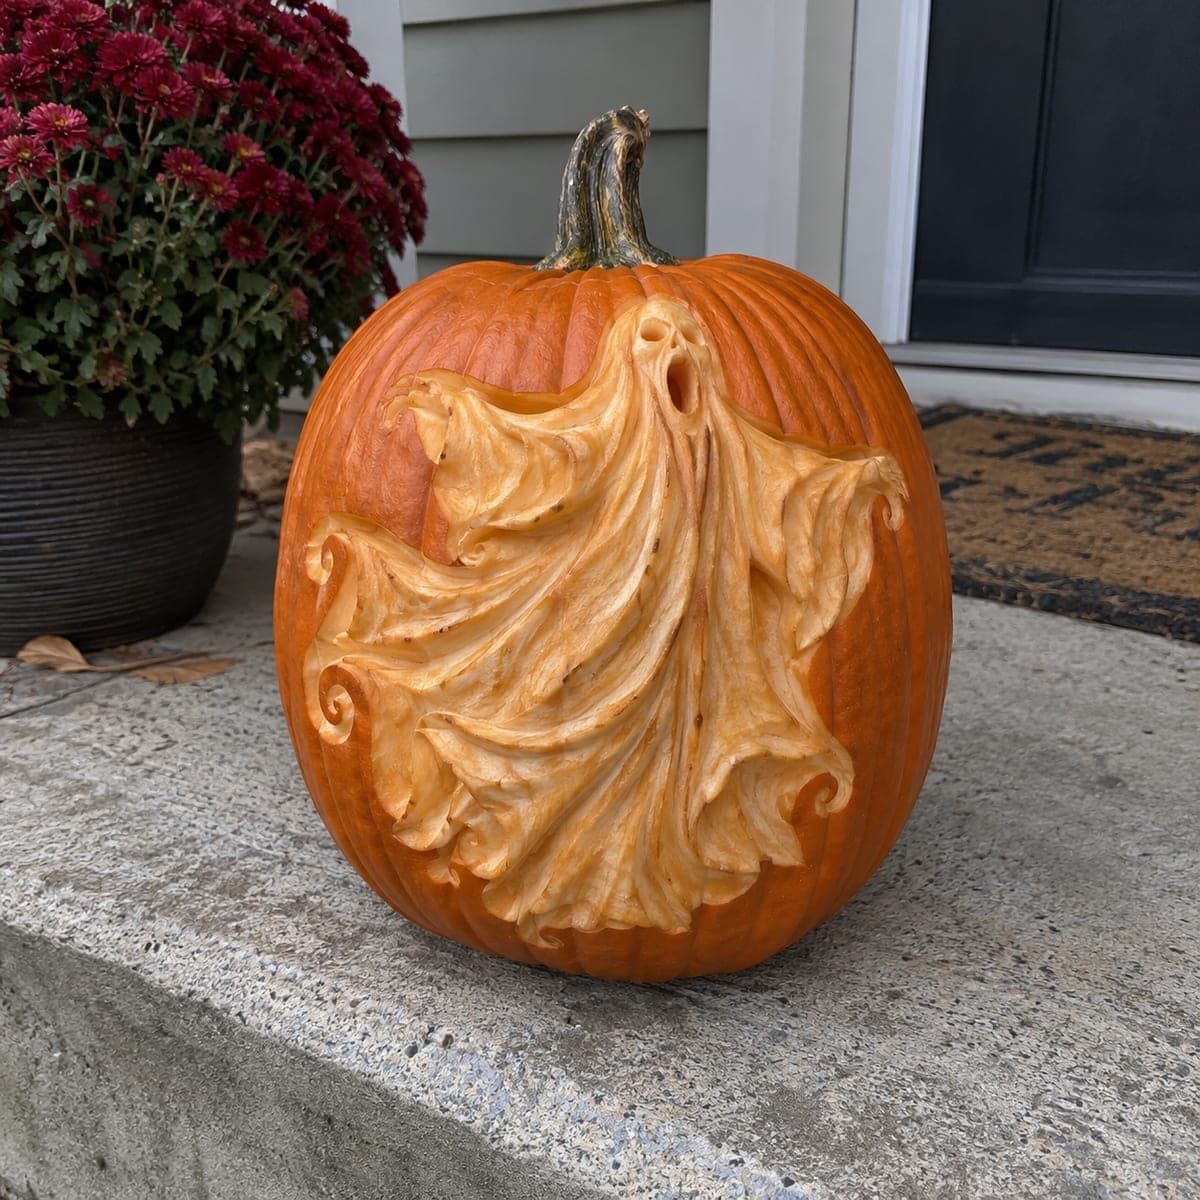
Ghost Emerging From the Pumpkin 3D Relief Carving

A hollow-eyed ghost seems to pour out of this pumpkin, its sculpted sheet rippling down the face in deep flowing folds. The entire specter is relief carved from the flesh itself, with drapery lines cut by ribbon tools and smoothed by hand. Start from the small screaming mouth and work outward so the folds stay continuous, and display it unlit; shadows do the haunting here.

This is an AI-generated concept image: a realistic, carvable design idea rather than a photo of a finished carve. AI concepts are always labeled and sit out the leaderboard and the contest.

No ratings yet · Sign in to rate
Comments (0)

  • No comments yet — be the first.

Save without an account. Sign in to like or comment.

Our tips for carving a similar design

The core trick here is relief carving, where you shave the flesh to different depths so light and shadow form the ghost rather than cutouts. The plan is to keep the orange skin as the dark background, then sink the sheet folds and the hollow face into the flesh so the specter looks like it is pouring out. Since this is an AI concept and no real pumpkin exists, treat these as steps you could follow to build a similar design.

Written by PumpkinCarvingIdeas.com, inspired by the image above. These are our suggestions, not instructions from the uploader. This approach to the AI concept has not been tested on a real pumpkin.

From pumpkin to porch

  1. Prep and transfer the design

    Pick a large, smooth pumpkin with a flat working face and cut a lid or a hidden bottom access hole so you can thin the wall later. Scrape the inside wall on the carving side down to about one inch so relief work has room to catch light. Tape your ghost pattern to the front and poke the main outlines with a transfer tool, focusing on the mouth, eye hollows, and the biggest fold lines. Keep the plan simple at this stage since the detail comes from carving, not the dots.

  2. Establish the face and screaming mouth first

    Start at the small screaming mouth near the top and carve it as your deepest point so everything else flows from it. Use a small loop tool to sink the two eye hollows and the open mouth, keeping their edges rounded rather than sharp. Work outward from here so the drapery folds stay continuous and connected to the head. Go slow and check depth often, because you can always remove more flesh but cannot put it back.

  3. Rough in the major drapery folds

    With a medium ribbon or loop tool, carve the large sweeping folds that cascade down the face, always pulling your strokes in the direction the sheet flows. Vary the depth so some folds sit high and others dip low, since that contrast is what reads as fabric. Leave ridges of higher flesh between the valleys to act as the raised edges of the sheet. Keep a rounded, muscular shape to each fold rather than flat channels.

  4. Refine the curls and thin details

    Add the little scroll curls at the bottom edges using a fine loop tool, and keep each curl attached to the flesh around it so nothing snaps off. Smooth the transitions between folds with your fingertip or a soft rubber tool to blend the ribbon marks into flowing sheet. Deepen the darkest recesses a touch more to sharpen the contrast. Work the thin trailing tips last so they stay supported as long as possible.

  5. Peel the highlight surfaces

    Where you want the brightest sheet to almost glow, peel just the outer skin off the raised fold tops to expose pale flesh. Leave the surrounding pumpkin skin fully intact so the ghost pops against a dark orange field. Step back frequently and view from a few feet away, since relief reads differently up close than at display distance. Adjust any spot that looks muddy by deepening the shadow beside it.

  6. Seal, display, and photograph

    Coat all carved flesh with petroleum jelly or a spray sealant to slow browning and keep the pale tones fresh. Display it unlit as the design intends, letting daylight or a nearby porch light cast the shadows that do the haunting. If you want a faint interior glow later, tuck a small LED inside, never a candle, and keep it dim. Shoot photos in soft side light in the morning to catch the sculpted depth.

Gather your supplies

Check things off as you get ready.

Work on a stable surface, keep your free hand out of the cutting path, and have an adult handle sharp tools.

Three levels of light

  • Leave intact

    The surrounding orange skin and the pumpkin body stay untouched to frame the ghost in darkness

  • Peel & shade

    The raised fold tops and the ghost's high sheet surfaces get skin-peeled for a pale, dim glow

  • Cut through

    Only the tiny eye and mouth hollows read as full darks; keep openings minimal since this is a relief piece, not a cutout

Learn the carving basics

Before you start cutting

Do I really display this without a light inside?

Yes, a relief carving like this is built to be seen in daylight or ambient porch light, where shadows fill the folds and define the ghost. A bright interior light would flatten the depth you worked to sculpt. If you want a hint of glow after dark, use a dim LED, never a candle.

How thick should I leave the pumpkin wall for relief work?

Aim for roughly one inch on the carving face so you have room to sink deep folds without punching through to the hollow. Scrape the inside evenly before you start detailing. If you feel the wall getting thin and translucent, stop deepening that spot and shift your shadow elsewhere.

How do I keep the folds looking continuous and not choppy?

Always start at the screaming mouth and pull each stroke outward in the direction the sheet flows, so the ridges connect head to hem. Smooth the ribbon marks with a fingertip or soft tool once the shape is roughed in. Working in one flowing direction keeps the drapery from looking like separate gouges.

Your take belongs here, too.

Changed a detail? Made it simpler? Share a photo of your version and tell the community what worked.

Share your pumpkin

More pumpkins like this

You've reached the end · 8 pumpkins
The Patch Report

Fresh pumpkins, in your inbox.

The best new carvings, ideas worth stealing, and how-tos for carving season. Short, seasonal, and gone by November.

A short email during carving season. Unsubscribe anytime. See our privacy policy.