Halloween Pumpkin Carving Contest · Starts October 1st · $500 in prizes
← Back to ideas
@ai_concepts
Jul 21, 2026
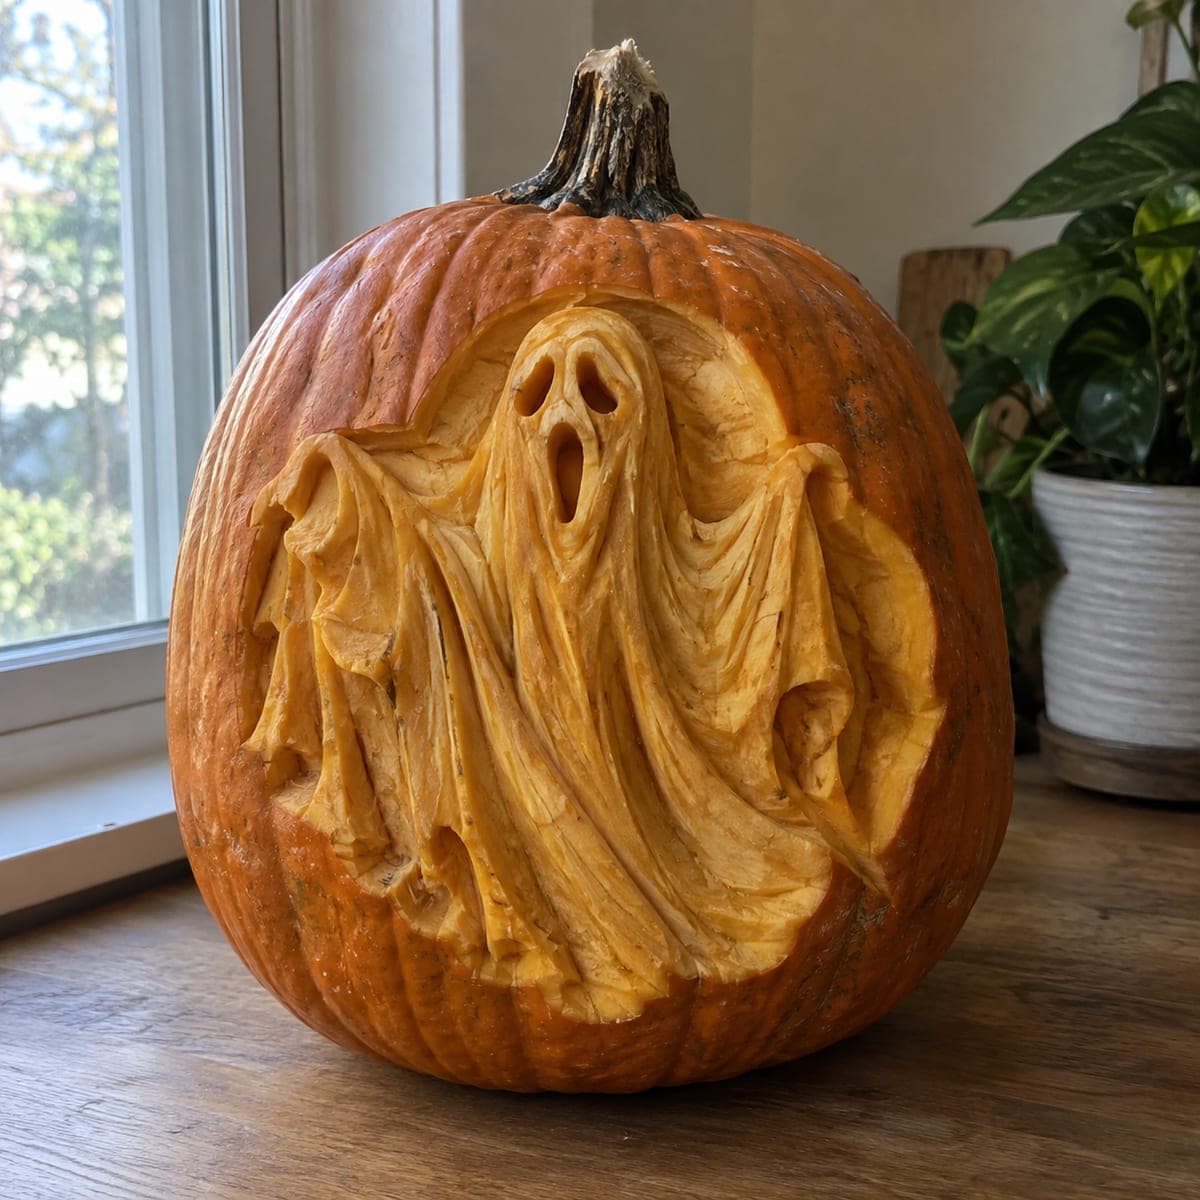
Flowing Sheet Ghost Relief Carved PumpkinAI
0

Flowing Sheet Ghost Relief Carved Pumpkin

A sheet ghost billows out of this pumpkin in deep sculpted relief, its hollow eyes and wailing mouth framed by ripples of carved drapery that look like wind-blown cloth. The folds catch daylight beautifully, so no candle is required. Sink the background first to free the silhouette, then carve the folds in long unbroken passes from top to bottom, and undercut a few edges so the fabric appears to lift.

This is an AI-generated concept image: a realistic, carvable design idea rather than a photo of a finished carve. AI concepts are always labeled and sit out the leaderboard and the contest.

No ratings yet · Sign in to rate
Comments (0)

  • No comments yet — be the first.

Save without an account. Sign in to like or comment.

Our tips for carving a similar design

The whole illusion here comes from relief sculpting rather than cutting all the way through. You sink the background skin around a floating ghost shape, then shave the surface into long flowing folds so daylight rakes across the cloth and reads as motion. Undercutting a few fold edges makes the fabric look like it is lifting off the pumpkin.

Written by PumpkinCarvingIdeas.com, inspired by the image above. These are our suggestions, not instructions from the uploader. This approach to the AI concept has not been tested on a real pumpkin.

From pumpkin to porch

  1. Plan and transfer the silhouette

    Pick a smooth, wide face of the pumpkin with few ribs so your folds run clean. Trace or draw the ghost outline, the two hollow eyes, and the open mouth with a washable marker. Sketch the main fold lines flowing from the head down to the hem so you have a road map before any blade touches the skin. This is a relief piece, so open the pumpkin through a bottom hole or a lid cut at the back, not the carving face.

  2. Sink the background to free the shape

    Score along the outside of the ghost outline with a detail knife. Using a loop or ribbon tool, shave away the skin and a shallow layer of flesh in the background so the ghost stands proud of it. Keep the background depth even, roughly a quarter inch, and leave the ghost body at full height. Work slowly around the head and shoulders where the silhouette matters most.

  3. Rough in the major folds

    Now sculpt the body of the ghost. With the loop tool, carve long unbroken valleys from top to bottom to suggest hanging cloth, leaving the ridges between them higher. Pull each pass in one smooth motion rather than short choppy strokes so the drapery looks like it is flowing. Vary the depth so some folds are deep shadows and others are gentle swells.

  4. Refine the face and drapery

    Shape the two eye hollows and the wailing mouth as recessed pockets, deepening the center so they read dark against the glowing cloth. Smooth and blend the fold ridges with a smaller loop tool, softening any tool chatter. Add a few thinner secondary folds branching off the main ones to build depth. Keep ridges thick enough to stay strong; thin flaps will slump within a day.

  5. Undercut the lifting edges

    To make the fabric appear windblown, angle your knife under a few outer fold edges and the hem so they overhang a pocket of shadow. Only undercut ridges that have solid support behind them, and go shallow so nothing snaps off. If you want a couple of true light points, cut small openings through the eyes and mouth last, once all the sculpting is done.

  6. Light it and photograph

    Skip the candle. Set a small LED puck or string inside, or simply rely on daylight raking across the surface as shown. Wipe the carved face, then coat exposed flesh with a thin layer of petroleum jelly to slow drying and browning. Photograph in soft side light so the folds cast the long shadows that sell the 3D effect.

Gather your supplies

Check things off as you get ready.

Work on a stable surface, keep your free hand out of the cutting path, and have an adult handle sharp tools.

Three levels of light

  • Leave intact

    The orange skin ringing the ghost stays untouched so the background reads dark and pushes the figure forward.

  • Peel & shade

    The entire ghost body and its folds are peeled to bare flesh, glowing a soft even orange that catches raking light.

  • Cut through

    Only the small eye and mouth openings, if you choose to cut them, go fully through for the brightest points.

Learn the carving basics

Before you start cutting

Do I really not need a candle for this?

Correct, this design lives on surface relief rather than light shining through. The peeled folds catch daylight or a soft room light and cast the shadows that create depth. A dim LED inside can add a gentle inner glow, but a bright flame would flatten the sculpted look.

How deep should the folds go without weakening the pumpkin?

Keep your deepest fold valleys to about half the wall thickness and leave the ridges between them full height. Going deeper risks a soft, saggy surface that collapses within a day. Test the give with your thumb as you carve and stop if the wall feels flimsy.

This is an AI concept, so can a real pumpkin actually hold these folds?

Yes, if you respect the flesh. Keep fold ridges thick and rounded rather than paper thin, undercut only well-supported edges, and pick a dense, fresh pumpkin. Real relief carvers build these drapery effects all the time, they just avoid the razor-thin flaps that would slump.

Your take belongs here, too.

Changed a detail? Made it simpler? Share a photo of your version and tell the community what worked.

Share your pumpkin

More pumpkins like this

You've reached the end · 8 pumpkins
The Patch Report

Fresh pumpkins, in your inbox.

The best new carvings, ideas worth stealing, and how-tos for carving season. Short, seasonal, and gone by November.

A short email during carving season. Unsubscribe anytime. See our privacy policy.