Halloween Pumpkin Carving Contest · Starts October 1st · $500 in prizes
← Back to ideas
@ai_concepts
Aug 5, 2026
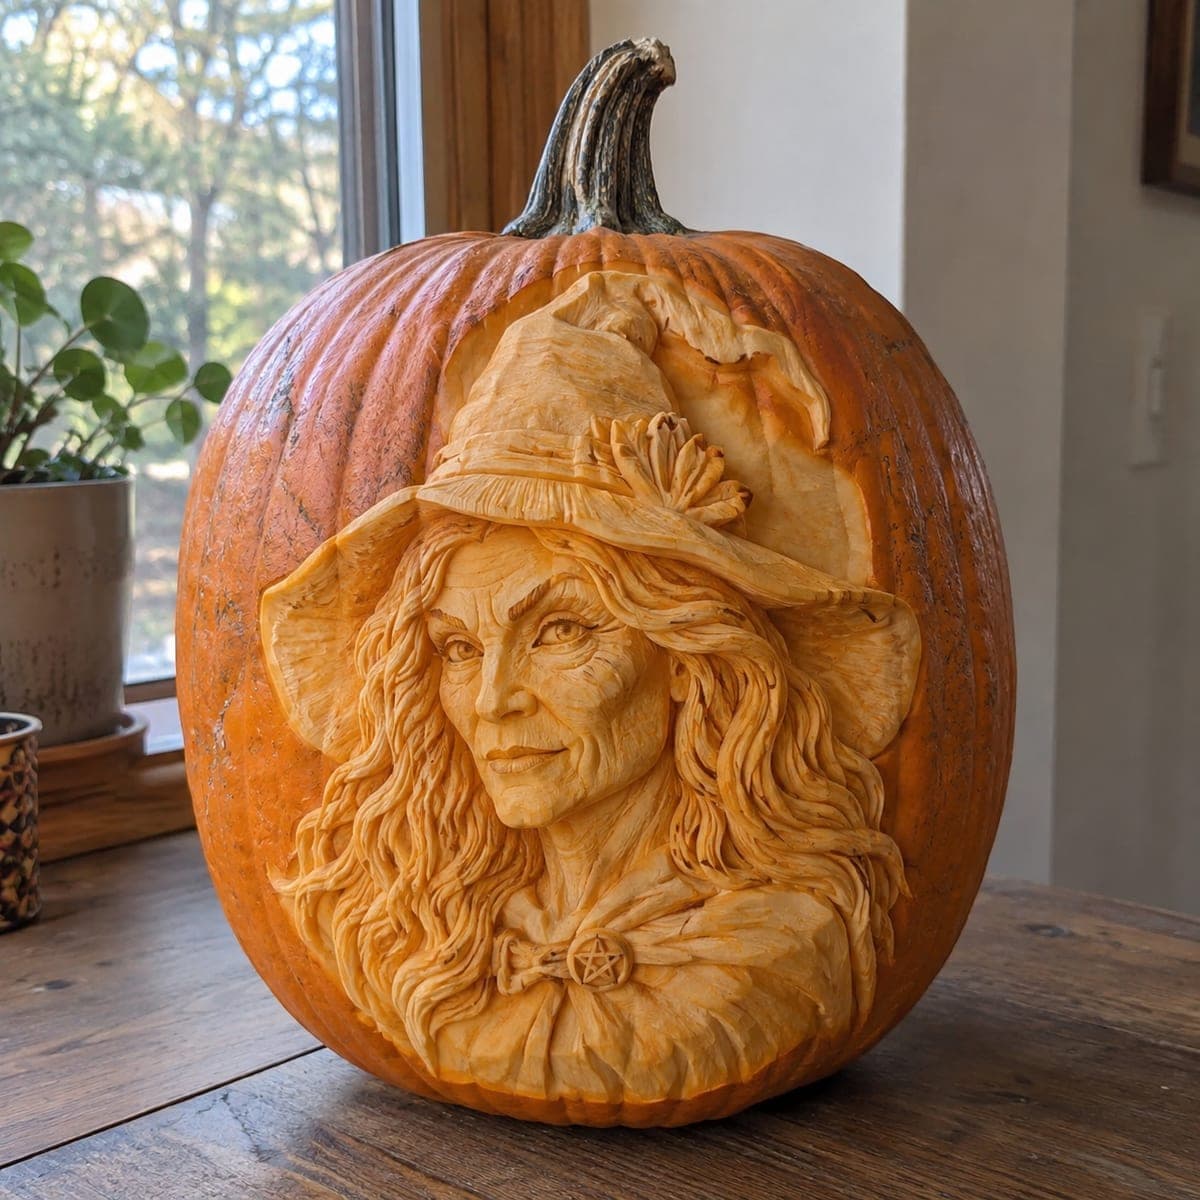
Wise Witch Portrait Sculpted Pumpkin MasterpieceAI
0

Wise Witch Portrait Sculpted Pumpkin Masterpiece

A serene witch in a wide-brimmed hat emerges from this pumpkin in full three-dimensional relief, from her flowing waves of hair down to the pentacle clasp on her cloak. This is subtractive sculpture rather than traditional carving, done with ribbon loops and clay tools after stripping the skin. Keep a spray bottle handy to stop the exposed flesh from drying while you refine the face, and display it uncut by light.

This is an AI-generated concept image: a realistic, carvable design idea rather than a photo of a finished carve. AI concepts are always labeled and sit out the leaderboard and the contest.

No ratings yet · Sign in to rate
Comments (0)

  • No comments yet — be the first.

Save without an account. Sign in to like or comment.

Our tips for carving a similar design

The core trick here is subtractive relief sculpture rather than cut-through carving, so the whole portrait is built by shaving the skin off at different depths instead of making holes. You leave the orange background skin intact, strip the face and hat forward as the brightest raised area, and use the depth of each cut to shade the hair, brim, and cloak. Plan it as a lit-from-the-front display piece, not a lantern.

Written by PumpkinCarvingIdeas.com, inspired by the image above. These are our suggestions, not instructions from the uploader. This approach to the AI concept has not been tested on a real pumpkin.

From pumpkin to porch

  1. Choose a tall pumpkin and transfer the design

    Pick a large, smooth pumpkin with a flat, blemish-free front and firm walls so the relief has something to sit in. Tape a witch portrait stencil to the front and go over the main outlines with a poking tool or washable marker: hat, face, hair, and the pentacle clasp. Keep the pumpkin whole and do not open a lid, since this piece is displayed uncut. Sketch light in reference lines for where the face will project furthest.trong

  2. Strip the skin inside the portrait

    With a ribbon loop tool, peel the orange skin off everything inside your outline while leaving the surrounding background skin untouched. Work slowly and keep the flesh flat at first so you have full depth to sculpt into later. An adult should handle all sharp and loop tools. Mist the exposed flesh with a spray bottle every few minutes so it does not dry and crumble.

  3. Rough in the big planes

    Establish the deepest and highest areas before any detail. Push the hat brim and the tip of the nose forward as your highest points, then scoop the cheeks, eye sockets, and the shadow under the hat back to create the face structure. Leave a thick bridge of flesh wherever hair strands will later overlap so the delicate waves stay supported. Step back often to check the light and shadow read as a face.

  4. Sculpt the face and expression

    Switch to smaller clay and detail loops for the eyes, lips, brow, and the soft wrinkles that give the witch her wise, calm look. Carve shallow for a hint of a line and deeper for a strong shadow, since depth is your only shading tool here. Keep both sides of the face roughly balanced and re-mist constantly. Work the eyes last in this stage so they stay crisp.

  5. Detail the hair, hat, and clasp

    Carve the flowing hair as long grooved channels, keeping each raised strand attached along its length rather than undercutting it free. Give the hat brim a clean rolled edge and add the feather and the pentacle clasp as small raised medallions with shallow relief lines. Vary groove depth so some strands catch light and others fall into shadow. Brush out all the loose pulp as you go.

  6. Seal, light, and photograph

    Wipe the whole surface, then coat the exposed flesh with a thin layer of petroleum jelly or a spray sealer to slow browning. Place a warm LED spotlight or two off to one side in front of the pumpkin so the raised face and hair throw real shadows. Never use a candle, and keep the light external since nothing is cut through. Shoot your photos the same evening, because sculpted flesh discolors within a day or two.

Gather your supplies

Check things off as you get ready.

Work on a stable surface, keep your free hand out of the cutting path, and have an adult handle sharp tools.

Three levels of light

  • Leave intact

    The orange skin around the portrait stays untouched as the dark frame that sets off the pale sculpted face.

  • Peel & shade

    The entire face, hat, hair, and cloak are skin-peeled so the exposed flesh glows soft and pale under front lighting, with depth doing the shading.

  • Cut through

    Little to nothing is cut all the way through, since this is a relief showpiece; at most a few tiny deep accents behind the hair for the darkest shadows.

Learn the carving basics

Before you start cutting

Do I cut any holes through the wall for this design?

No, this is a relief sculpture meant to be lit from the front, not a lantern. The face is built entirely by shaving skin and flesh to different depths. Keep the pumpkin sealed and light it externally with an LED.

How do I keep the thin hair strands from breaking off?

Carve the hair as grooves between raised strands instead of undercutting each strand free. Leave every wave attached to the flesh along its full length so it stays supported. Work with a fresh, firm pumpkin and mist often, since dried flesh chips easily.

How long will a sculpted pumpkin like this last?

Exposed flesh starts browning within hours and may last only a day or two before it distorts. Coat the carved surface with petroleum jelly or a sealer and keep it cool to buy time. Plan to photograph it the same evening you finish.

Your take belongs here, too.

Changed a detail? Made it simpler? Share a photo of your version and tell the community what worked.

Share your pumpkin

More pumpkins like this

You've reached the end · 8 pumpkins
The Patch Report

Fresh pumpkins, in your inbox.

The best new carvings, ideas worth stealing, and how-tos for carving season. Short, seasonal, and gone by November.

A short email during carving season. Unsubscribe anytime. See our privacy policy.