Halloween Pumpkin Carving Contest · Starts October 1st · $500 in prizes
← Back to ideas
@ai_concepts
Sep 1, 2026
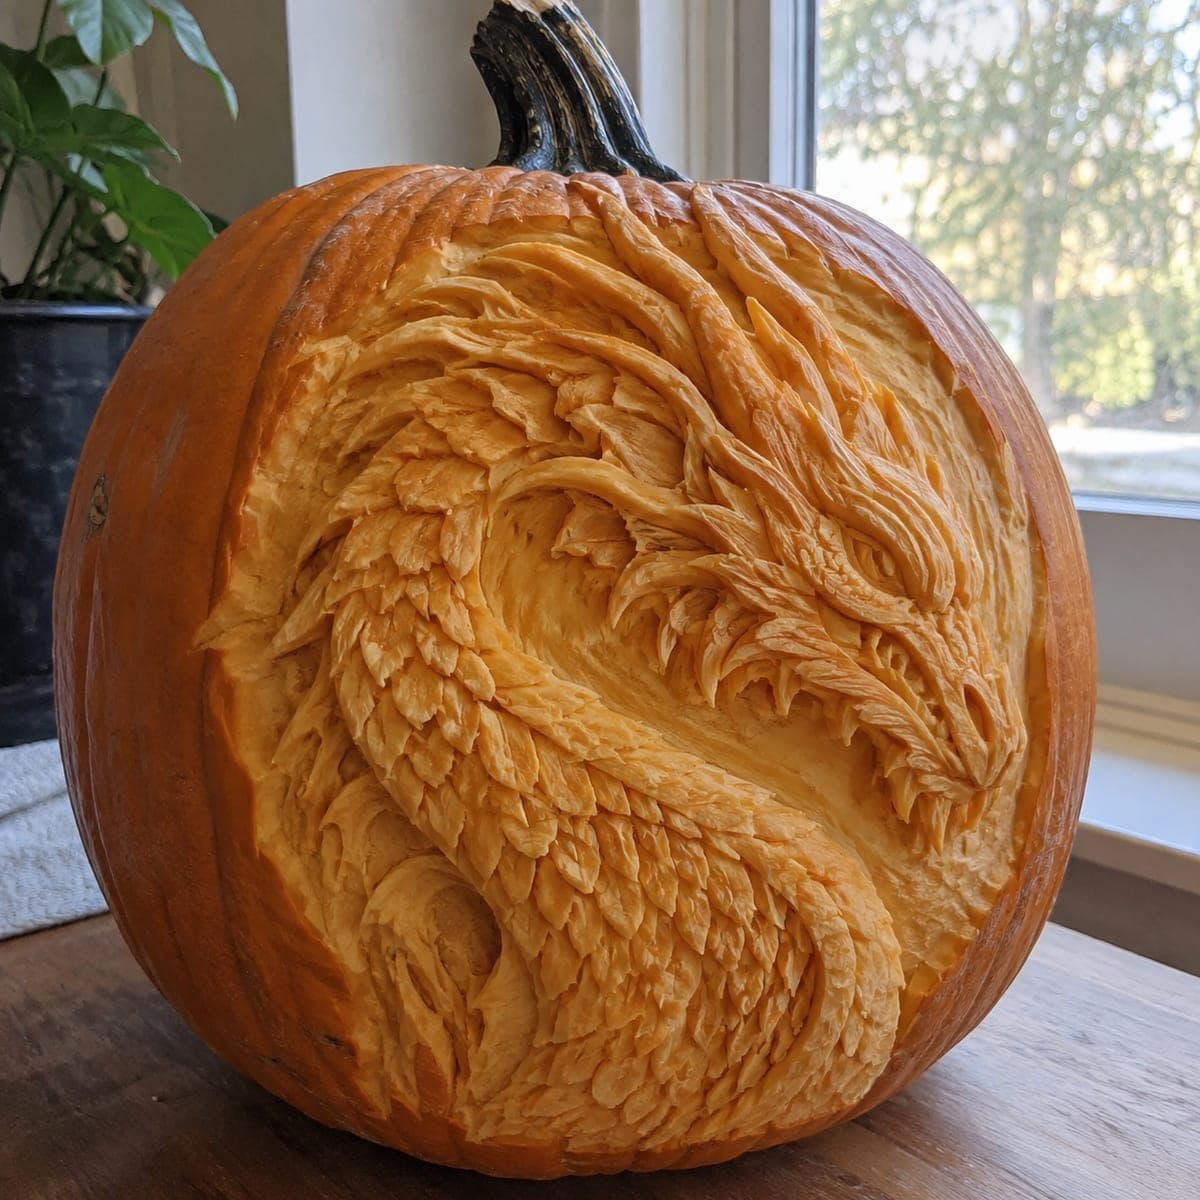
Sculpted Dragon Head Relief Pumpkin MasterpieceAI
0

Sculpted Dragon Head Relief Pumpkin Masterpiece

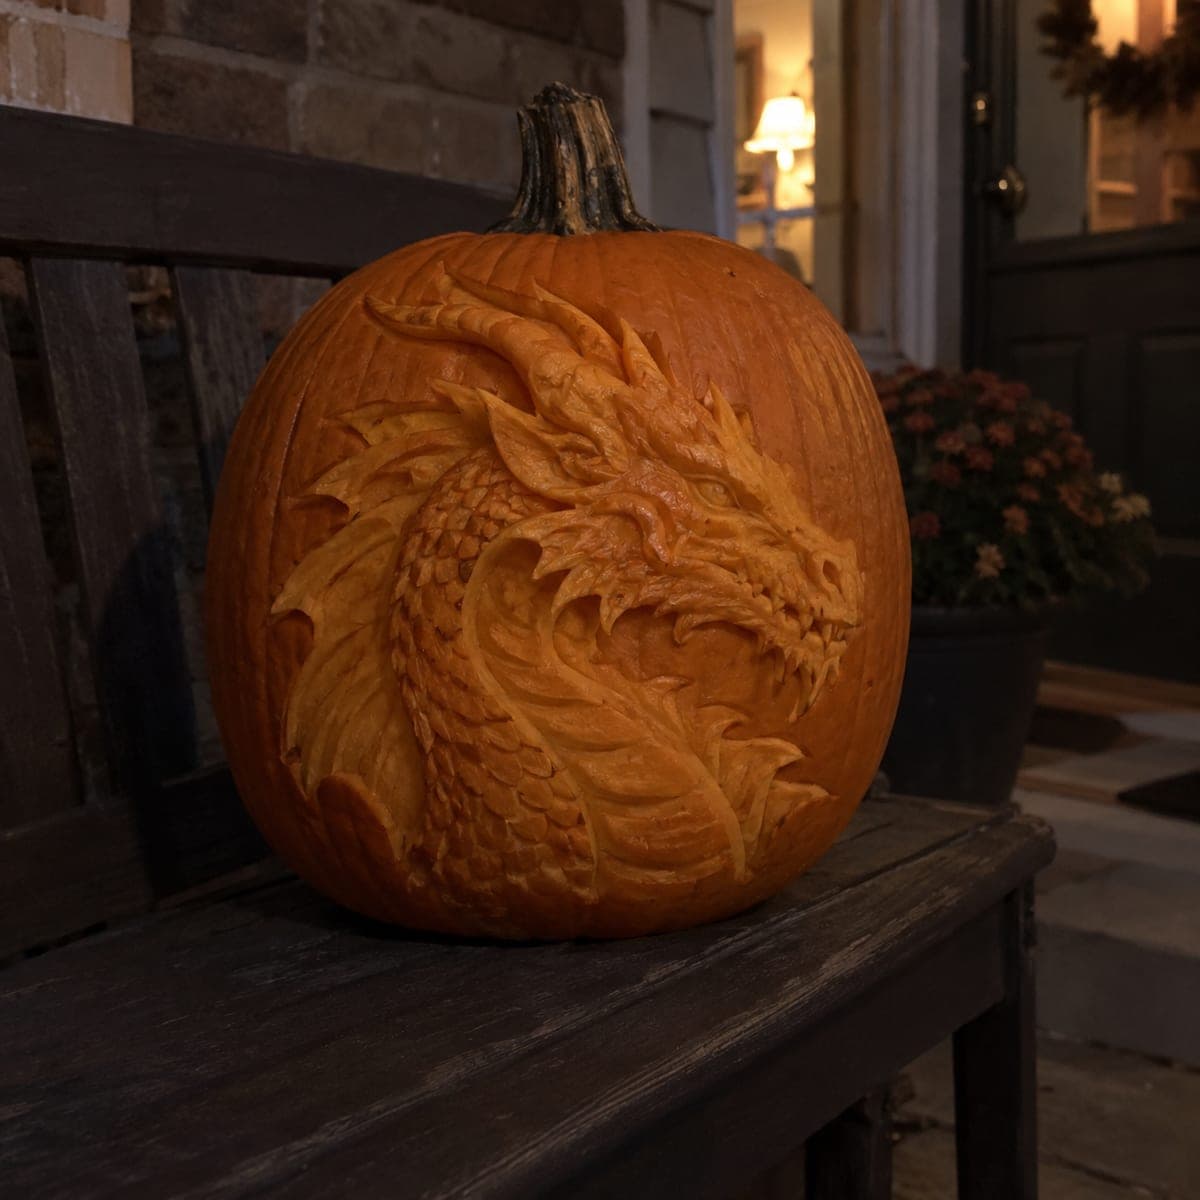
A dragon's head erupts from this pumpkin in deep sculpted relief, with layered horns, frilled spines, and individually carved scales flowing around the side. This is 3D pumpkin sculpting rather than flat carving, done with clay ribbon tools and loop knives on a thick-walled pumpkin. Rough out the big forms of the skull and frill before touching any scales, and mist the surface with water as you work to keep the flesh from drying.

This is an AI-generated concept image: a realistic, carvable design idea rather than a photo of a finished carve. AI concepts are always labeled and sit out the leaderboard and the contest.

No ratings yet · Sign in to rate
Comments (0)

  • No comments yet — be the first.

Save without an account. Sign in to like or comment.

Our tips for carving a similar design

The core trick here is subtractive relief sculpting rather than cut-through carving, so almost nothing is fully hollowed out. You shave the skin away in graduated depths, leaving the raised skull and horns closest to the surface and carving the frill and scales deeper behind them. Because this is an AI concept and no real pumpkin exists, treat these as ideas for how you could build a similar piece on a heavy, thick-fleshed carving pumpkin.

Written by PumpkinCarvingIdeas.com, inspired by the image above. These are our suggestions, not instructions from the uploader. This approach to the AI concept has not been tested on a real pumpkin.

From pumpkin to porch

  1. Pick a thick pumpkin and open the bottom

    Choose a large pumpkin with a deep, dense wall, since relief sculpting eats into the flesh instead of cutting through it. Cut your access hole in the bottom, not the top, so the stem stays intact and the pumpkin sits flat on a bench. Scrape the inside wall on the carving side down to a uniform thickness so you have room to sculpt. Set an LED light inside to check how thin your deepest cuts are getting as you go.

  2. Transfer and rough out the big forms

    Sketch or transfer the dragon silhouette, marking the snout, brow, horns, and the sweep of the frill. Using a loop tool, remove the skin and shave down the background around the head first, so the whole dragon sits proud of the surface. Block in the largest masses, the skull and the main horn shapes, before you touch any fine detail. Keep the snout and brow as the highest points and let everything else step back from there.

  3. Carve the horns, frill, and jaw

    Refine the layered horns and the frilled spines with a small loop and a ribbon tool, undercutting slightly so each layer casts its own shadow. Leave a bit of extra thickness where thin horn tips and frill points meet the body so they stay supported and do not snap off. Shape the jaw line and the eye socket, keeping the eye recessed for depth. Mist the surface with water every so often to stop the exposed flesh from drying and cracking.

  4. Sculpt the flowing scales

    Once the big forms read as a dragon, start the scales along the neck and cheek, working in overlapping rows that follow the curve of the body. Use the tip of a small loop or a lino-style gouge to carve each scale as a shallow scoop with a raised edge. Vary the scale size, larger near the jaw and smaller toward the frill, to keep the flow natural. Work in sections and step back often, since scale patterns are easy to overcrowd.

  5. Vary depth for shading

    This design gets its dimension from depth, not paint, so push your deepest scoops thin enough to let a soft glow through while leaving the raised skull mostly solid. Feather the transitions between deep and shallow areas so light fades gradually across the face. Do any true cut-throughs, like a bright slit in the eye or a gap between horns, last, after all the delicate sculpting is done. Keep checking with the interior light so you do not accidentally break through a raised area.

  6. Light it and photograph

    Drop in a warm LED, ideally two small ones angled to graze across the relief from the side. Side lighting exaggerates the shadows in the scales and frill far better than a single center light. Set the pumpkin on a porch bench, wipe away loose pulp, and shoot in low ambient light so the sculpted texture pops. Mist it lightly before photos to bring back that fresh, glossy look.

Gather your supplies

Check things off as you get ready.

Work on a stable surface, keep your free hand out of the cutting path, and have an adult handle sharp tools.

Three levels of light

  • Leave intact

    The raised skull, snout, and brow stay near full skin thickness so they read as the darkest, most solid mass.

  • Peel & shade

    The scales, frill, and cheek get shaved to mid depth so they glow a soft orange and show their shadows.

  • Cut through

    Only tiny accents like the eye slit or a gap between horn layers get cut fully through for a bright spark.

Learn the carving basics

Before you start cutting

Do I need to cut all the way through anywhere?

Almost never on a piece like this. It is a relief sculpture, so the effect comes from carving different depths into the wall, not from open holes. Save any true cut-throughs, like a bright eye, for the very end so the surrounding flesh stays strong while you work.

How do I keep the horns and frill tips from breaking off?

Leave a little extra thickness where thin points join the body and avoid fully undercutting them. Think of each horn as attached along its whole base rather than sticking out on a fragile stem. If a tip does snap, you can often reshape it slightly shorter and keep going.

How long will a sculpted pumpkin like this last?

Exposed flesh dries fast, so a detailed relief may only look its best for a day or two. Mist it with water and keep it cool and out of direct sun between viewings. For a big time investment like this, many carvers plan to shoot photos the same night they finish.

Your take belongs here, too.

Changed a detail? Made it simpler? Share a photo of your version and tell the community what worked.

Share your pumpkin

More pumpkins like this

You've reached the end · 8 pumpkins
The Patch Report

Fresh pumpkins, in your inbox.

The best new carvings, ideas worth stealing, and how-tos for carving season. Short, seasonal, and gone by November.

A short email during carving season. Unsubscribe anytime. See our privacy policy.