Halloween Pumpkin Carving Contest · Starts October 1st · $500 in prizes
← Back to ideas
@ai_concepts
Aug 22, 2026
Sculpted Dragon Relief Pumpkin MasterpieceAI
0

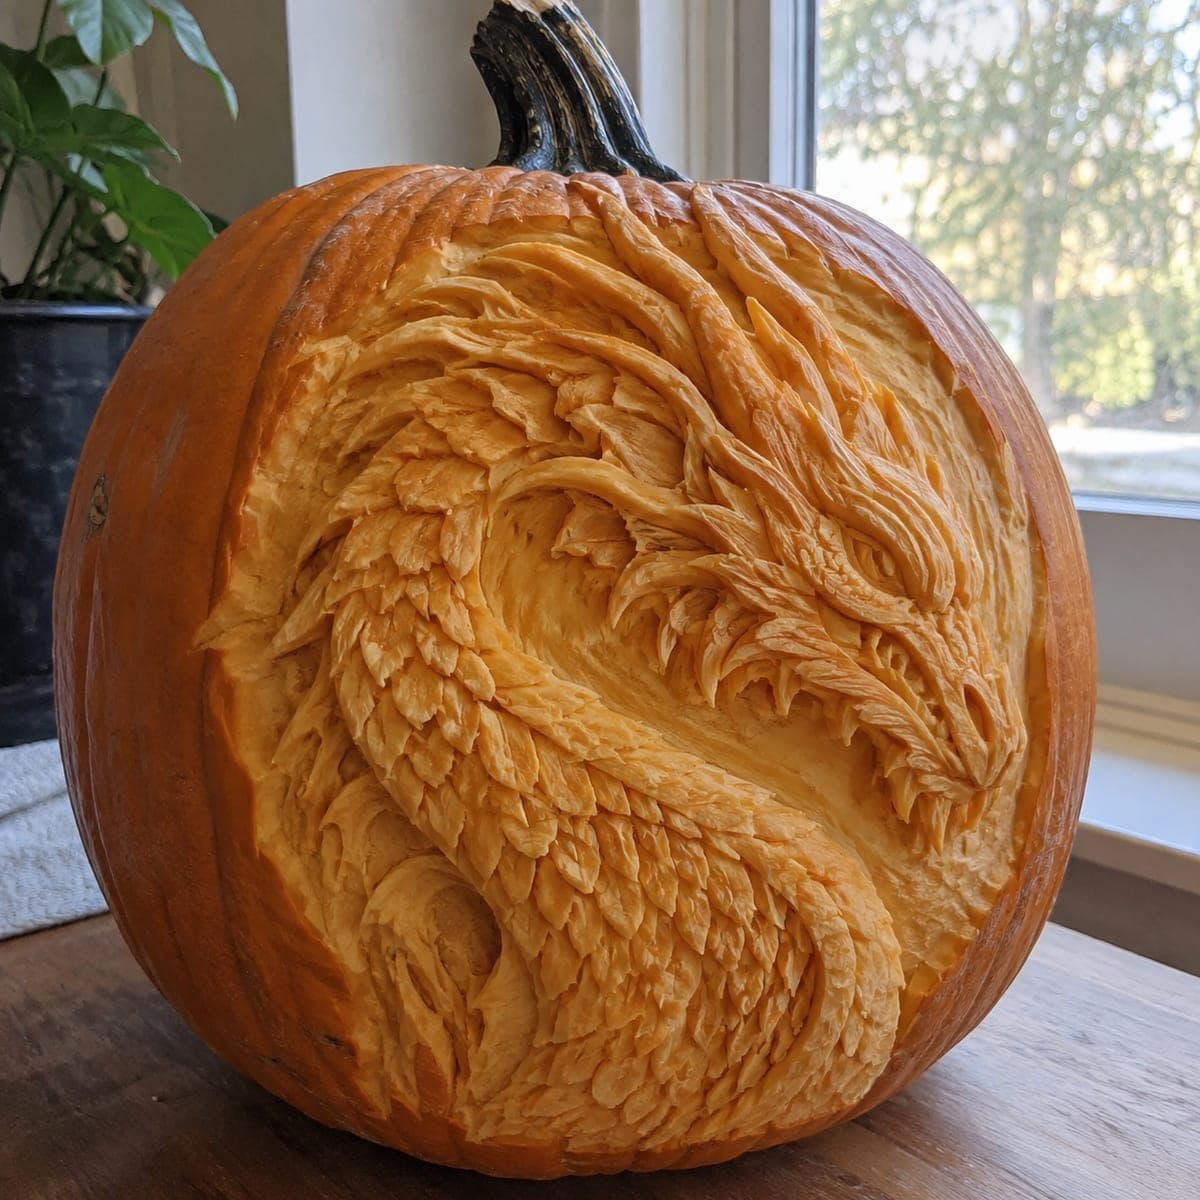
Sculpted Dragon Relief Pumpkin Masterpiece

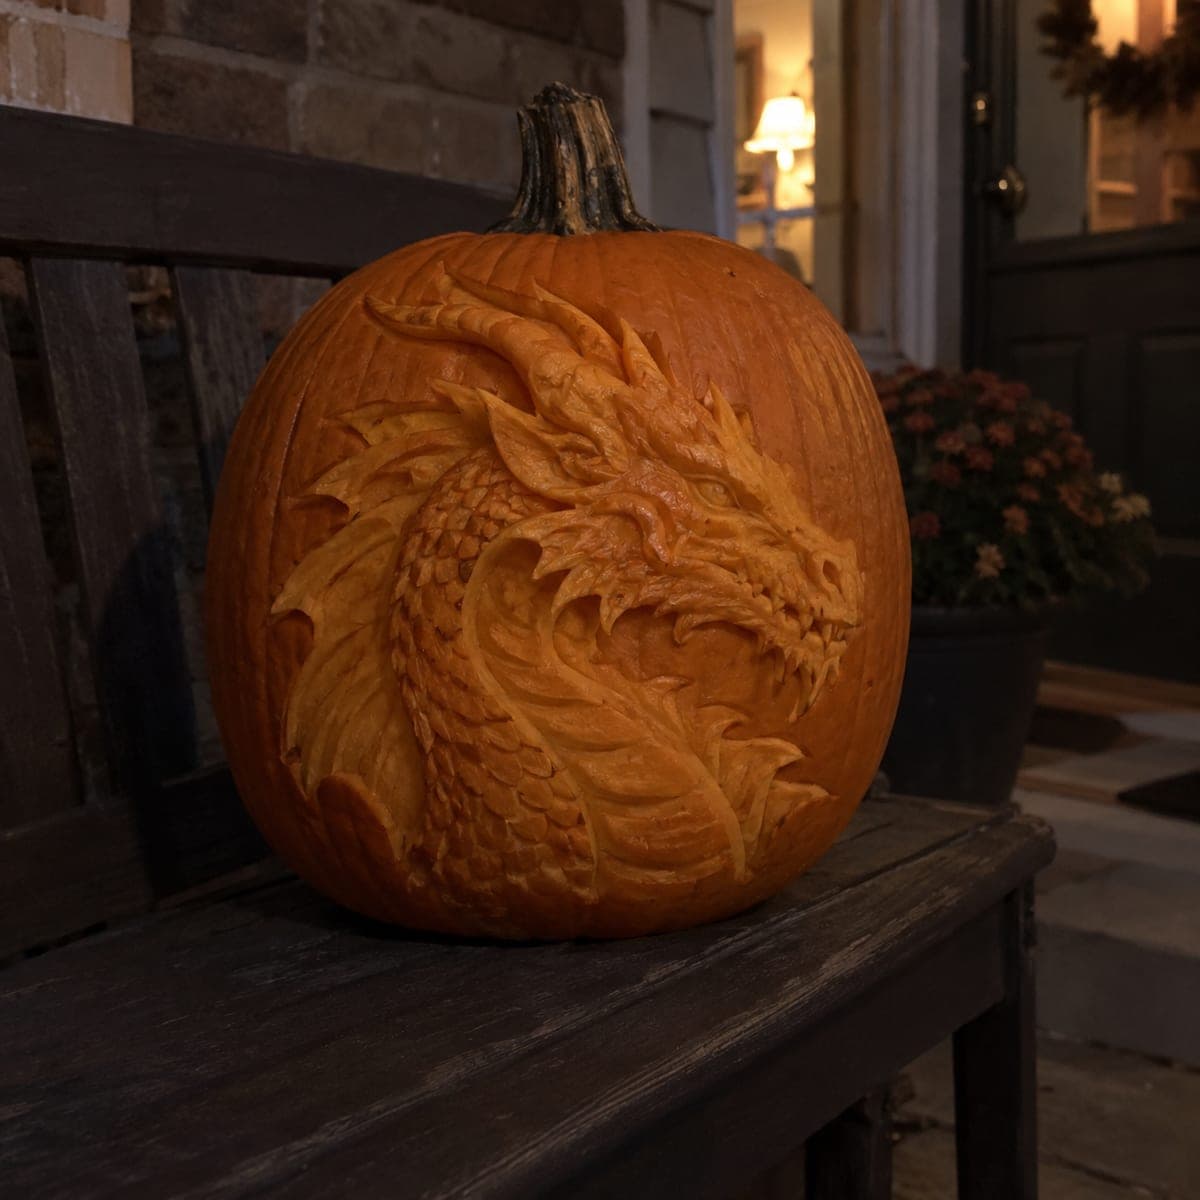
A dragon's head and coiling, feather-scaled neck sweep across this pumpkin in full sculptural relief, with horns, brow ridges, and layered plumage carved from the pale flesh. Work of this caliber means removing the entire background to a uniform depth, then modeling the creature with ribbon loops and a detail knife over many hours. Study the highest points, the snout and brow, and leave them tallest from the start. Display it unlit near a window so raking light throws shadows.

This is an AI-generated concept image: a realistic, carvable design idea rather than a photo of a finished carve. AI concepts are always labeled and sit out the leaderboard and the contest.

No ratings yet · Sign in to rate
Comments (0)

  • No comments yet — be the first.

Save without an account. Sign in to like or comment.

Our tips for carving a similar design

The core trick here is pumpkin relief sculpture, where you shave away the entire background to one even depth and leave the dragon standing proud of the flesh. You model the head and neck like clay, keeping the snout and brow ridges as the tallest points and letting everything else step down from there. Because this is an AI concept image, no real pumpkin exists, but you could recreate a similar look over several patient hours with loop tools and a detail knife.

Written by PumpkinCarvingIdeas.com, inspired by the image above. These are our suggestions, not instructions from the uploader. This approach to the AI concept has not been tested on a real pumpkin.

From pumpkin to porch

  1. Pick a thick-walled pumpkin and gut it well

    Choose a large pumpkin with a smooth, blemish-free face and the thickest wall you can find, since relief carving eats into that depth. Cut a lid from the bottom rather than the top so the stem stays intact for looks. Scrape the inside wall on the carving side down to a clean, even thickness so your relief has room. Wipe the face dry before you transfer any pattern.

  2. Transfer the outline and set your background depth

    Trace or draw the dragon's head, neck, and coiling body onto the skin, marking the snout and brow as your highest zones. Score the full outline with a detail knife so you have a clean edge to carve against. Then peel the background skin away and shave it down to one uniform depth across the whole face using a large ribbon loop. Keep checking that the background stays flat and even, because inconsistent depth will read as a mistake later.

  3. Rough in the big forms first

    Before any scales, block out the major masses: the wedge of the head, the tube of the neck, and the sweep of the tail. Round these shapes with a loop tool so light will wrap around them smoothly. Leave the snout and brow standing tallest, and step the neck and body slightly lower so the head reads as closest to the viewer. Resist adding detail until these large volumes look right from a few feet away.

  4. Carve the horns, brow, and face

    Switch to a fine detail knife for the horns, brow ridges, and eye socket, working slowly since these are the focal point. Keep horns short and thick at the base rather than long and thin so they do not snap off. Undercut gently beneath the jaw and brow to throw a shadow and make features pop. Take your time here; the face sells the whole piece.

  5. Layer the feather-scale texture

    Work the plumage and scales from the head backward, carving each row so it slightly overlaps the one behind it like roof shingles. Use a small U-gouge or the tip of your detail knife to lift each scale edge, keeping them attached at the base so nothing flakes free. Vary the scale size, larger over the body and finer near the face, to add realism. This is the longest stage, so keep your blade sharp and take breaks to stay precise.

  6. Clean up and light it for the photo

    Go back over the whole surface to sharpen soft edges and even out any rough shaving marks. Brush away crumbs and lightly mist the flesh with water to keep it from drying and curling. Since this is a relief with no openings, skip the inside light and instead set it near a window so raking daylight rakes across the scales and casts deep shadows. Photograph it fresh, as this style looks best within a day or two before the surface oxidizes.

Gather your supplies

Check things off as you get ready.

Work on a stable surface, keep your free hand out of the cutting path, and have an adult handle sharp tools.

Three levels of light

  • Leave intact

    The untouched orange rind around the very edge of the face and the intact stem, which stay darkest and frame the sculpture.

  • Peel & shade

    The whole dragon body and the shaved-down background, where the exposed pale flesh glows warm under raking daylight.

  • Cut through

    Little to none on this relief; only the deepest gouges under the jaw and between overlapping scales, carved for shadow rather than to punch through the wall.

Learn the carving basics

Before you start cutting

Do I need to cut all the way through the pumpkin anywhere?

No, this is a relief sculpture, so almost everything is shaving and modeling rather than punching through the wall. The dark shadows come from deep gouges and undercuts, not open holes. Keep the wall intact so the piece stays strong and reads as solid sculpture.

How thick should the pumpkin wall be for this?

Thicker is better, ideally an inch or more, since relief carving removes a lot of flesh across the whole background. Scrape the inside down to an even thickness first so you know exactly how much depth you have to work with. If the wall is thin, keep your background shallow so you do not accidentally break through.

How do I keep the horns and scale edges from breaking off?

Keep horns short and thick at the base rather than long and delicate, and leave every scale attached along its bottom edge instead of fully freeing it. Work with a very sharp detail knife so you shave rather than pry, which is what usually snaps fine details. Mist the surface with water now and then to keep the flesh firm and less brittle.

Your take belongs here, too.

Changed a detail? Made it simpler? Share a photo of your version and tell the community what worked.

Share your pumpkin

More pumpkins like this

You've reached the end · 8 pumpkins
The Patch Report

Fresh pumpkins, in your inbox.

The best new carvings, ideas worth stealing, and how-tos for carving season. Short, seasonal, and gone by November.

A short email during carving season. Unsubscribe anytime. See our privacy policy.