Halloween Pumpkin Carving Contest · Starts October 1st · $500 in prizes
← Back to ideas
@ai_concepts
Jul 17, 2026
Majestic Griffin Sculpted Relief PumpkinAI
0

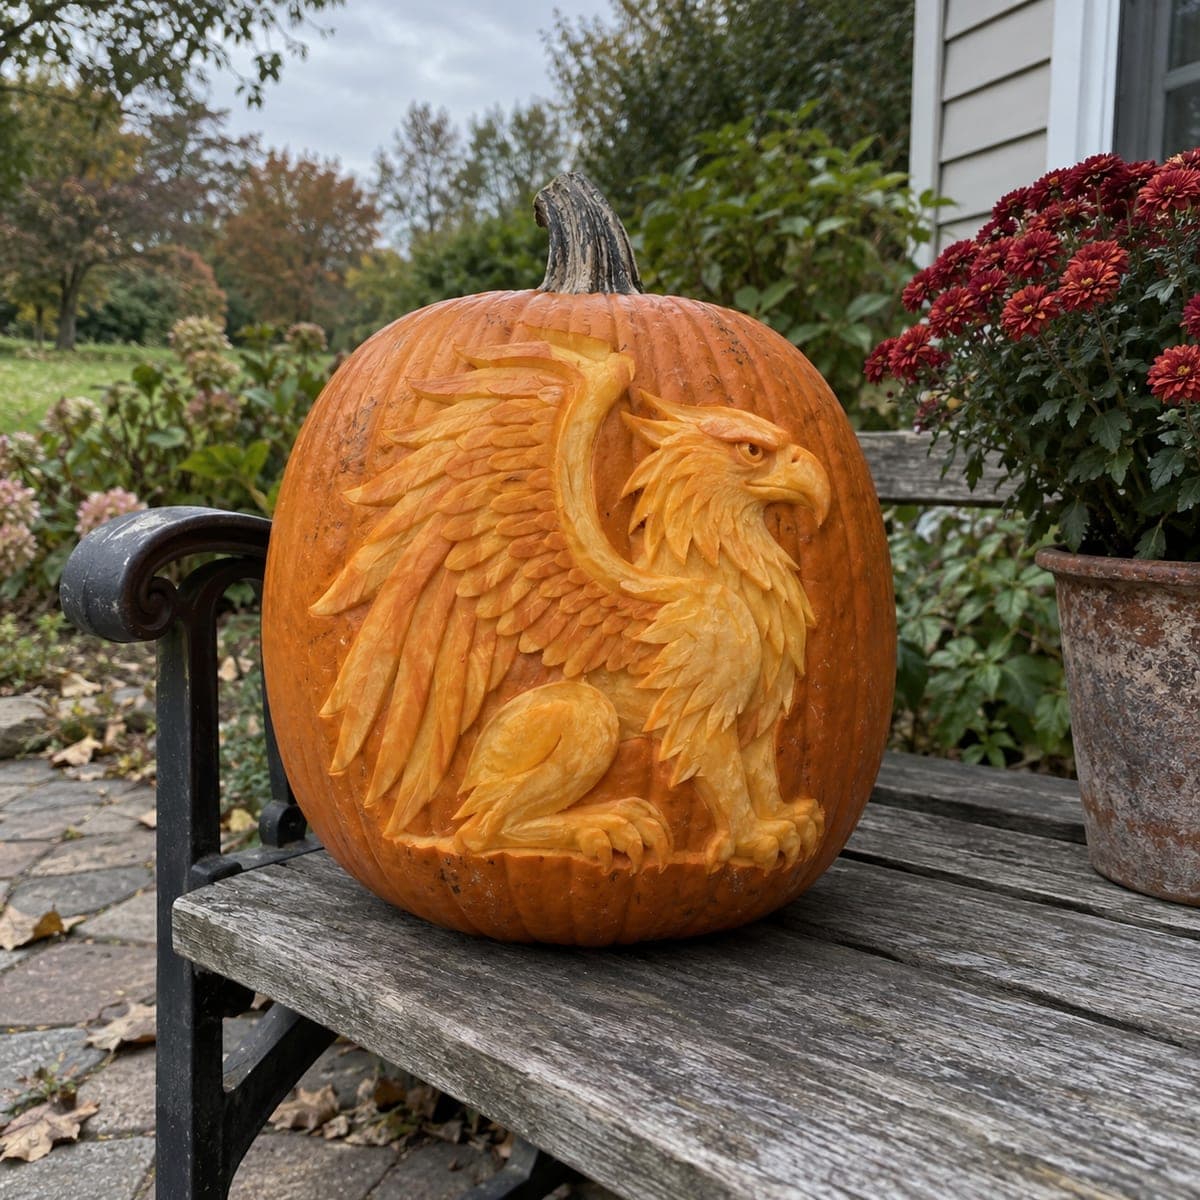
Majestic Griffin Sculpted Relief Pumpkin

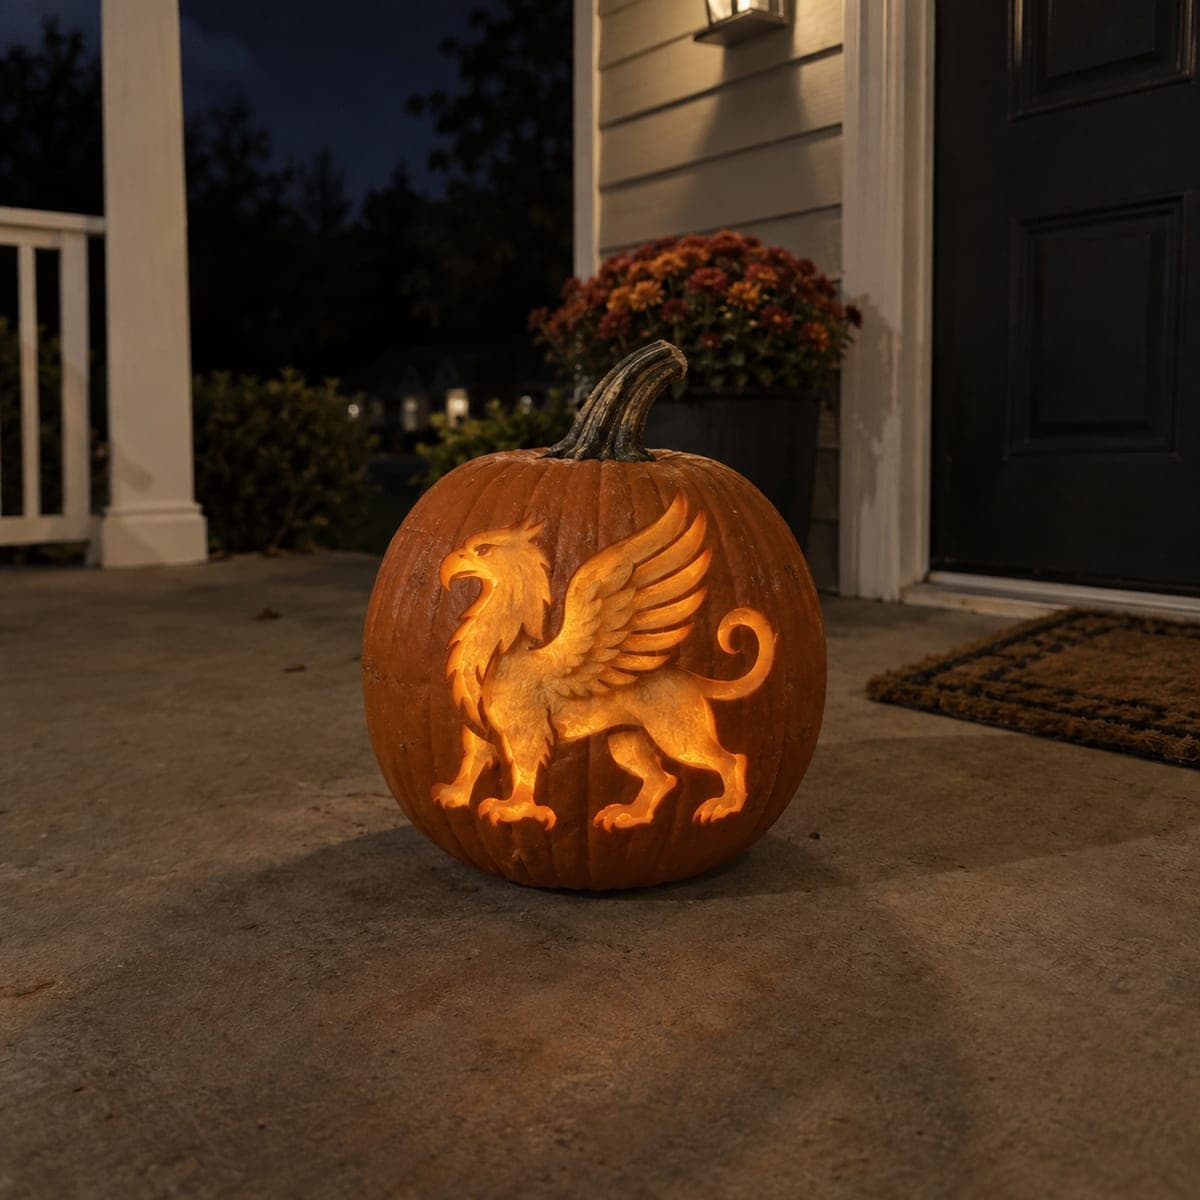
A seated griffin fills this pumpkin in deep sculpted relief, eagle head raised and layered wing feathers sweeping back over a lion's haunches. Each feather is undercut so it appears to overlap the one behind it, a slow loop-tool process that rewards patience and a thick-walled pumpkin. Block out the silhouette and major masses first, then feather the wing from the leading edge backward. In daylight it reads like carved stone.

This is an AI-generated concept image: a realistic, carvable design idea rather than a photo of a finished carve. AI concepts are always labeled and sit out the leaderboard and the contest.

No ratings yet · Sign in to rate
Comments (0)

  • No comments yet — be the first.

Save without an account. Sign in to like or comment.

Our tips for carving a similar design

The core trick here is sculpted relief rather than cutouts. You shave the pumpkin skin and outer flesh to different depths so the griffin stands out like carved stone, with each wing feather undercut so it appears to overlap the one behind it. Plan to block out the silhouette and big masses first, then slowly detail the head, feather the wing from the leading edge back, and finish the haunches and claws.

Written by PumpkinCarvingIdeas.com, inspired by the image above. These are our suggestions, not instructions from the uploader. This approach to the AI concept has not been tested on a real pumpkin.

From pumpkin to porch

  1. Pick a thick pumpkin and prep

    Choose a large, evenly shaped pumpkin with a thick wall, since relief carving eats into the flesh and thin walls will blow through. Cut a lid or a back access hole and scrape the inside wall behind the design down to a workable thickness. Leave the front wall as thick as possible for depth. Wipe the surface clean and dry before transferring your pattern.

  2. Transfer and outline the silhouette

    Tape your griffin stencil in place and poke the main outlines, or draw them on with a washable marker. Score the full outer silhouette with a shallow blade cut so you have a clean boundary to carve down to. Keep the head, wing, haunches, and tail as separate zones in your mind. Do not remove any material yet, just define the map.

  3. Lower the background and block the masses

    Using a loop tool, shave away the skin and flesh in the background around the griffin so the whole figure sits raised. Work slowly and keep the depth even. Then rough in the big forms, the raised eagle head, the bulk of the wing, and the seated lion haunches, leaving each slightly higher where it should overlap. This blocking stage sets the whole composition.

  4. Sculpt the head and feather the wing

    Refine the eagle head first, rounding the beak and setting the eye deep so it catches shadow. Then feather the wing from the leading edge backward, carving each feather and undercutting its lower edge so the next one tucks behind it. Keep feathers attached along their tops so nothing breaks free. Take your time here, this is the slow part that gives the stone-carved look.

  5. Detail the haunches, tail, and claws

    Shape the lion haunch with smooth rounded strokes so it contrasts with the crisp feathers. Carve the curled tail and the front claws last, keeping the thin claw tips backed by solid flesh so they stay strong. Vary your depth to build soft shadows across the body. Step back often to check that light and shade read as a single animal.

  6. Light it and photograph

    This is a relief piece, so most of the drama comes from daylight and shadow rather than a glowing cutout. For evening, tuck a warm LED puck inside so any thinned areas glow softly. Set the pumpkin on a bench in soft daylight to shoot it, where the raised feathers throw the best shadows. Mist it lightly and keep it cool to slow drying.

Gather your supplies

Check things off as you get ready.

Work on a stable surface, keep your free hand out of the cutting path, and have an adult handle sharp tools.

Three levels of light

  • Leave intact

    The background skin around the figure and the darkest recesses of the wing stay untouched for deep shadow.

  • Peel & shade

    The griffin body, feathers, head, and haunches are skin-peeled to varying depths for a soft orange glow and sculpted shading.

  • Cut through

    No full cutouts are needed, though you could thin the eye or a few gaps between feathers for small bright accents.

Learn the carving basics

Before you start cutting

Do I need to cut all the way through anywhere?

No, this is a relief carving, so almost all of it is surface shaving at different depths. The look comes from shadow and thinned flesh, not open holes. If you want a little evening glow, thin a few small spots like the eye rather than cutting clean through.

How do I keep the feathers from looking flat?

Undercut each feather along its lower edge so it casts a shadow and appears to overlap the one behind it. Work from the leading edge of the wing backward in overlapping rows. Vary the depth slightly feather to feather so the light breaks up naturally.

Why does the wall thickness matter so much?

Relief carving removes a lot of outer flesh, so a thin pumpkin will tear or go translucent in patches. A thick, dense pumpkin gives you room to carve depth and undercuts without breaking through. Scrape the inside only behind the design and leave the sculpted front wall generous.

Your take belongs here, too.

Changed a detail? Made it simpler? Share a photo of your version and tell the community what worked.

Share your pumpkin

More pumpkins like this

You've reached the end · 8 pumpkins
The Patch Report

Fresh pumpkins, in your inbox.

The best new carvings, ideas worth stealing, and how-tos for carving season. Short, seasonal, and gone by November.

A short email during carving season. Unsubscribe anytime. See our privacy policy.