Halloween Pumpkin Carving Contest · Starts October 1st · $500 in prizes
← Back to ideas
@ai_concepts
Aug 20, 2026
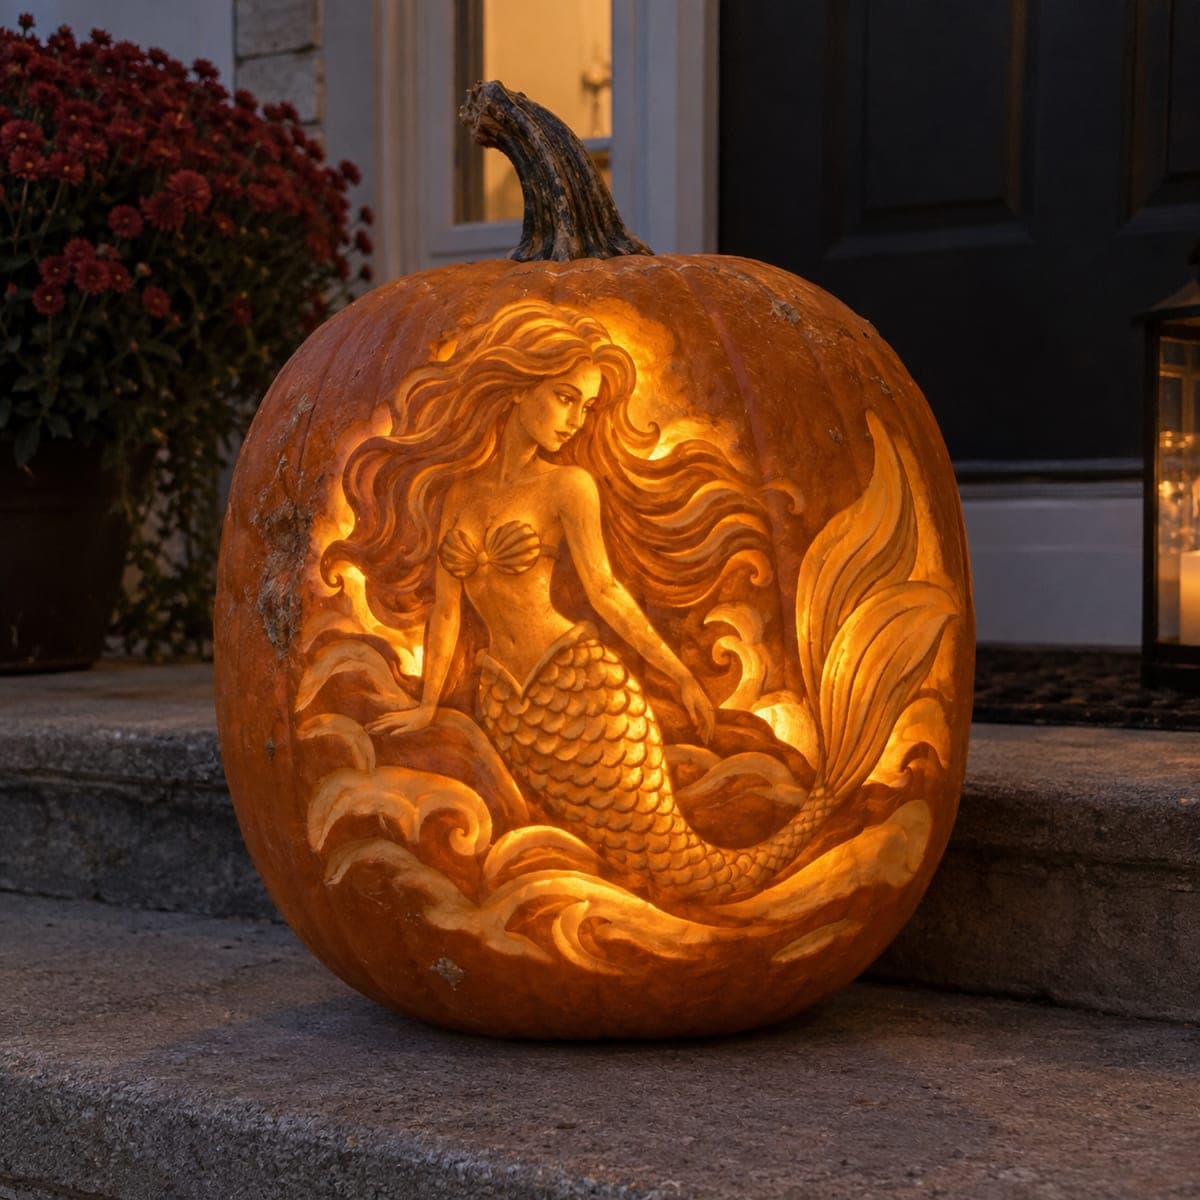
Mermaid Relief Pumpkin Carving MasterpieceAI
0

Mermaid Relief Pumpkin Carving Masterpiece

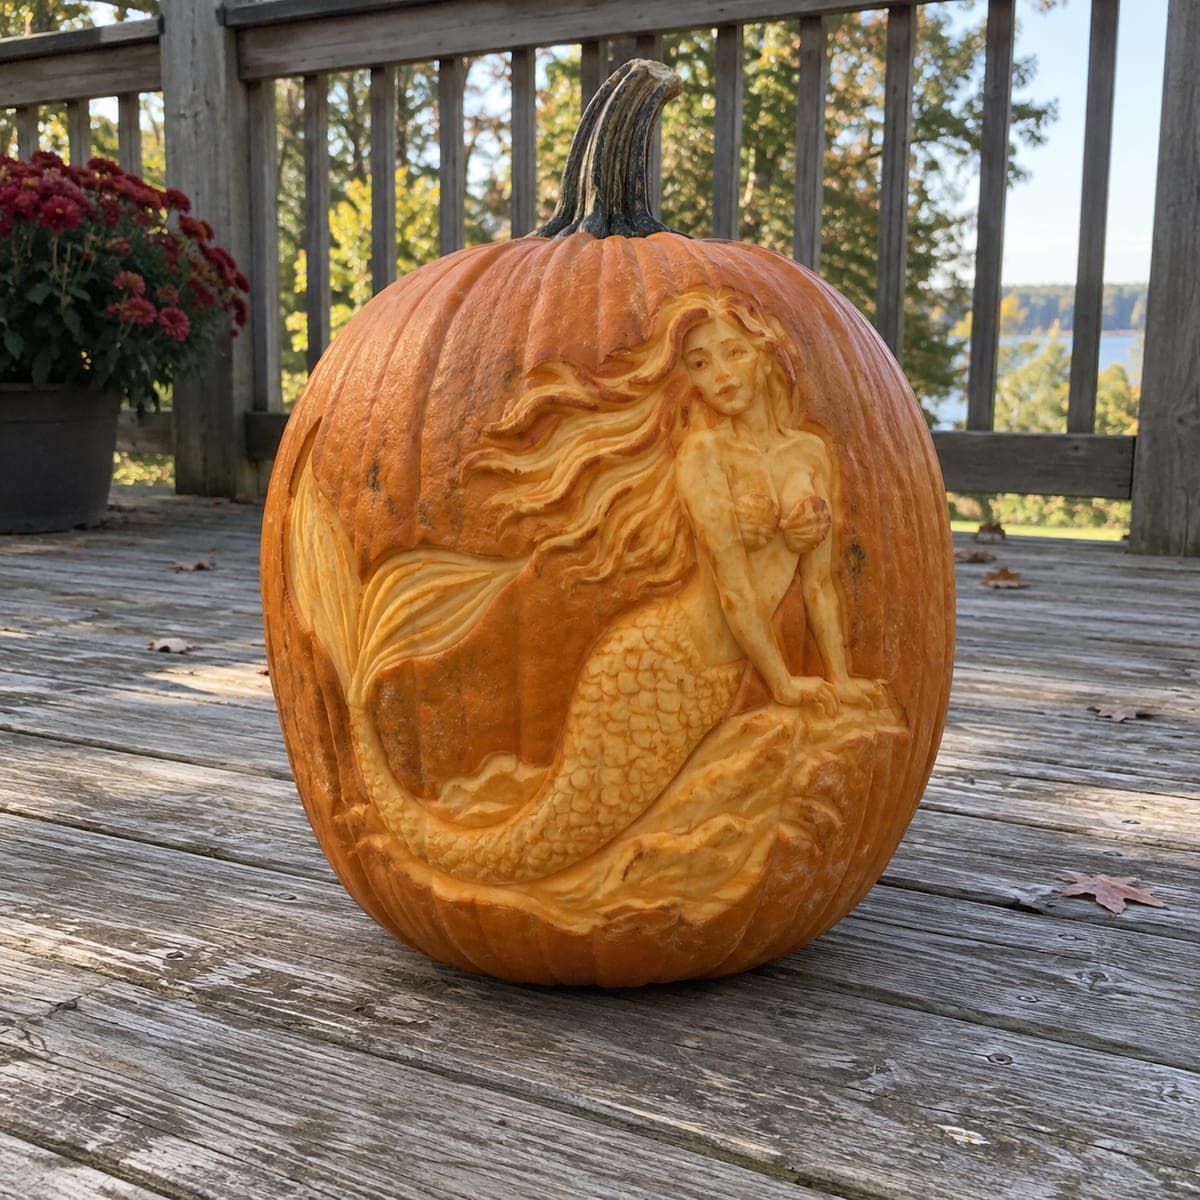
A mermaid with wind-swept hair and a fully scaled tail lounges on carved waves in this deep-relief pumpkin sculpture, every scale individually tooled. The figure is built by carving the background away and modeling the body in rounded layers, with the hair strands flowing into the swirling surf so the composition never breaks. Rough the pose with a large loop tool, then texture the tail scale by scale using a small U-gouge. Shade it from direct sun to make an afternoon display last.

This is an AI-generated concept image: a realistic, carvable design idea rather than a photo of a finished carve. AI concepts are always labeled and sit out the leaderboard and the contest.

No ratings yet · Sign in to rate
Comments (0)

  • No comments yet — be the first.

Save without an account. Sign in to like or comment.

Our tips for carving a similar design

The core trick here is deep relief carving, where you shave the background skin away and leave the mermaid raised so she catches light in rounded layers instead of glowing through cutouts. The plan is to rough the whole figure first, then slowly model her body, hair, and tail with shallow shaving, saving the tiny scale texture for last. Because this is an AI concept and no real pumpkin exists, treat it as a target look you can approach on a thick-walled pumpkin.

Written by PumpkinCarvingIdeas.com, inspired by the image above. These are our suggestions, not instructions from the uploader. This approach to the AI concept has not been tested on a real pumpkin.

From pumpkin to porch

  1. Pick a thick pumpkin and transfer the outline

    Choose a large, evenly shaped pumpkin with a thick, blemish-free wall, since relief work needs plenty of flesh to sculpt into. Leave it whole and cut a lid on the bottom or back so the front stays smooth. Tape your mermaid pattern in place and poke or trace the main outline, hair flow, tail line, and wave shapes. Keep the guide lines light so you can carve past them without leaving marks.

  2. Shave the background down

    With a large loop tool, remove the outer skin and a shallow layer of flesh from everything around the mermaid and waves. Work evenly so the whole background sits at one lower level, which makes the figure pop forward. Keep her body, hair, and tail standing tall as untouched high ground for now. Go slow near the hair tips and wave crests so you do not undercut them.

  3. Rough the pose in rounded layers

    Switch to the loop tool at a lighter touch and start rounding the mermaid's form, lowering the areas that should sit back like the far arm and the underside of the tail. Build gentle slopes so her shoulder, torso, and tail curve read as three dimensional. Think in soft steps from high to low rather than sharp edges. Step back often and check the shape against your reference in raking light.

  4. Model the face, hair, and surf

    Use smaller ribbon and detail loops to refine the face, keeping features shallow and soft since deep cuts on a small face look harsh. Carve the hair as long flowing channels that sweep down and merge into the wave swirls, so the composition stays connected. Leave thin ridges of raised skin between hair strands and wave crests as natural bridges that hold everything together. Round the top scale line of the tail smoothly into the hip.

  5. Texture the tail scale by scale

    With a small U-gouge, tool each scale as an overlapping half-moon scoop, starting near the hip and working down toward the fin. Keep the rows staggered like real fish scales and vary the depth slightly so they catch light unevenly. Rinse away debris as you go so you can see your spacing. Fan the tail fin with long straight gouge lines for contrast against the round scales.

  6. Light it, shade it, and photograph

    Set a battery LED puck or string inside so it grazes across the relief and rakes shadow into every scale and wave. Never use a candle, since the heat curls thin relief edges and dries the flesh fast. Display it out of direct sun and mist the cut surface, then wrap it in the fridge overnight to stretch its life. Shoot photos at dusk when the low light shows off the sculpted depth.

Gather your supplies

Check things off as you get ready.

Work on a stable surface, keep your free hand out of the cutting path, and have an adult handle sharp tools.

Three levels of light

  • Leave intact

    The raised mermaid body, hair, and scaled tail stay as untouched skin so they read dark and solid against the glow.

  • Peel & shade

    The shaved-down background and shallow wave troughs give a soft dim orange that pushes the figure forward.

  • Cut through

    Reserve any full cutouts for a few tiny surf gaps or a thin halo behind the hair so the brightest light frames her without breaking the relief.

Learn the carving basics

Before you start cutting

Do I need to cut all the way through anywhere?

Mostly no, since this is a relief carving that works by shaving depth rather than making openings. You can keep almost everything as raised and peeled skin and still get plenty of glow from a bright interior LED. Save any small through-cuts for the very end and keep them tiny so the wall stays strong.

How do I keep the scales from looking messy?

Work in staggered rows and keep each U-gouge scoop the same size and depth, wiping away pulp so you can see your spacing. Start at the hip and move toward the fin so the scales shrink naturally. If one scoop goes crooked, gently reshape its neighbors to match rather than fighting a single scale.

This is an expert design. How can I make it more forgiving?

Simplify the face into soft shallow shading and reduce the number of scale rows, texturing only the front of the tail. Keep the hair as a few broad flowing channels instead of many fine strands, which also protects the bridges that hold the piece together. Choose the thickest pumpkin you can find so you have room to correct mistakes.

Your take belongs here, too.

Changed a detail? Made it simpler? Share a photo of your version and tell the community what worked.

Share your pumpkin

More pumpkins like this

You've reached the end · 8 pumpkins
The Patch Report

Fresh pumpkins, in your inbox.

The best new carvings, ideas worth stealing, and how-tos for carving season. Short, seasonal, and gone by November.

A short email during carving season. Unsubscribe anytime. See our privacy policy.