Halloween Pumpkin Carving Contest · Starts October 1st · $500 in prizes
← Back to ideas
@ai_concepts
Jul 30, 2026
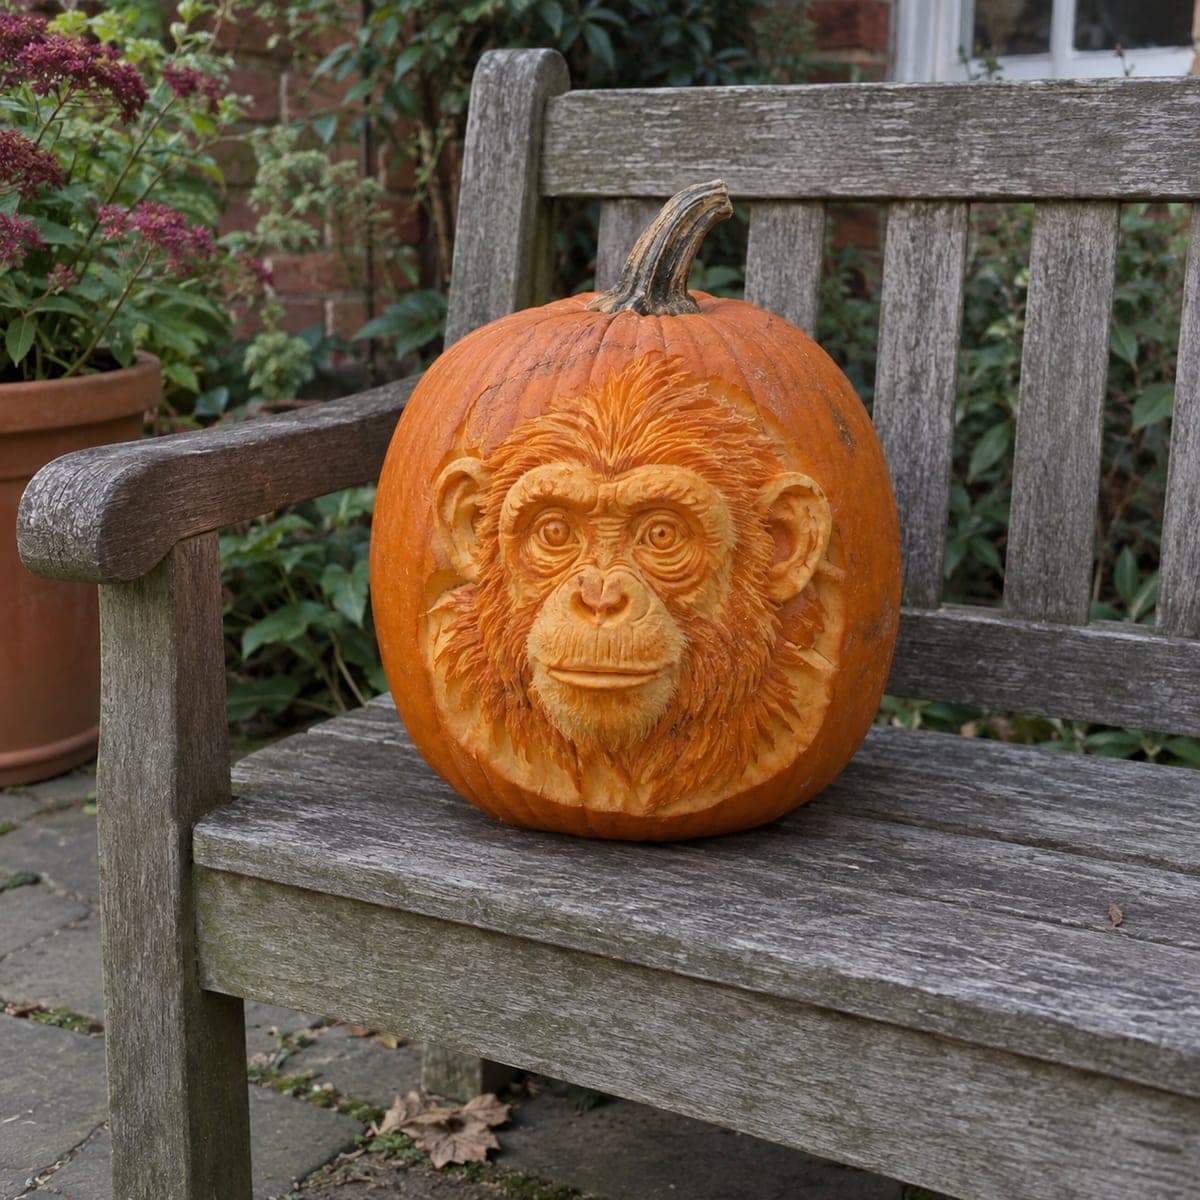
Sculpted Chimpanzee Face 3D Pumpkin CarvingAI
0

Sculpted Chimpanzee Face 3D Pumpkin Carving

This chimpanzee portrait is sculpted in true three-dimensional relief, with a protruding muzzle, deep-set eyes, and fur that radiates outward in carved strands. Work of this kind starts by removing the skin over the whole design area, then shaping the features with clay-sculpting ribbons and loop tools, always cutting from the highest point (the nose) down. Mist the finished carving with water and refrigerate it overnight to slow browning. A masterpiece project for experienced carvers.

This is an AI-generated concept image: a realistic, carvable design idea rather than a photo of a finished carve. AI concepts are always labeled and sit out the leaderboard and the contest.

No ratings yet · Sign in to rate
Comments (0)

  • No comments yet — be the first.

Save without an account. Sign in to like or comment.

Our tips for carving a similar design

The core trick here is 3D relief sculpting: instead of cutting all the way through, you remove skin and shave down the flesh to raise the muzzle, brow, and cheeks as real surfaces. The plan is to map the face, peel the whole design area, then carve from the highest point (the nose) down and back, ending with fine fur strands. Since this is an AI concept, treat it as a target look you could reproduce on a tall, thick-walled pumpkin.

Written by PumpkinCarvingIdeas.com, inspired by the image above. These are our suggestions, not instructions from the uploader. This approach to the AI concept has not been tested on a real pumpkin.

From pumpkin to porch

  1. Pick and prep the canvas

    Choose a tall, evenly rounded pumpkin with a thick wall, since relief work eats into the flesh rather than through it. Leave the pumpkin whole and do not cut a lid; a solid front gives you material to sculpt. Wipe the face clean and dry it. Have an adult handle all blades throughout.

  2. Transfer the outline

    Sketch or transfer the chimp's outline, marking the muzzle, brow ridge, eye sockets, ears, and the outer edge of the fur. Keep your guide lines light so you can adjust as the shape emerges. Note the nose as your highest point and the fur edges as your lowest. Step back often to check that the face reads as symmetrical.

  3. Peel the whole design area

    Using a ribbon or loop tool, remove the outer skin across the entire face region so you are working in bare orange flesh. Keep the peel shallow and even at this stage. This uniform surface becomes your base level, and everything you carve deeper will glow or shadow against it. Work slowly and rotate the pumpkin for good light.

  4. Rough in the big forms

    Carve from the nose outward and downward, lowering the flesh around the muzzle so it stands proud. Scoop gentle sockets for the deep-set eyes and shave the cheeks back to define the brow and jaw. Keep the ears attached to the surrounding wall as natural bridges so they stay strong. Take off less than you think you need; you can always deepen later.

  5. Sculpt features and fur

    Switch to smaller loop and detail tools to refine the eyes, nostrils, and lips. Then cut the fur as many short, radiating strands, each a shallow groove that catches shadow. Vary the depth so the coat looks layered rather than combed. Blend the fur edges into the untouched skin so the portrait fades naturally into the pumpkin.

  6. Preserve, light, and photograph

    Mist the finished carving with water and refrigerate it overnight to slow browning. Because this is a relief piece with no cutouts, light it from the side with a small LED spotlight or place an LED puck nearby to rake across the fur. Shoot it in soft evening light on a bench or step. Re-mist between showings to keep the surface fresh.

Gather your supplies

Check things off as you get ready.

Work on a stable surface, keep your free hand out of the cutting path, and have an adult handle sharp tools.

Three levels of light

  • Leave intact

    The outer fur edges and background left as untouched skin stay dark and frame the face.

  • Peel & shade

    The broad peeled face surface glows a soft mid orange and forms the base tone for the portrait.

  • Cut through

    There are no full cutouts here; the deepest carved grooves in the fur and eye sockets read brightest when lit from the side.

Learn the carving basics

Before you start cutting

Do I cut all the way through the pumpkin for this?

No. This is a relief sculpture, so you shave down flesh rather than open windows. Keep a solid wall behind the face for strength and shadow. Save any true cutouts, if you add them, for last.

How do I keep the ears and thin fur from breaking off?

Leave the ears connected to the surrounding wall so they act as their own bridges, and keep fur strands shallow instead of undercutting them. Thin, deeply undercut details are the first to sag. If a piece feels fragile, thicken its base.

How far ahead can I carve a showpiece like this?

Relief carvings brown faster than simple cutouts because so much flesh is exposed. Carve it the day you plan to display it, then mist and refrigerate overnight to buy time. Re-mist before each showing and keep it out of direct sun.

Your take belongs here, too.

Changed a detail? Made it simpler? Share a photo of your version and tell the community what worked.

Share your pumpkin

More pumpkins like this

You've reached the end · 8 pumpkins
The Patch Report

Fresh pumpkins, in your inbox.

The best new carvings, ideas worth stealing, and how-tos for carving season. Short, seasonal, and gone by November.

A short email during carving season. Unsubscribe anytime. See our privacy policy.