Halloween Pumpkin Carving Contest Β· Starts October 1st Β· $500 in prizes
← Back to ideas
@ai_concepts
Aug 23, 2026
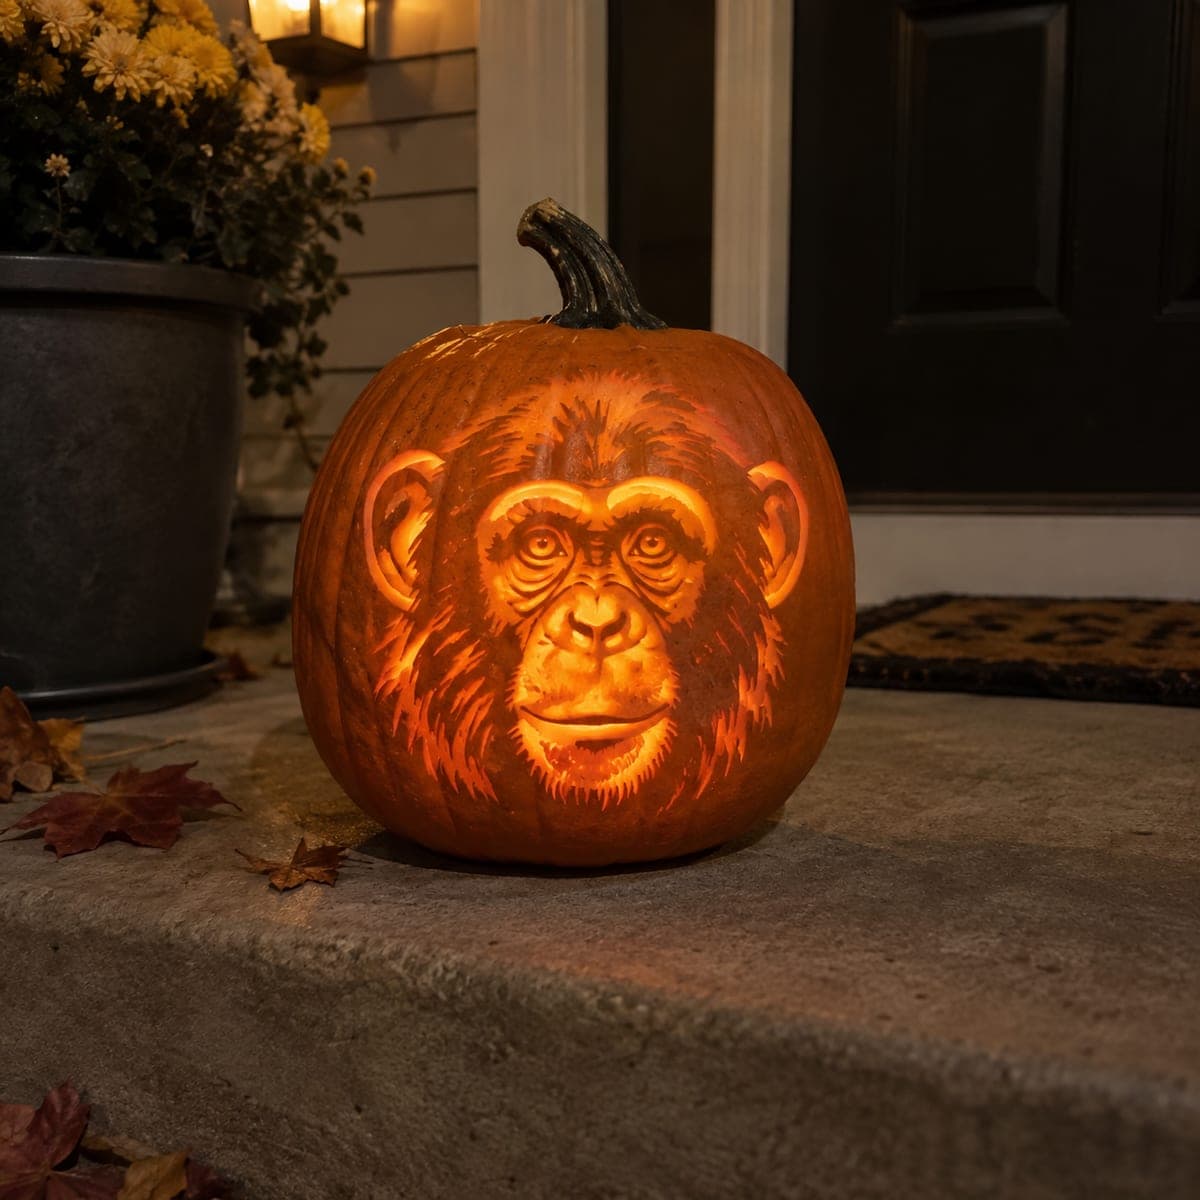
Chimpanzee Portrait Expert Shaded PumpkinAI
0

Chimpanzee Portrait Expert Shaded Pumpkin

A chimpanzee gazes out of this pumpkin with startling realism, the face etched smooth and bright while shaggy strokes build the surrounding fur. Portrait carvings like this depend on value control: the muzzle and brow are shaved thinnest for the strongest glow, and each fur stroke is a single confident gouge pass. Print a posterized reference photo, transfer the main contours, and carve the eyes last when your hand is warmed up.

This is an AI-generated concept image: a realistic, carvable design idea rather than a photo of a finished carve. AI concepts are always labeled and sit out the leaderboard and the contest.

No ratings yet Β· Sign in to rate

Comments (0)

  • No comments yet β€” be the first.

Save without an account. Sign in to like or comment.

Our tips for carving a similar design

The core trick here is value control: the smooth muzzle and brow are shaved down thin so they glow brightest, while the surrounding fur is built from hundreds of short gouge strokes that leave the skin darker. Since this is an AI concept and no real pumpkin exists, treat it as a plan you could follow on a large, wall-thick pumpkin. Work from a posterized reference, carve the fur in confident single passes, and save the eyes for last.

Written by PumpkinCarvingIdeas.com, inspired by the image above. These are our suggestions, not instructions from the uploader. This approach to the AI concept has not been tested on a real pumpkin.

From pumpkin to porch

  1. Prep the pumpkin and pattern

    Choose a big pumpkin with a smooth, pale section wide enough for a face. Cut a lid from the bottom or the back rather than the top so the stem stays as a natural crown, then scrape the inside wall down to about an inch thick where the face will sit. Print a posterized reference broken into three or four value zones and tape it flat against the surface. Transfer only the main contours, the eyes, brow, muzzle, and ear edges, with a poker or dotting tool.

  2. Establish the face map

    Before any cutting, lightly score the boundary between the smooth face and the shaggy fur so you always know where the two zones meet. Mark the brightest areas, the muzzle, the bridge of the nose, and the brow ridge, so you remember to shave those thinnest. Keep the eyes and nostrils as reference dots only for now. A clear map keeps you from over-carving as the details build up.

  3. Shave the smooth face

    With a ribbon or loop tool, gently skin the outer peel off the muzzle, cheeks, and brow to reveal the pale flesh underneath. Go thinnest on the muzzle and nose bridge where you want the strongest glow, and leave slightly more flesh on the cheeks for a softer mid tone. Blend the edges so the shading fades gradually instead of stopping in a hard line. Test against a light now and then to read the values.

  4. Carve the fur strokes

    Switch to a small V gouge and pull short, confident strokes outward from the face into the fur zone. Each stroke should be a single clean pass; do not scrub back and forth or the texture turns muddy. Follow the direction the hair grows, fanning down the cheeks and up over the crown, and vary the length so the coat looks natural. Leave plenty of untouched skin between strokes to keep the fur reading dark.

  5. Detail the eyes, nose, and ears

    Now that your hand is warmed up, carve the eyes with the most care, shaving the lids thin and leaving a small dark rim so they read as looking out. Deepen the nostrils and the line of the mouth with a fine tool, and open the inner ear shadows just slightly. If any spot needs to be brightest of all, a nostril or a highlight in the eye, a tiny full cutout is fine, but keep it small. Take breaks to check the whole face for balance.

  6. Light it and photograph

    Set a battery LED inside, never a candle, since the thin shaved areas can scorch. Warm white light flatters the orange glow and reads most like real fur. Photograph at dusk on a step or porch so the surroundings stay soft and the face is the star. Coat the cut edges with petroleum jelly to slow drying if you want it to last a few more days.

Gather your supplies

Check things off as you get ready.

Work on a stable surface, keep your free hand out of the cutting path, and have an adult handle sharp tools.

Three levels of light

  • Leave intact

    The shaggy fur around the face and the dark spaces between hair strokes stay as untouched skin.

  • Peel & shade

    The muzzle, cheeks, brow, and nose bridge are shaved thin for a warm mid glow, thinnest on the muzzle.

  • Cut through

    Only tiny accents like the nostrils or an eye highlight are cut all the way through for the brightest points.

Learn the carving basics

Before you start cutting

Do I need to cut all the way through anywhere?

Almost none of this design is a full cutout. The realism comes from shaving skin to different depths so light passes through the thin flesh. Reserve true cutouts for a couple of the tiniest accents, like the nostrils, and even those can stay shallow.

How do I keep the fur from looking messy?

Make each fur mark a single clean pass with a small V gouge and follow the direction the hair naturally grows. Resist the urge to go back over a stroke, since repeated passes blur the texture. Leaving dark skin between strokes is what gives the coat its depth.

What kind of pumpkin works best for a portrait like this?

Pick a large pumpkin with a broad, smooth, pale patch and a thick wall so you have room to shave to several depths. Avoid heavily ribbed or bruised skin, which fights fine detail. A lighter-colored surface reads values more clearly as you carve.

Your take belongs here, too.

Changed a detail? Made it simpler? Share a photo of your version and tell the community what worked.

Share your pumpkin

More pumpkins like this

You've reached the end Β· 8 pumpkins
The Patch Report

Fresh pumpkins, in your inbox.

The best new carvings, ideas worth stealing, and how-tos for carving season. Short, seasonal, and gone by November.

A short email during carving season. Unsubscribe anytime. See our privacy policy.