Halloween Pumpkin Carving Contest · Starts October 1st · $500 in prizes
← Back to ideas
@ai_concepts
Aug 23, 2026
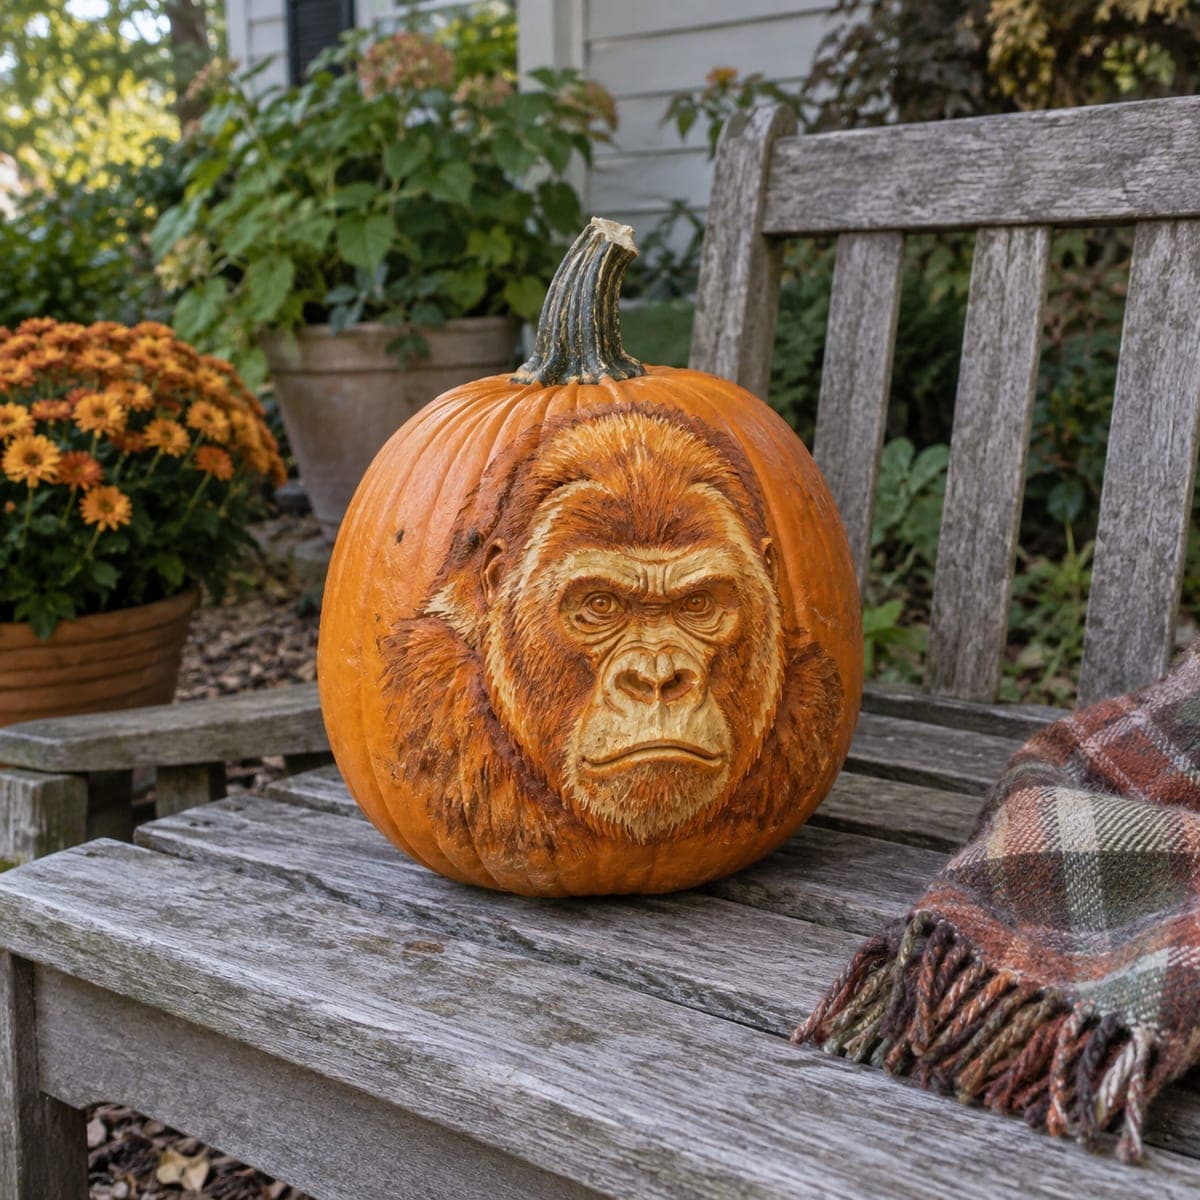
Gorilla Portrait Shaded Pumpkin Carving IdeaAI
0

Gorilla Portrait Shaded Pumpkin Carving Idea

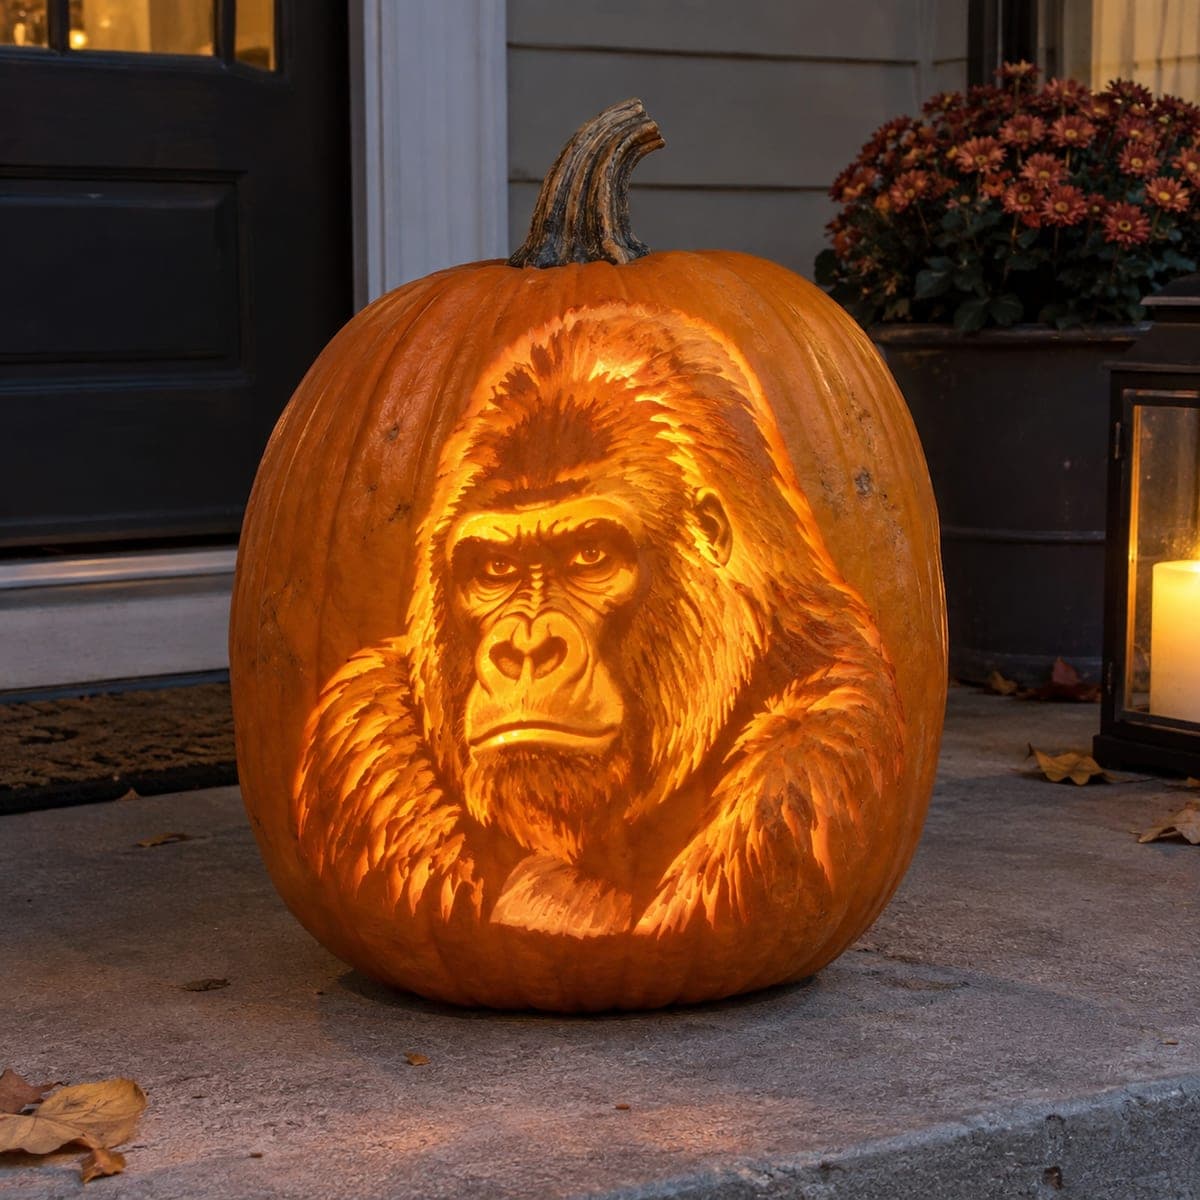
A powerful gorilla face, wide brow, deep-set eyes, and a flat expressive nose, is etched across the pumpkin surface in multi-depth shading that gives the portrait a photographic quality. The design uses no full cutouts, allowing the orange pumpkin flesh to show through at varying tones from pale cream at the highlights to deep amber in the shadows. Begin with the darkest recesses around the brow and under the chin, then slowly work lighter as you move toward the bridge of the nose and forehead. Wildlife admirers looking for a non-horror pumpkin carving idea will find this gorilla portrait an impressive centerpiece for a fall display.

This is an AI-generated concept image: a realistic, carvable design idea rather than a photo of a finished carve. AI concepts are always labeled and sit out the leaderboard and the contest.

No ratings yet · Sign in to rate

Comments (0)

  • No comments yet — be the first.

Save without an account. Sign in to like or comment.

Our tips for carving a similar design

This is a relief portrait built entirely from depth, not holes, so the core trick is scraping the skin away at different depths to control how much orange glows through. You leave the darkest fur in shadow untouched, peel to mid tones across the face, and go thinnest at the bright cream highlights on the nose and brow. Plan the whole gorilla as a map of light before you make a single cut.

Written by PumpkinCarvingIdeas.com, inspired by the image above. These are our suggestions, not instructions from the uploader. This approach to the AI concept has not been tested on a real pumpkin.

From pumpkin to porch

  1. Transfer the portrait and study the values

    Pick a smooth, wide pumpkin and clean the front panel with a damp cloth. Tape your gorilla stencil in place and poke through the outlines with a transfer tool or push pin, marking the eyes, brow, nose, mouth, and the main fur zones. Before carving, shade the paper or your mental map into three tones so you know where dark, medium, and bright will fall. This planning step is what makes the finished face read as a real gorilla.

  2. Score the outlines and eyes first

    With a fine detail knife, lightly trace all the transferred lines so the design is locked in even after the dots fade. Cut the eyes as shallow etched details, keeping the small catchlights as untouched skin so the stare stays sharp. Do not remove any skin yet. Getting clean boundaries now keeps your shading from bleeding across features later.

  3. Carve the deepest shadows

    Switch to a small loop or ribbon tool and remove flesh deepest under the brow, in the eye sockets, beside the nose, and under the chin and jaw. These recesses stay in shadow and read darkest even though you are cutting into the flesh. Work in shallow passes and check often, since you can always go deeper but cannot undo. Keep the tool moving in the direction the fur grows for a natural texture.

  4. Peel the midtones across the face

    Skin-peel the broad medium areas, the cheeks, the sides of the muzzle, and the outer fur, removing only the top layer so a soft orange glows through. Vary your pressure so the tone shifts gradually rather than in flat blocks. Add short flicking strokes throughout the fur to suggest individual hairs. Step back frequently to judge the overall balance of light and dark.

  5. Thin the highlights for the brightest cream

    On the bridge of the nose, the brow ridge, and the top of the muzzle, scrape the flesh very thin so the most light passes through, giving that pale cream tone. Go slowly here because thin flesh tears easily, and leave a little thickness so nothing collapses. Blend the edges of these highlights into the midtones so the transitions look photographic. This contrast is what gives the portrait its dimensional pop.

  6. Light it, seal it, and photograph

    Set a battery LED puck or string inside so the peeled and thinned areas glow warm while the deep skin stays dark. Rub the cut surfaces with a little petroleum jelly to slow drying and keep your tones crisp for days. Display on a bench or porch where side light also catches the relief texture. Snap your photo in the evening so the internal glow shows off the shading.

Gather your supplies

Check things off as you get ready.

Work on a stable surface, keep your free hand out of the cutting path, and have an adult handle sharp tools.

Three levels of light

  • Leave intact

    The deep fur, eye sockets, under-brow, and jaw shadows stay as untouched skin for the darkest tones.

  • Peel & shade

    The cheeks, muzzle sides, and outer fur are skin-peeled for a soft mid orange glow.

  • Cut through

    Nothing is cut fully through; the brightest cream on the nose bridge and brow is flesh scraped very thin instead.

Learn the carving basics

Before you start cutting

There are no cutouts, so how will this pumpkin light up?

All the glow comes from thinning the flesh rather than cutting holes. Where you scrape thin, more light passes through and the area looks bright; where you leave full skin, it stays dark. An LED inside makes the varying depths read as shading, which is the whole point of this portrait style.

How do I keep the shading from looking flat or muddy?

Plan three clear value zones before you carve and commit to them: dark shadows, medium fur, and bright highlights. Blend the edges between zones with gradual scraping so tones flow into each other. Step back every few minutes, since problems that are invisible up close jump out at a distance.

This is an AI concept image, so is a gorilla portrait realistic to carve?

Yes, a shaded relief like this is achievable because it relies on scraping depth rather than fragile cutouts. The pictured pumpkin is a digital concept, but the technique of peeling and thinning flesh to different depths is well established. Give yourself a couple of hours and a good reference photo of a real gorilla face.

Your take belongs here, too.

Changed a detail? Made it simpler? Share a photo of your version and tell the community what worked.

Share your pumpkin

More pumpkins like this

You've reached the end · 8 pumpkins
The Patch Report

Fresh pumpkins, in your inbox.

The best new carvings, ideas worth stealing, and how-tos for carving season. Short, seasonal, and gone by November.

A short email during carving season. Unsubscribe anytime. See our privacy policy.