Halloween Pumpkin Carving Contest · Starts October 1st · $500 in prizes
← Back to ideas
@ai_concepts
Sep 6, 2026
Old Witch Face Relief Carved PumpkinAI
0

Old Witch Face Relief Carved Pumpkin

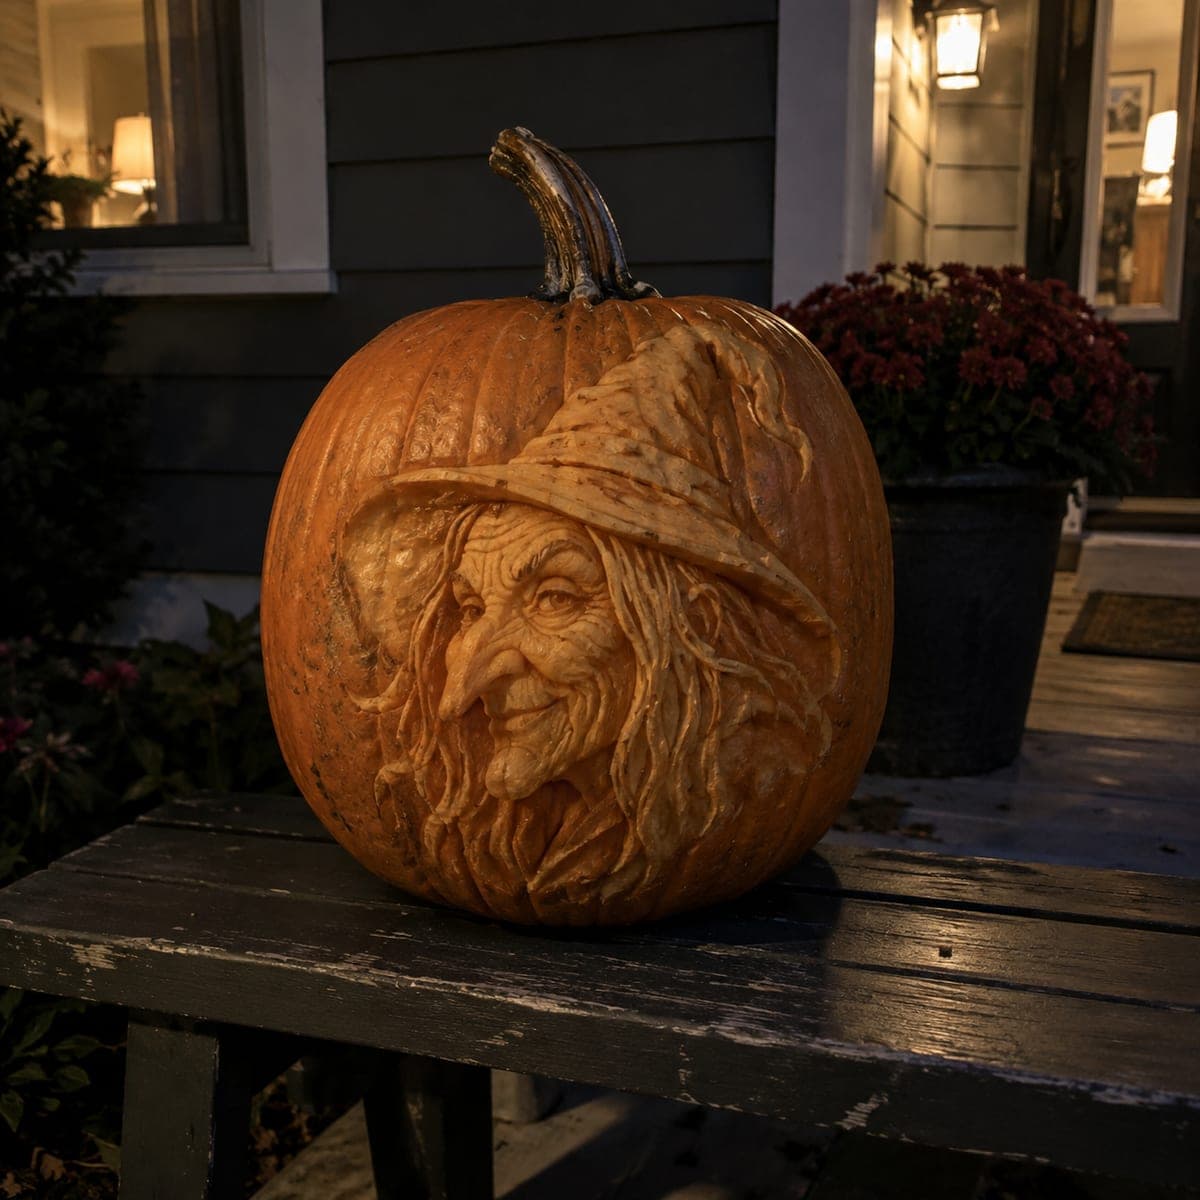
An old witch grins from this pumpkin in astonishing sculpted detail, from her drooping hat brim to the wrinkles around her hooked nose. Everything is relief carved, with stringy hair pulled out in long gouge strokes and skin smoothed for contrast. Begin with the big forms of hat and jaw, refine the face last, and give her raking side light after dark.

This is an AI-generated concept image: a realistic, carvable design idea rather than a photo of a finished carve. AI concepts are always labeled and sit out the leaderboard and the contest.

No ratings yet · Sign in to rate

Comments (0)

  • No comments yet — be the first.

Save without an account. Sign in to like or comment.

Our tips for carving a similar design

The core trick here is relief sculpting, where you shave away skin at different depths instead of cutting all the way through. The plan is to block in the big shapes first, the drooping hat brim and the heavy jaw, then work the face and stringy hair last with fine gouges. Since no real pumpkin exists in this concept image, treat it as a target to aim for and build the depth gradually.

Written by PumpkinCarvingIdeas.com, inspired by the image above. These are our suggestions, not instructions from the uploader. This approach to the AI concept has not been tested on a real pumpkin.

From pumpkin to porch

  1. Prep and cut a rear access hole

    Pick a large pumpkin with a smooth, blemish-free front and a flat side to work on. Cut an access hole in the back rather than the top so the front face stays intact for sculpting. Scrape the inside wall behind your face area down to about one inch thick so light passes through the thinned skin later. Have an adult handle all the sharp tools throughout.

  2. Transfer the layout and block the big forms

    Sketch or transfer the main masses first: the pointed hat, the curved brim shadow, the nose, and the jaw line. Use a large loop tool to knock back the background areas around the head so the whole witch sits slightly raised. Keep everything shallow at this stage, removing only skin and the first layer of flesh. Step back often to check the shapes read from a few feet away.

  3. Carve the hat and its drape

    Deepen the shadow under the hat brim so it clearly overhangs the forehead. Use a U-gouge to pull long folds down the crown of the hat, letting the point lean and slump for that worn look. Vary your depth so the folds catch light on their ridges and stay dark in the creases. Leave a raised edge where the brim meets the hair so the two forms do not blur together.

  4. Sculpt the face and nose

    Now refine the features, working from high points down. Round the long hooked nose so it stands off the surface, then carve the cheek hollows and the smiling mouth beneath it. Press in short shallow lines for the wrinkles around the eyes and mouth, keeping them fine so they do not collapse. Smooth the skin of the cheeks and forehead with a small loop for contrast against the textured hair.

  5. Pull the stringy hair

    Switch to a narrow V or U gouge and pull long single strokes for the hair, starting near the face and sweeping outward and down. Let strands overlap and cross so they look tangled and stringy. Keep the deepest gouges for the darkest gaps between locks, and leave thin raised ridges between them so the hair holds together. This texture is what sells the witch, so take your time.

  6. Light it and photograph

    Set a battery LED puck or string inside, never a candle, since the thin sculpted wall can scorch. For the best effect place a small light off to one side so it rakes across the surface and throws the wrinkles and hair into relief. Shoot photos after dark against a dark background so the glow reads. Mist the carving and bag it in the fridge between showings to slow drying.

Gather your supplies

Check things off as you get ready.

Work on a stable surface, keep your free hand out of the cutting path, and have an adult handle sharp tools.

Three levels of light

  • Leave intact

    The untouched background skin and the deepest hat and hair creases stay dark to frame the face.

  • Peel & shade

    The thinned cheeks, forehead, and hat surface glow a soft orange where skin is shaved away.

  • Cut through

    Reserve any full cutouts for tiny accents like a glint in the eye, added last if at all.

Learn the carving basics

Before you start cutting

This is a relief carving, so how much light will actually show through?

Most of the glow comes from skin that has been shaved thin, not from open holes, so the effect is a warm subtle backlight rather than bright shafts. Scrape the inner wall down to about an inch behind the face so light seeps through. A single side light does more for a relief than a bright center light.

How do I keep the stringy hair from breaking off?

Since you are carving grooves rather than cutting free strands, the hair stays part of the pumpkin wall and is fairly sturdy. Leave a thin raised ridge between each gouge stroke instead of undercutting, and do not carve deeper than about half the wall thickness. If a ridge feels fragile, widen its base slightly.

I am not a sculptor. Can I still attempt this face?

You can, but plan on it being a long project and start with the big masses before any detail. Practice pulling clean gouge strokes on a scrap section of pumpkin first. If it feels like too much, a simpler stenciled witch silhouette gives a similar spooky result with far less carving.

Your take belongs here, too.

Changed a detail? Made it simpler? Share a photo of your version and tell the community what worked.

Share your pumpkin

More pumpkins like this

You've reached the end · 8 pumpkins
The Patch Report

Fresh pumpkins, in your inbox.

The best new carvings, ideas worth stealing, and how-tos for carving season. Short, seasonal, and gone by November.

A short email during carving season. Unsubscribe anytime. See our privacy policy.