Halloween Pumpkin Carving Contest · Starts October 1st · $500 in prizes
← Back to ideas
@ai_concepts
Jul 24, 2026
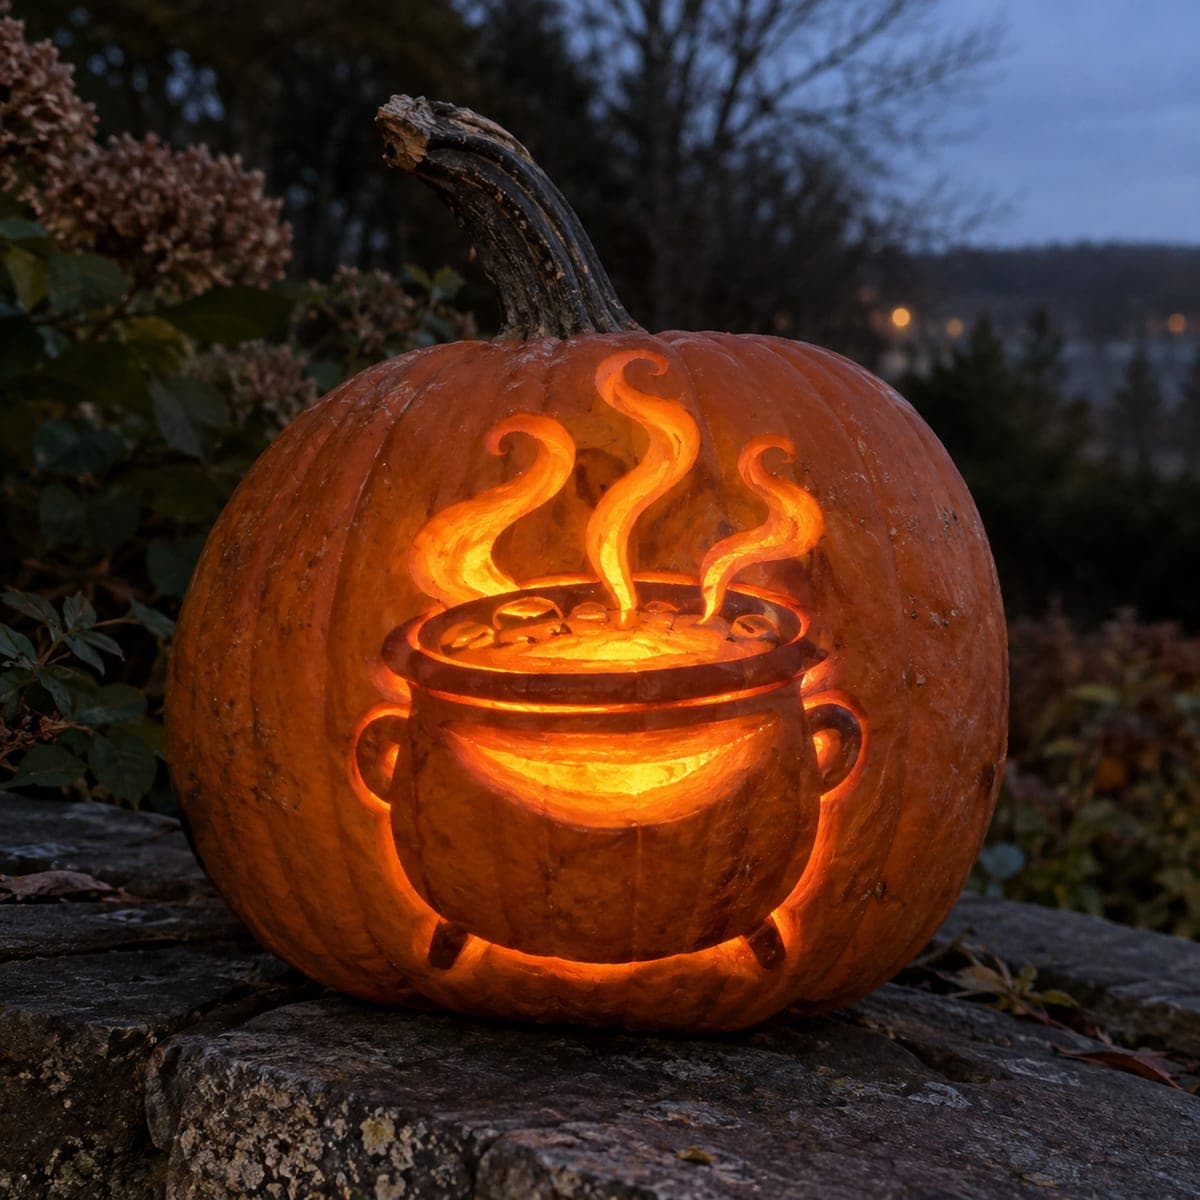
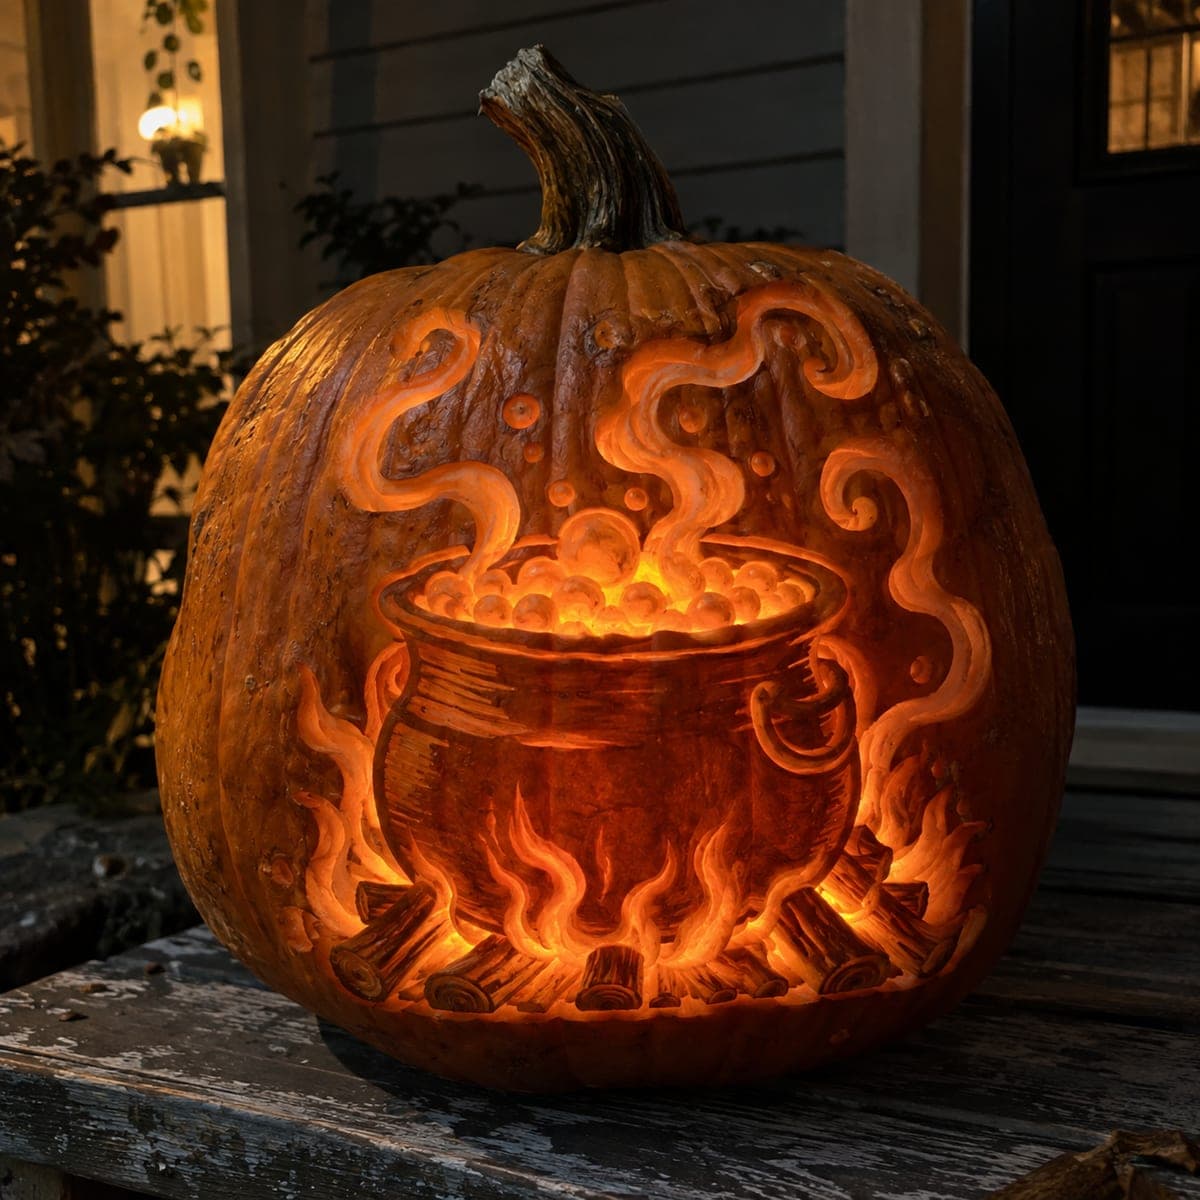
Steaming Cauldron Pumpkin Carving Glowing at DuskAI
0

Steaming Cauldron Pumpkin Carving Glowing at Dusk

Thick plumes of steam curl off this carved cauldron pumpkin, each one shaded at a different depth so the glow fades naturally toward the tips. The pot itself is sculpted in relief with dimensional handles and a bubbling surface of gouged froth. Carve the deepest layers first and check the glow often with a light inside, since thin spots read differently once the sun goes down.

This is an AI-generated concept image: a realistic, carvable design idea rather than a photo of a finished carve. AI concepts are always labeled and sit out the leaderboard and the contest.

No ratings yet · Sign in to rate
Comments (0)

  • No comments yet — be the first.

Save without an account. Sign in to like or comment.

Our tips for carving a similar design

The core trick here is layering depth so the light fades naturally, with the cauldron body carved in shallow relief and the steam plumes cut deeper as they rise. You leave the outline dark, peel the skin for the dim glow of the pot and lower steam, and cut all the way through only at the brightest tips and the bubbling surface. Work the shallow shading first and save the full cutouts for last so the shell stays strong.

Written by PumpkinCarvingIdeas.com, inspired by the image above. These are our suggestions, not instructions from the uploader. This approach to the AI concept has not been tested on a real pumpkin.

From pumpkin to porch

  1. Prep and transfer the design

    Pick a large pumpkin with a wide, smooth front panel to hold the whole cauldron and rising steam. Cut a lid from the bottom or back so the pumpkin sits flat and you can reach in easily. Scrape the inside wall behind the design down to about one inch so light passes through evenly. Tape your stencil on and poke the outline through with a pin or a transfer tool.

  2. Outline everything you plan to keep dark

    With a small detail saw or knife, score the crisp edges of the cauldron rim, the handles, the legs, and the outer edge of each steam plume. These scored lines separate what stays as untouched skin from what you will shade. Keep the handles and legs connected to the body so they do not snap off. Do not remove any material yet, just define the borders.

  3. Shade the pot with relief peeling

    Use a ribbon or loop tool to peel the orange skin off the belly of the cauldron, leaving the rim and handle outlines raised and darker. Vary the depth so the lower belly glows softly and the mid section reads a touch brighter. Round the peeled areas slightly to suggest a curved iron pot. Slip an LED light inside often to check how the glow reads, since thin spots look very different once it is dark.

  4. Build the steam in graded layers

    Shade the base of each steam plume shallow so it glows dim near the brew, then peel gradually thinner as the curl rises. Keep each ribbon of steam attached to the pumpkin along its length so nothing droops. The goal is a fade from soft to bright as the plume climbs. Leave narrow untouched channels between plumes so each one stays a distinct curl.

  5. Cut through for the brightest accents

    Now make the true cutouts. Open small gaps at the very tips of the steam and along the bubbling froth at the top of the brew so those spots blaze brightest. Cut the largest openings last so the surrounding shell stays rigid while you work. Clean each edge with a gentle bevel from the inside to widen the light.

  6. Light it and photograph at dusk

    Drop in one or two battery LED lights, warm white or orange, and never a candle near thin carved areas. Set the pumpkin on a flat surface like a stone ledge and shoot as the sky goes deep blue. If a plume looks flat, peel it a little thinner and recheck. Mist the cut edges with water and store cool between showings to keep the glow crisp.

Gather your supplies

Check things off as you get ready.

Work on a stable surface, keep your free hand out of the cutting path, and have an adult handle sharp tools.

Three levels of light

  • Leave intact

    The cauldron outline, rim, handles, legs, and the channels between steam plumes stay as dark skin.

  • Peel & shade

    The belly of the pot and the lower portions of each steam plume are peeled for a dim, curved glow.

  • Cut through

    The steam tips and the bubbling froth along the top of the brew are cut through for the brightest light.

Learn the carving basics

Before you start cutting

How do I keep the steam plumes from looking flat?

Grade the depth along each curl, shallow at the base and thinner toward the tip, then open a tiny cutout only at the very top. That fade from dim to bright is what makes the steam read as rising vapor. Check with the light on frequently, since a plume that looks fine in daylight can flatten out at dusk.

Will the handles and legs break off?

They should not if you only shade around them rather than cutting through. Keep the handles and legs as raised, untouched skin connected to the pot on both ends. Treating them as relief instead of open cutouts keeps the whole design sturdy.

This is a concept image, so how do I make it work on a real pumpkin?

No real pumpkin exists for this picture, so treat it as a target look you can build. Choose a big pumpkin with a broad flat face, thin the inside wall behind the design, and lean on peeled shading for most of the effect. Reserve full cutouts for just the brightest tips so the shell holds its shape.

Your take belongs here, too.

Changed a detail? Made it simpler? Share a photo of your version and tell the community what worked.

Share your pumpkin

More pumpkins like this

You've reached the end · 8 pumpkins
The Patch Report

Fresh pumpkins, in your inbox.

The best new carvings, ideas worth stealing, and how-tos for carving season. Short, seasonal, and gone by November.

A short email during carving season. Unsubscribe anytime. See our privacy policy.