Halloween Pumpkin Carving Contest · Starts October 1st · $500 in prizes
← Back to ideas
@ai_concepts
Sep 14, 2026
Foaming Witch Cauldron PumpkinAI
0

Foaming Witch Cauldron Pumpkin

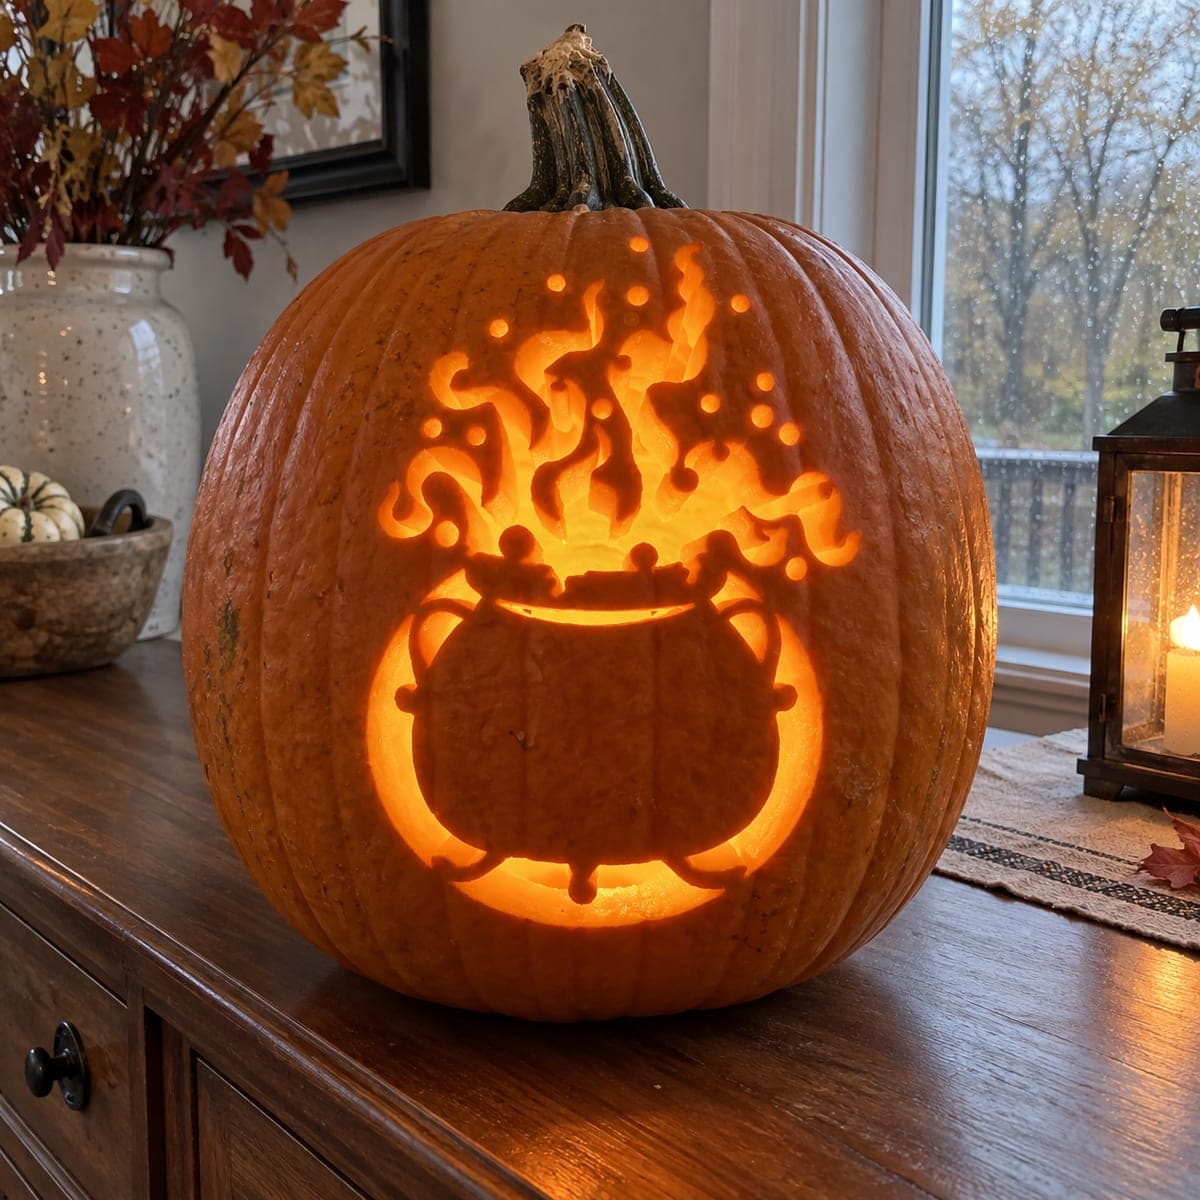
A round black cauldron sits at the base while curling flames, looping wisps, and scattered round bubbles erupt above it in a complex cutout carving that fills the upper two-thirds of the pumpkin face. The silhouette technique keeps the cauldron body as dark uncut rind while the flame curls and bubbles are pierced through to glow brightly. Carve each isolated bubble dot as its own small circle with a drill or hole cutter before tackling the intertwined flame spirals, so you avoid accidentally widening the gaps between the curls during the detail work.

This is an AI-generated concept image: a realistic, carvable design idea rather than a photo of a finished carve. AI concepts are always labeled and sit out the leaderboard and the contest.

No ratings yet · Sign in to rate
Comments (0)

  • No comments yet — be the first.

Save without an account. Sign in to like or comment.

Our tips for carving a similar design

The core trick here is silhouette carving, where the round cauldron body stays as solid dark rind while the flames, wisps, and bubbles above it are pierced all the way through to glow. Plan the layout so the cauldron reads as one clean shape at the bottom and the curling flames fill the upper two-thirds. Drill the small bubble dots first, then work outward through the flame spirals, saving the widest openings for last so the design stays sturdy.

Written by PumpkinCarvingIdeas.com, inspired by the image above. These are our suggestions, not instructions from the uploader. This approach to the AI concept has not been tested on a real pumpkin.

From pumpkin to porch

  1. Transfer the design and plan your light zones

    Print or draw the cauldron and rising flames, then tape the pattern smoothly onto the front of the pumpkin. Poke the outlines through with a transfer tool or pushpin, spacing dots close together on the tight flame curls. Step back and mark clearly which areas will be cut through and which stay as dark rind. This is the moment to confirm the cauldron body reads as a solid shape before any blade touches the pumpkin.

  2. Open the lid and clean out the shell

    Have an adult cut a lid from the bottom or the back rather than around the stubby stem, which keeps the front face intact. Scoop the guts and scrape the inside wall behind the flame area down to about one inch thick. A thinner wall makes the fine flame cuts much easier and lets more light through. Dry the inside with a paper towel so your tools grip well.

  3. Drill the isolated bubble dots first

    Use a small drill bit or a hole cutter to make each floating bubble as its own clean circle. Doing these first means you are cutting into solid, well supported rind before the flame gaps weaken the area. Vary the circle sizes a little so the bubbles look scattered and natural. Take your time and let the tool do the work rather than forcing it.

  4. Carve the intertwined flame spirals

    Switch to a fine detail saw and cut the curling flames and looping wisps, working from the center outward. Keep a little rind between neighboring curls so the spirals stay crisp and do not merge into one big hole. Cut slowly on the tight curves and support the surrounding surface with your free hand. Leaving these bridges intact is what gives the flames their layered, dancing look.

  5. Define the cauldron as untouched silhouette

    Leave the entire cauldron body, its rim, handles, and little feet as uncut skin so it stays dark against the glow above. Cut through only the thin outline gaps around the cauldron if your pattern calls for a bright ring behind it. This contrast between the dark pot and the bright flames is the whole point of the silhouette style. Resist the urge to add detail inside the cauldron itself.

  6. Light it and take your photo

    Drop in an LED puck or string of battery lights, never a candle, since the thin flame cuts can scorch. Set the pumpkin on a windowsill or table and dim the room to check the balance of glow. If any flame curl looks muddy, gently widen it from the inside with your detail saw. Photograph it at dusk so the warm light reads against the dark cauldron.

Gather your supplies

Check things off as you get ready.

Work on a stable surface, keep your free hand out of the cutting path, and have an adult handle sharp tools.

Three levels of light

  • Leave intact

    The cauldron body, rim, handles, and feet stay as untouched dark rind for the silhouette.

  • Peel & shade

    Shave a thin halo of skin just around the cauldron edges for a soft mid glow that separates it from the background.

  • Cut through

    The curling flames, looping wisps, and scattered bubble dots are cut all the way through for the brightest light.

Learn the carving basics

Before you start cutting

How do I keep the thin flame curls from breaking apart?

Leave a small strip of rind between each neighboring curl instead of cutting them into one open gap. Carve from the center outward and support the surrounding surface with your free hand as you go. Thinning the inside wall to about one inch also lets you use lighter pressure, which reduces the risk of cracking.

Why drill the bubbles before carving the flames?

The bubble dots sit in areas that are still solid and well supported before the flame gaps are opened. If you cut the flames first, the surface flexes and it becomes easy to accidentally widen or crack the little circles. Doing the small round holes first keeps them clean and evenly shaped.

This is a concept image, so how would a real version hold up?

No real pumpkin exists for this picture, but the design carves fine if you keep bridges between the flame curls and drill the bubbles as separate circles. Use a fresh, firm pumpkin and a thin inner wall for the best glow. An LED light keeps the delicate cuts safe from heat.

Your take belongs here, too.

Changed a detail? Made it simpler? Share a photo of your version and tell the community what worked.

Share your pumpkin

More pumpkins like this

You've reached the end · 8 pumpkins
The Patch Report

Fresh pumpkins, in your inbox.

The best new carvings, ideas worth stealing, and how-tos for carving season. Short, seasonal, and gone by November.

A short email during carving season. Unsubscribe anytime. See our privacy policy.