@harvestmoonhank
Sep 7, 2026
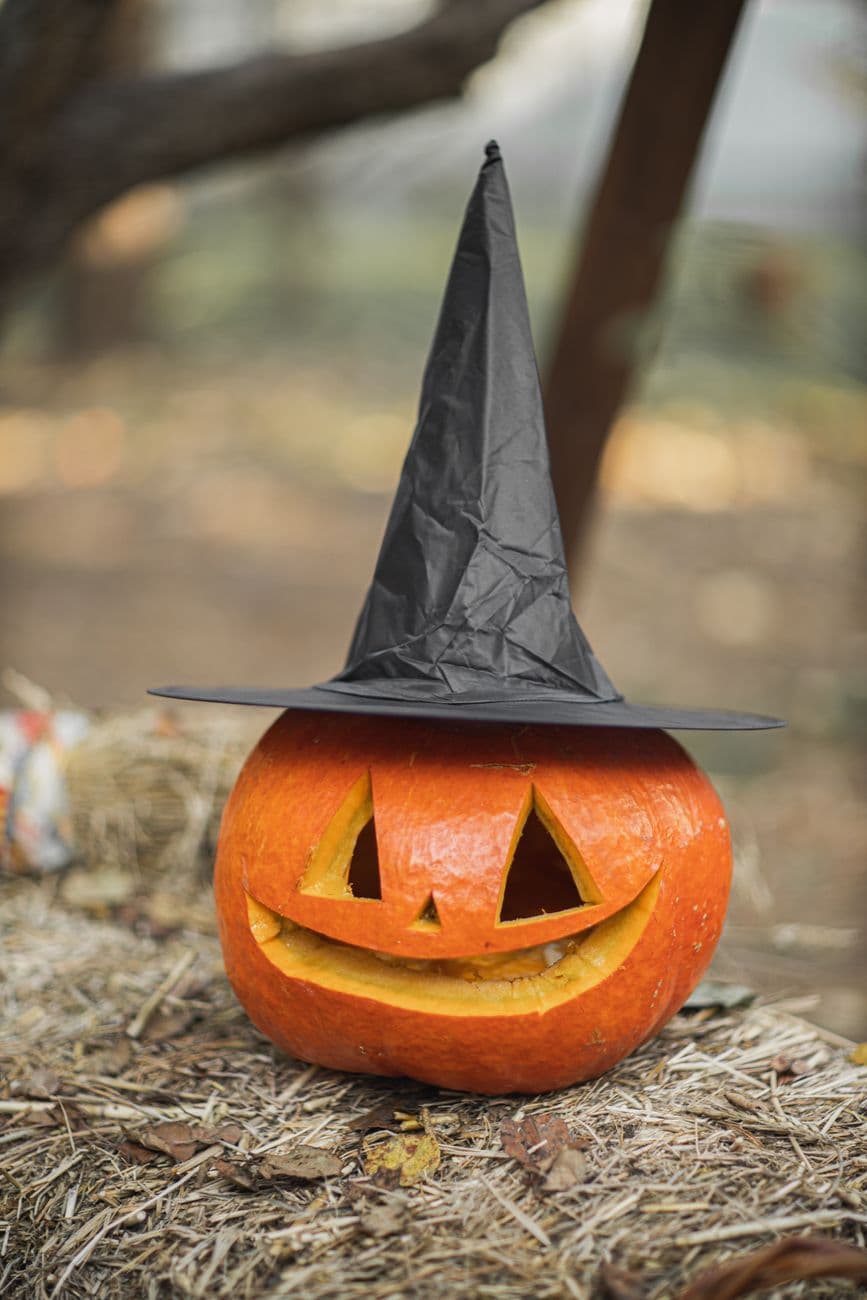
The core trick here is a traditional triangle-eyed, fanged jack-o'-lantern that gets its personality from a witch hat perched on the lid. You carve a clean, bold face with full cutouts, then let the felt hat do the theming so the light stays bright and simple. Keep the toothy grin symmetrical and leave a couple of pointed fangs attached for character.
Written by PumpkinCarvingIdeas.com, inspired by @harvestmoonhank's photo above. These are our suggestions, not instructions from the uploader, and this approach hasn't been tested on their exact carve.
Choose a pumpkin with a broad, upright shape so a witch hat sits naturally on top. Wipe the skin clean and check that it stands flat without wobbling. A slightly taller pumpkin reads better with a hat than a squat one. Set aside a felt or foam witch hat to test the fit before you start cutting.
Have an adult cut a wide lid around the stem at a slight inward angle so it rests without falling in. Scoop out all the seeds and pulp, then thin the front carving wall to about one inch. A thinner wall makes the eyes and grin much easier to cut cleanly. Scrape the inside floor flat so your LED light sits steady.
Tape a simple stencil with two triangle eyes, a triangle nose, and a wide toothy grin onto the front. Poke along the outlines with a pin or awl to dot the pattern onto the skin. Keep the grin curving upward at the corners for a friendly, classic look. Mark two teeth as longer fangs so you remember to leave them attached at both ends.
Start with the smaller shapes while the pumpkin is still sturdy. Use a small serrated saw and gentle back-and-forth pressure, cutting straight in rather than prying. Push each piece out from the inside once the outline is complete. Save the big grin for last so the face wall stays strong while you work.
Cut the wide mouth in sections, leaving each tooth and fang connected to the top and bottom of the opening. Those bridges are what hold the pointed fangs in place, so do not undercut them. Trim slowly around the points to keep them crisp. Test the light inside and clean up any ragged edges from behind.
Drop a battery LED light or tea light inside and set the lid back on. Perch the witch hat over the stem, tilting it slightly for attitude. Set the pumpkin on a step or porch away from foot traffic so the hat stays put. Snap your photo at dusk when the glow shows off the grin best.
Check things off as you get ready.
Work on a stable surface, keep your free hand out of the cutting path, and have an adult handle sharp tools.
The outer orange skin and the whole hat area stay dark for contrast
Optional shallow-scraped cheeks or brow can give a soft dim glow
The triangle eyes, nose, and toothy grin are cut through for the brightest light
Leave each fang attached at both the top and bottom of the mouth opening so it forms a bridge rather than a loose spike. Cut slowly around the points and avoid prying pieces out. If a pumpkin wall is thick, thin it from the inside first so the fangs are easier to shape cleanly.
Test the hat before carving to make sure the brim rests on the shoulders of the pumpkin, not just the stem. A felt or foam hat is light and grips better than a stiff one. If it slides, a small loop of tape under the brim keeps it steady outdoors.
We recommend a battery LED light instead of a candle, especially with a felt hat nearby that could catch heat. LEDs give a steady glow, will not scorch the lid, and are safe to leave on a porch step. Look for a flickering amber LED if you want a candle-like effect.
Changed a detail? Made it simpler? Share a photo of your version and tell the community what worked.
The best new carvings, ideas worth stealing, and how-tos for carving season. Short, seasonal, and gone by November.




Comments (0)