Halloween Pumpkin Carving Contest · Starts October 1st · $500 in prizes
← Back to ideas
@ai_concepts
Sep 14, 2026
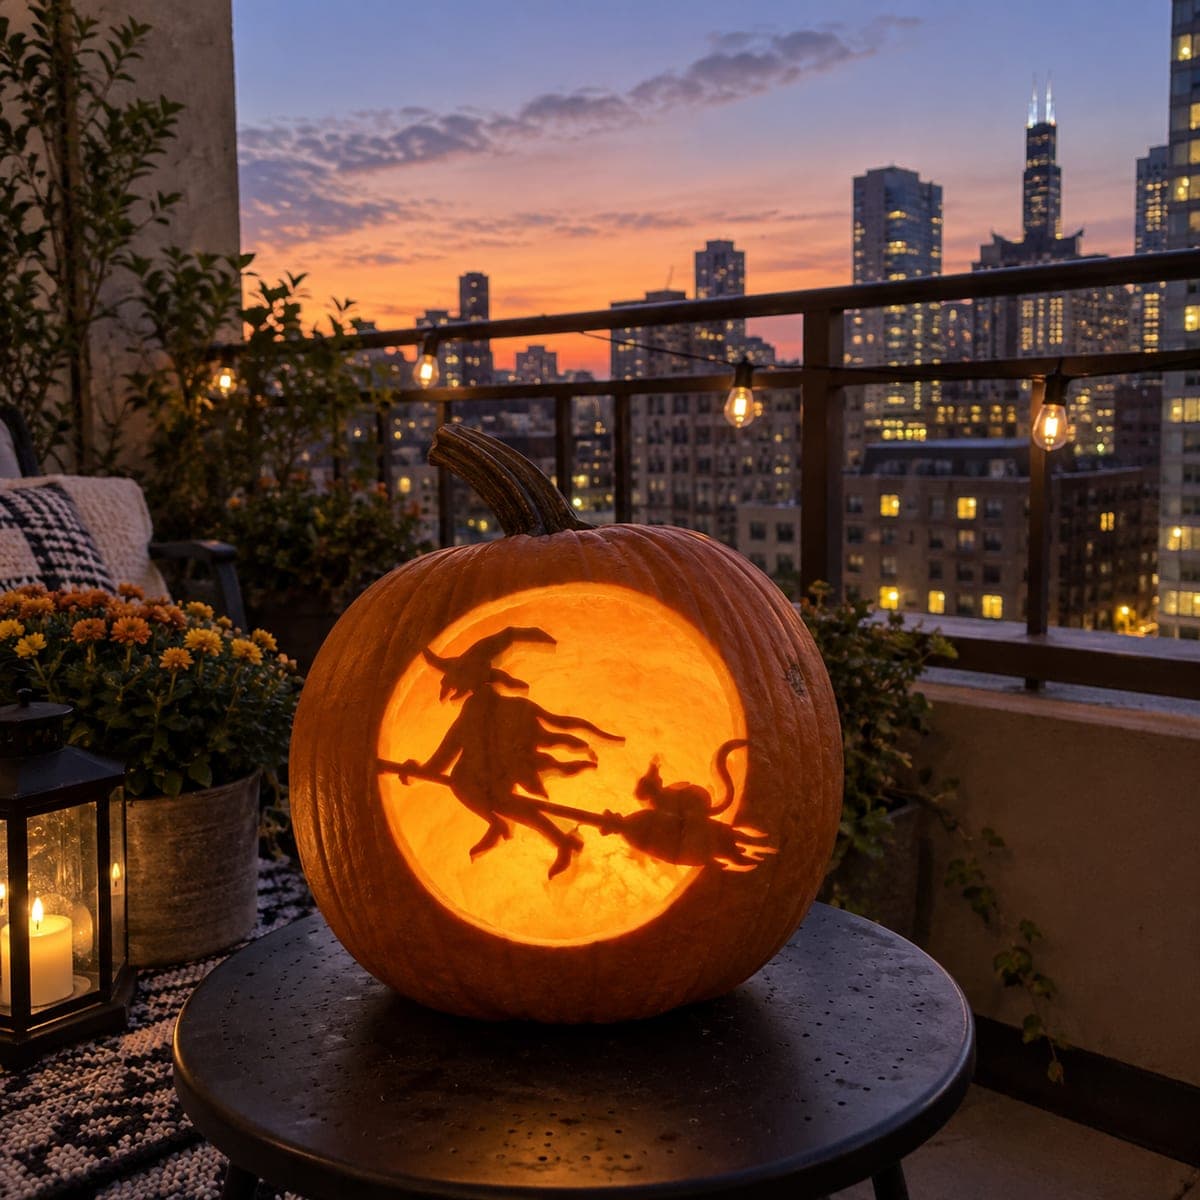
Flying Witch Across a Round Moon PumpkinAI
0

Flying Witch Across a Round Moon Pumpkin

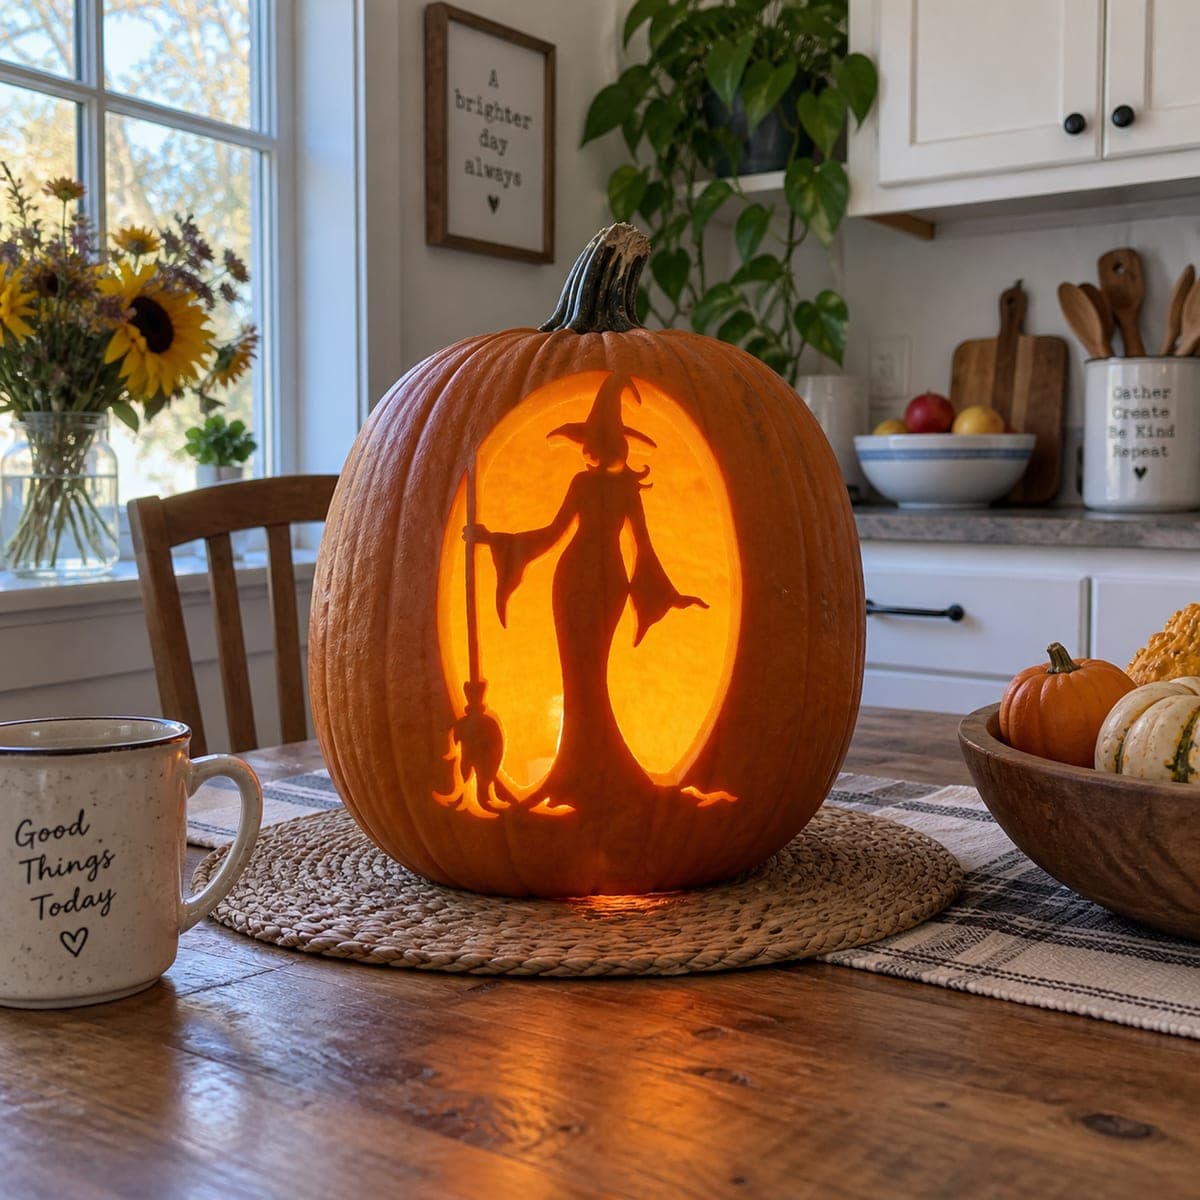
A witch riding a broomstick crosses in front of a large round glowing moon, her pointed hat and flowing cloak reading as dark silhouette shapes against the bright circular cutout backdrop. A black cat sits on the broom behind her, adding a secondary dark shape to the composition. Carve the full moon circle first, then use a transfer tool to position the witch and cat silhouette exactly on top of it, making sure the broomstick extends across the full width of the circle so it acts as a structural bridge connecting the two sides.

This is an AI-generated concept image: a realistic, carvable design idea rather than a photo of a finished carve. AI concepts are always labeled and sit out the leaderboard and the contest.

No ratings yet · Sign in to rate
Comments (0)

  • No comments yet — be the first.

Save without an account. Sign in to like or comment.

Our tips for carving a similar design

The whole effect rests on one big bright circle with dark shapes standing in front of it, so the moon is a single large cutout and the witch, hat, cloak, and cat stay as untouched skin that reads as black against the glow. The key trick is treating the broomstick as a bridge that spans the full width of the moon, keeping both sides of the circle connected so the pumpkin wall stays strong. Plan the silhouette before you cut anything big.

Written by PumpkinCarvingIdeas.com, inspired by the image above. These are our suggestions, not instructions from the uploader. This approach to the AI concept has not been tested on a real pumpkin.

From pumpkin to porch

  1. Pick a wide pumpkin and clean it out

    Choose a large, round pumpkin with a smooth front panel big enough for the whole moon. Cut a lid from the back or bottom rather than the top so the stem stays intact on the front. Scrape the inside wall behind your design down to about one inch thick so light passes through easily. A thinner wall makes both the peeled glow and the cutouts brighter.

  2. Transfer the moon and silhouette together

    Tape your stencil flat against the front and trace the full circle first, then lay the witch, cat, and broom on top exactly where they cross it. Use a transfer tool or poke dots along every line so you can see the design once the paper comes off. Double check that the broomstick runs all the way across the circle, because it is the bridge that holds the two halves together. Mark clearly which areas are moon and which are silhouette so you do not cut the wrong part.

  3. Score and peel the moon area

    Before cutting anything through, decide how much of the moon you want as full cutout versus a softer peeled glow. You can peel a thin outer ring of the moon for a dim halo and reserve the center for full cutting. Use a lino or ribbon tool to shave off just the orange skin in the peel zones, leaving the flesh underneath. Go slow and keep the depth even so the glow looks smooth.

  4. Cut the moon, saving the bridge

    Cut out the open parts of the moon with a small saw blade, working in short controlled strokes and leaving the witch, hat, cloak, and cat as solid uncut skin. Cut around the broomstick so it stays as an attached band of pumpkin wall spanning the circle. Remove the moon in small chunks rather than one big piece to avoid cracking the thin silhouette shapes. Save any large openings near the edges for last so the wall stays rigid while you work.

  5. Refine the silhouette edges

    Clean up the outline of the witch's pointed hat, flowing cloak, and the cat's arched tail so the shapes are crisp against the light. Trim tiny stray bits and smooth the cut edges with the tip of your knife. Check the broomstick from inside to make sure it is still firmly connected on both ends. If any silhouette detail feels fragile, leave a little extra flesh behind it for support.

  6. Light it and photograph at dusk

    Drop in a battery LED light or two, never a candle, since the enclosed shape and thin wall trap heat. Set the pumpkin somewhere the moon glow can be seen straight on, like a small table on a balcony or porch. Shoot photos right at dusk when the sky still has color but the cutout reads bright. Rotate the LED around inside to find the most even fill across the moon.

Gather your supplies

Check things off as you get ready.

Work on a stable surface, keep your free hand out of the cutting path, and have an adult handle sharp tools.

Three levels of light

  • Leave intact

    The witch, her pointed hat and cloak, the broomstick, and the black cat stay as untouched skin so they read as dark silhouettes.

  • Peel & shade

    A thin outer ring of the moon can be skin-peeled for a soft dim halo around the bright center.

  • Cut through

    The main body of the moon circle is cut fully through for the brightest glow behind the figures.

Learn the carving basics

Before you start cutting

How do I keep the witch and cat from falling out when I cut the moon?

They will not fall out because they are attached skin, not separate pieces. You only cut away the open moon areas around them, leaving the figures as solid pumpkin wall. The broomstick spanning the full circle acts as a bridge that ties the two sides together and keeps everything rigid.

This is an AI concept image, so can a real pumpkin actually hold these thin shapes?

Yes, if you keep the delicate parts attached and supported. The broomstick should be a continuous band connecting both sides of the moon rather than a floating sliver. Leave a bit of extra flesh behind slim details like the cat's tail and the hat point so they do not snap while you carve.

Should I carve the moon as one big hole or break it up?

Cut it as the open background but remove it in several small chunks instead of prying out one large disc. This reduces stress on the thin wall and protects the silhouette edges. Save the widest openings near the rim for last so the pumpkin stays firm while you work the detailed areas.

Your take belongs here, too.

Changed a detail? Made it simpler? Share a photo of your version and tell the community what worked.

Share your pumpkin

More pumpkins like this

You've reached the end · 8 pumpkins
The Patch Report

Fresh pumpkins, in your inbox.

The best new carvings, ideas worth stealing, and how-tos for carving season. Short, seasonal, and gone by November.

A short email during carving season. Unsubscribe anytime. See our privacy policy.