Halloween Pumpkin Carving Contest · Starts October 1st · $500 in prizes
← Back to ideas
@ai_concepts
Sep 14, 2026
Tiny Witch Beneath a Tall Moon PumpkinAI
0

Tiny Witch Beneath a Tall Moon Pumpkin

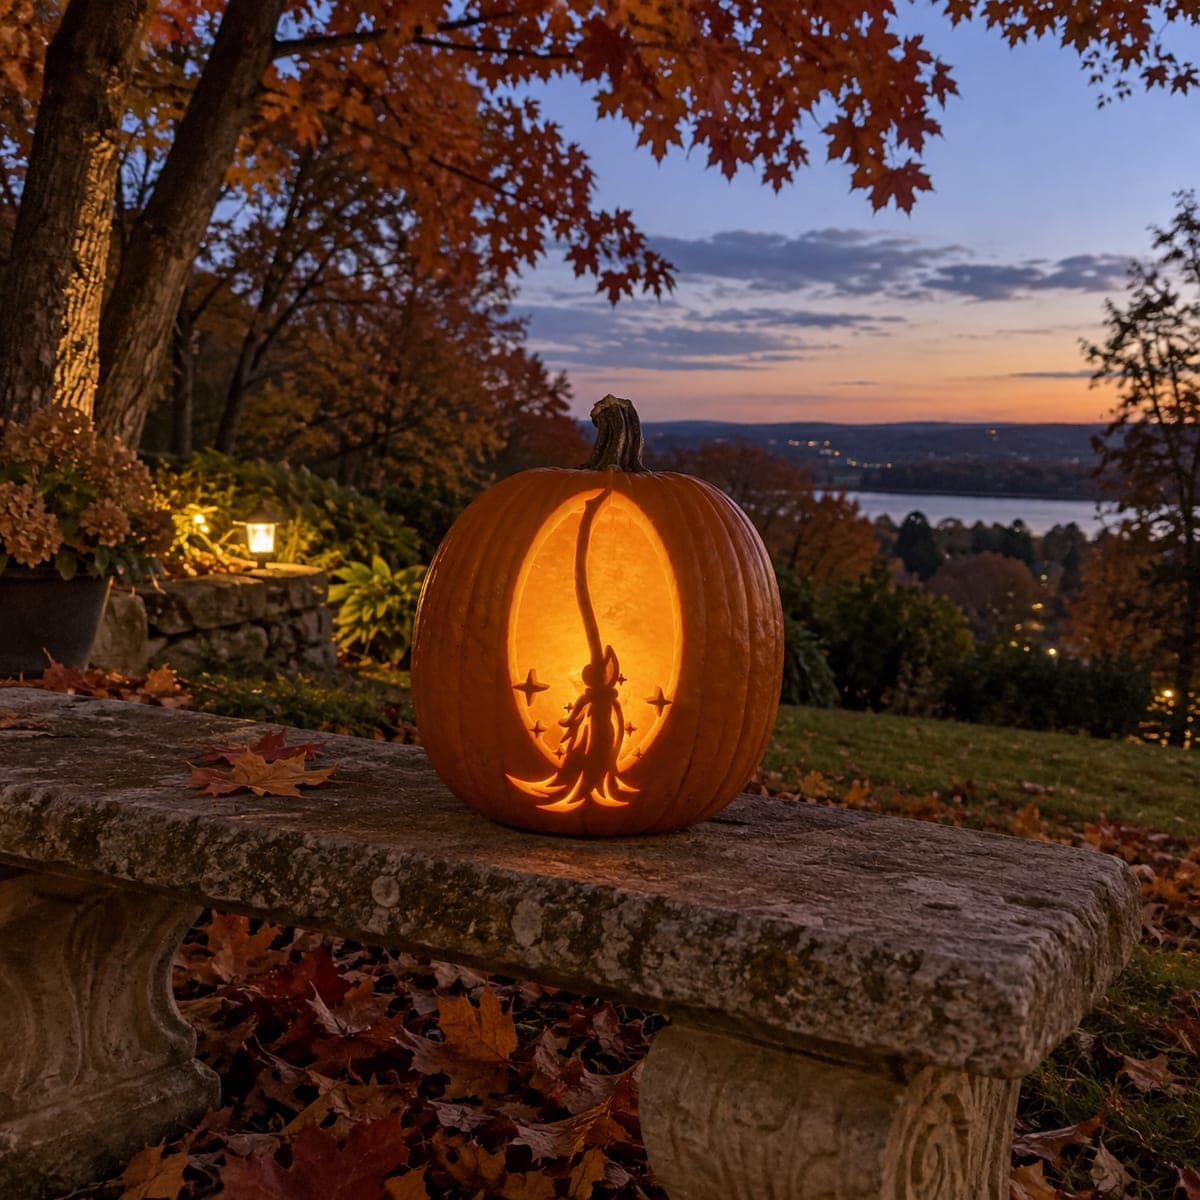
A tiny witch figure with a pointed hat and outstretched arms stands at the base of a tall slender glowing oval on this elegant silhouette pumpkin carving idea, shown outdoors at dusk with autumn foliage behind it. Small star or sparkle shapes flank the witch near the bottom of the oval, adding delicate detail around the dark silhouette. Carve the tall oval backdrop first so you have a defined glow field, then carefully cut around the witch's body while leaving her connected to the oval at the feet and hat tip.

This is an AI-generated concept image: a realistic, carvable design idea rather than a photo of a finished carve. AI concepts are always labeled and sit out the leaderboard and the contest.

No ratings yet · Sign in to rate
Comments (0)

  • No comments yet — be the first.

Save without an account. Sign in to like or comment.

Our tips for carving a similar design

The core trick here is a single tall oval cutout that becomes one bright glow field, with the little witch, her broom, and a few stars left as dark silhouettes floating inside it. You carve the big oval opening first so you have a clean field of light, then cut carefully around the figure while leaving her attached at the feet, the hat tip, and along the broom handle. Keep every skinny piece bridged to the surrounding wall so nothing falls in.

Written by PumpkinCarvingIdeas.com, inspired by the image above. These are our suggestions, not instructions from the uploader. This approach to the AI concept has not been tested on a real pumpkin.

From pumpkin to porch

  1. Plan and transfer the design

    Choose a tall, smooth pumpkin so the oval has room to stretch vertically. Print or draw the tall oval, then place the tiny witch, her broom, and the small stars in the lower third. Tape the pattern on and poke the outlines with a pin or a transfer tool. Mark clearly which shapes stay dark, since the witch and stars are the negative space inside the glow.

  2. Open the lid and clean it out

    An adult should cut a lid from the bottom or the back rather than the top, so the natural stem stays intact for looks. Scoop the guts and scrape the inside wall behind the oval down to about one inch thick. A thinner wall cuts more cleanly and lets more light through. Dry the inside so your lines stay crisp.

  3. Carve the witch, broom, and stars first

    Before the big opening, cut the fine detail while the wall is still strong. Cut around the witch's outstretched arms, pointed hat, and dress, but leave her joined to the surrounding pumpkin at her feet and at the tip of her hat so she stays anchored. Treat the broom handle as a thin bridge that connects the top of the oval to the figure. Cut the small stars as tiny separate openings, working slowly with a fine detail saw.

  4. Cut the tall oval glow field last

    Now remove the large oval sections around your silhouette. Cut the openings on each side of the witch and broom, leaving the figure and its bridges standing in the middle. Make relief cuts and take out small pieces at a time rather than one big chunk, so you do not stress the thin bridges. Ease each piece out gently toward you.

  5. Test the light and tidy the edges

    Drop in an LED puck or a battery tea light and check the glow in a dark room. Trim any ragged edges and, if a shape looks dim, gently peel the outer skin just around it for a soft halo. Confirm the witch and stars read as solid dark shapes against the bright oval. Never use a real candle inside such a thin-walled carving.

  6. Stage it for the photo

    Set the pumpkin on a stone bench or step at dusk with autumn leaves around it. Angle it so the tall oval faces your camera and the tiny witch sits low in the frame. Keep other lights soft and warm so the glow field stands out. Shoot at twilight for that blue-to-orange sky behind the silhouette.

Gather your supplies

Check things off as you get ready.

Work on a stable surface, keep your free hand out of the cutting path, and have an adult handle sharp tools.

Three levels of light

  • Leave intact

    The witch figure, her broom handle, and the tiny star shapes stay as untouched dark skin inside the glow.

  • Peel & shade

    An optional thin skin peel just around the oval edge or stars gives a soft dim halo.

  • Cut through

    The tall slender oval is cut fully through for the brightest, cleanest glow field.

Learn the carving basics

Before you start cutting

How do I keep the tiny witch from falling into the pumpkin?

Leave her connected to the surrounding wall at more than one point, ideally her feet, the tip of her hat, and along the broom handle. These bridges act like little supports that hold the silhouette in place. Carve all the fine detail before you remove the large oval sections so the wall stays strong while you work.

Should I carve the big oval or the witch first?

Carve the witch, broom, and stars first while the pumpkin wall is still solid and stable. Cutting the large oval opening last means you are not putting stress on delicate bridges. If you open the big field early, the thin details are much more likely to crack or drop.

This is an AI concept, so can a real pumpkin look like this?

Yes, as long as you keep the thin pieces attached with bridges rather than free floating. The broom handle and the witch's arms should stay joined to the pumpkin at both ends or be slightly thicker than they look in the image. Scrape the inside wall thin and use a bright LED to get that even glow behind the silhouette.

Your take belongs here, too.

Changed a detail? Made it simpler? Share a photo of your version and tell the community what worked.

Share your pumpkin

More pumpkins like this

You've reached the end · 8 pumpkins
The Patch Report

Fresh pumpkins, in your inbox.

The best new carvings, ideas worth stealing, and how-tos for carving season. Short, seasonal, and gone by November.

A short email during carving season. Unsubscribe anytime. See our privacy policy.