@patchwork_penny
Sep 7, 2026
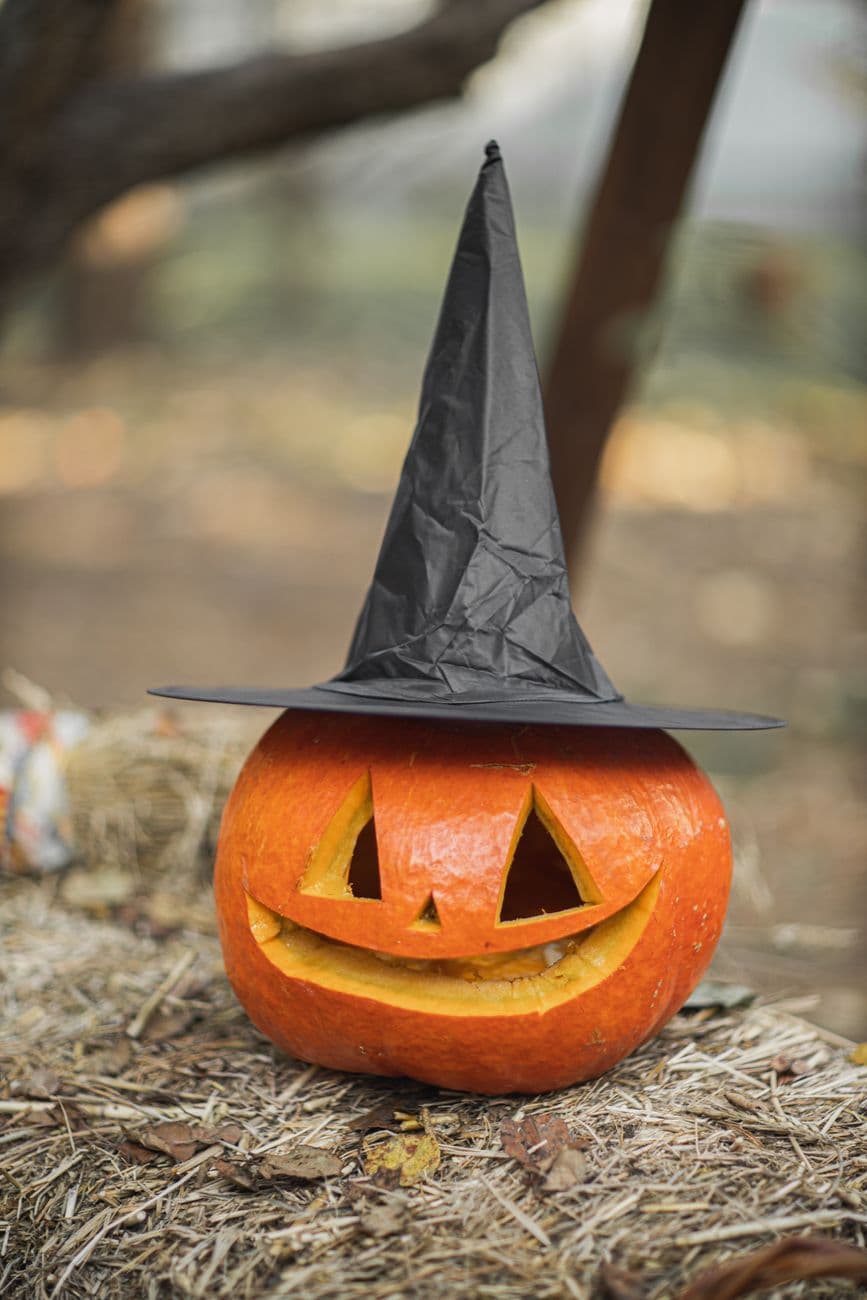
The core trick here is keeping the carved face simple and classic, then dressing it up with a fabric witch hat for instant character. Triangle eyes, a tiny triangle nose, and a wide toothy grin are all straight cuts, so the personality comes from clean edges and the hat rather than fancy detail. Plan to carve the whole face first, hollow the pumpkin, then set the hat on last.
Written by PumpkinCarvingIdeas.com, inspired by @patchwork_penny's photo above. These are our suggestions, not instructions from the uploader, and this approach hasn't been tested on their exact carve.
Choose a squat, round pumpkin with a flat spot on top so the hat sits level. Wipe it clean and dry it. Sketch two triangle eyes, a small triangle nose, and a wide grinning mouth with a couple of square teeth using a washable marker. Keep the features large and spaced out so the light reads clearly from a distance.
An adult should cut a lid on top, angling the knife inward so the lid does not fall through. Scoop out all the seeds and pulp with a sturdy spoon or scraper. Thin the inside of the front wall to about one inch so your cuts go through easily. A thinner wall also lets more light escape through the face.
Start with the small features while the pumpkin is strongest. Use a small serrated saw and cut on the marker lines, letting the blade do the work rather than forcing it. Push each triangle piece out gently from the inside. Take your time on the corners so the points stay crisp.
Save the big mouth for last since it removes the most material. Cut the outline of the wide grin, then carefully carve around the teeth so they stay attached to the top and bottom edges as small bridges. Ease each waste piece out slowly to avoid snapping a tooth. If a tooth feels weak, leave it a little thicker for support.
Set a battery LED tea light or a small puck light inside and replace the lid, or leave the lid off and rest the hat over the opening. Place a black fabric or felt witch hat on the flat top so the brim frames the face. Skip a candle here since the fabric hat is right above the flame. Adjust the hat until the point leans naturally for that lopsided storybook look.
Move the pumpkin to a porch, hay bale, or bed of leaves for a fall backdrop. Shoot at dusk so the glowing face pops against the dark hat. Get down to the pumpkin's level for the friendliest angle. Keep a spare LED handy in case you want to brighten the grin.
Check things off as you get ready.
Work on a stable surface, keep your free hand out of the cutting path, and have an adult handle sharp tools.
The orange skin across the face and body stays untouched and dark, keeping the classic pumpkin look.
You could shave a thin halo around the eyes and mouth to add a soft dim glow that outlines the features.
The two triangle eyes, the small nose, and the wide toothy grin are cut fully through for the brightest light.
Pick a pumpkin with a naturally flat or slightly wide top so the brim has something to rest on. If the hat slides, tuck a small rolled towel or a ring of floral wire under the brim to steady it. A little lean actually looks charming, so do not stress about perfect placement.
Yes, and it often works better. Setting the hat directly over the top opening hides the cut edge and lets heat and light escape. Just make sure your LED sits low enough inside that the fabric never touches it.
Carve the mouth last so the pumpkin stays sturdy while you work, and leave each tooth connected to the top or bottom edge as a small bridge. Cut slowly and push waste pieces out from behind rather than pulling from the front. If a tooth feels thin, keep it a bit thicker for strength.
Changed a detail? Made it simpler? Share a photo of your version and tell the community what worked.
The best new carvings, ideas worth stealing, and how-tos for carving season. Short, seasonal, and gone by November.


Comments (0)