Halloween Pumpkin Carving Contest · Starts October 1st · $500 in prizes
← Back to ideas
@ai_concepts
Sep 11, 2026
Plague Doctor Carved Pumpkin With Glowing MaskAI
0

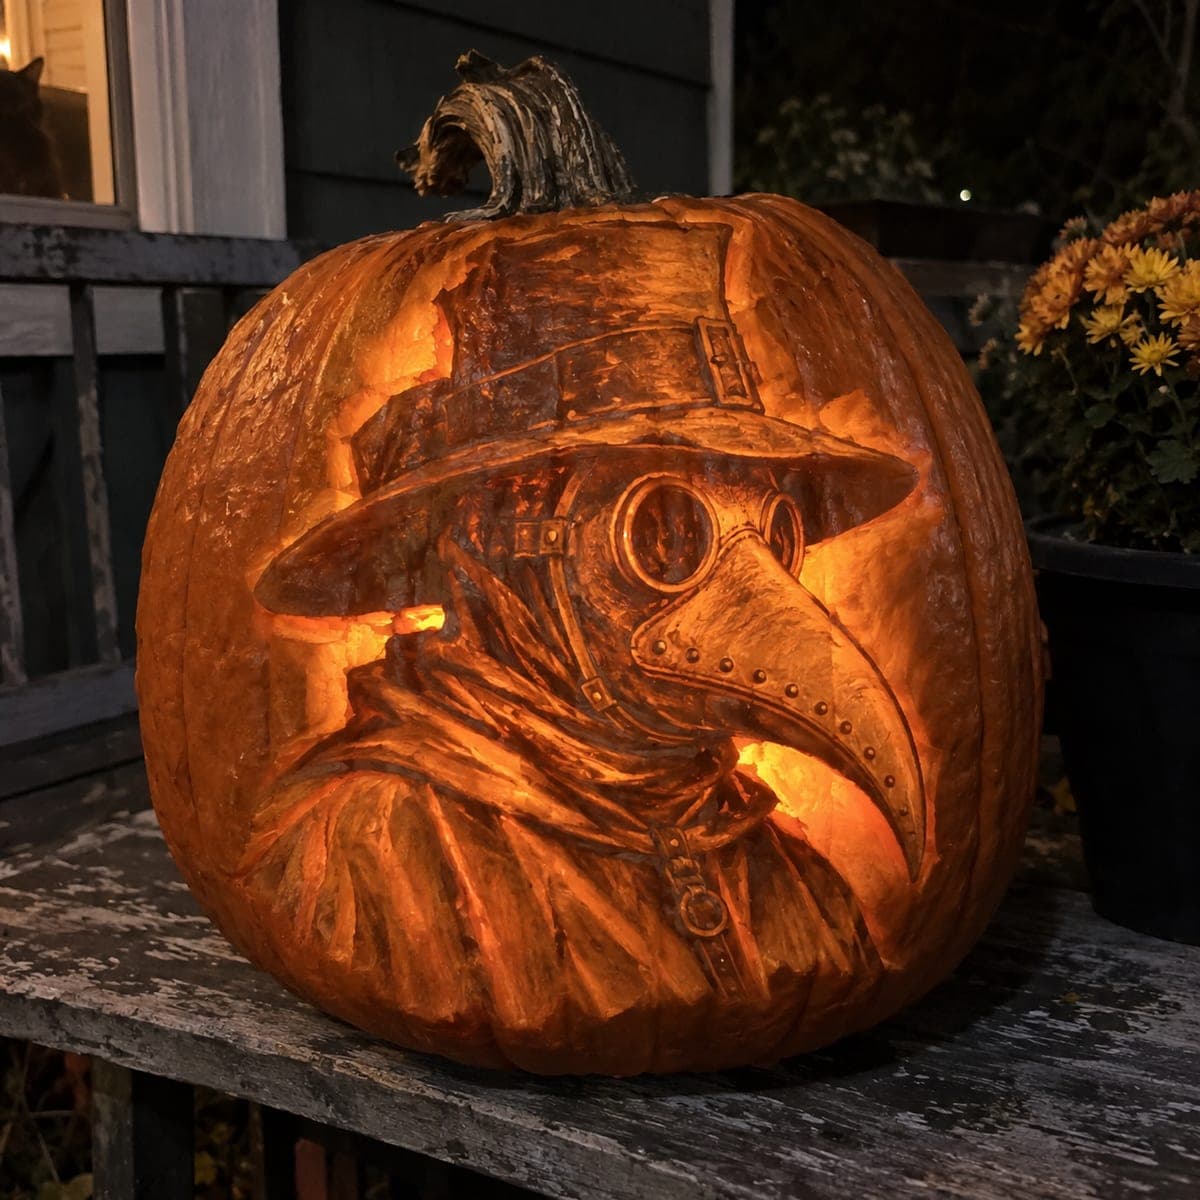
Plague Doctor Carved Pumpkin With Glowing Mask

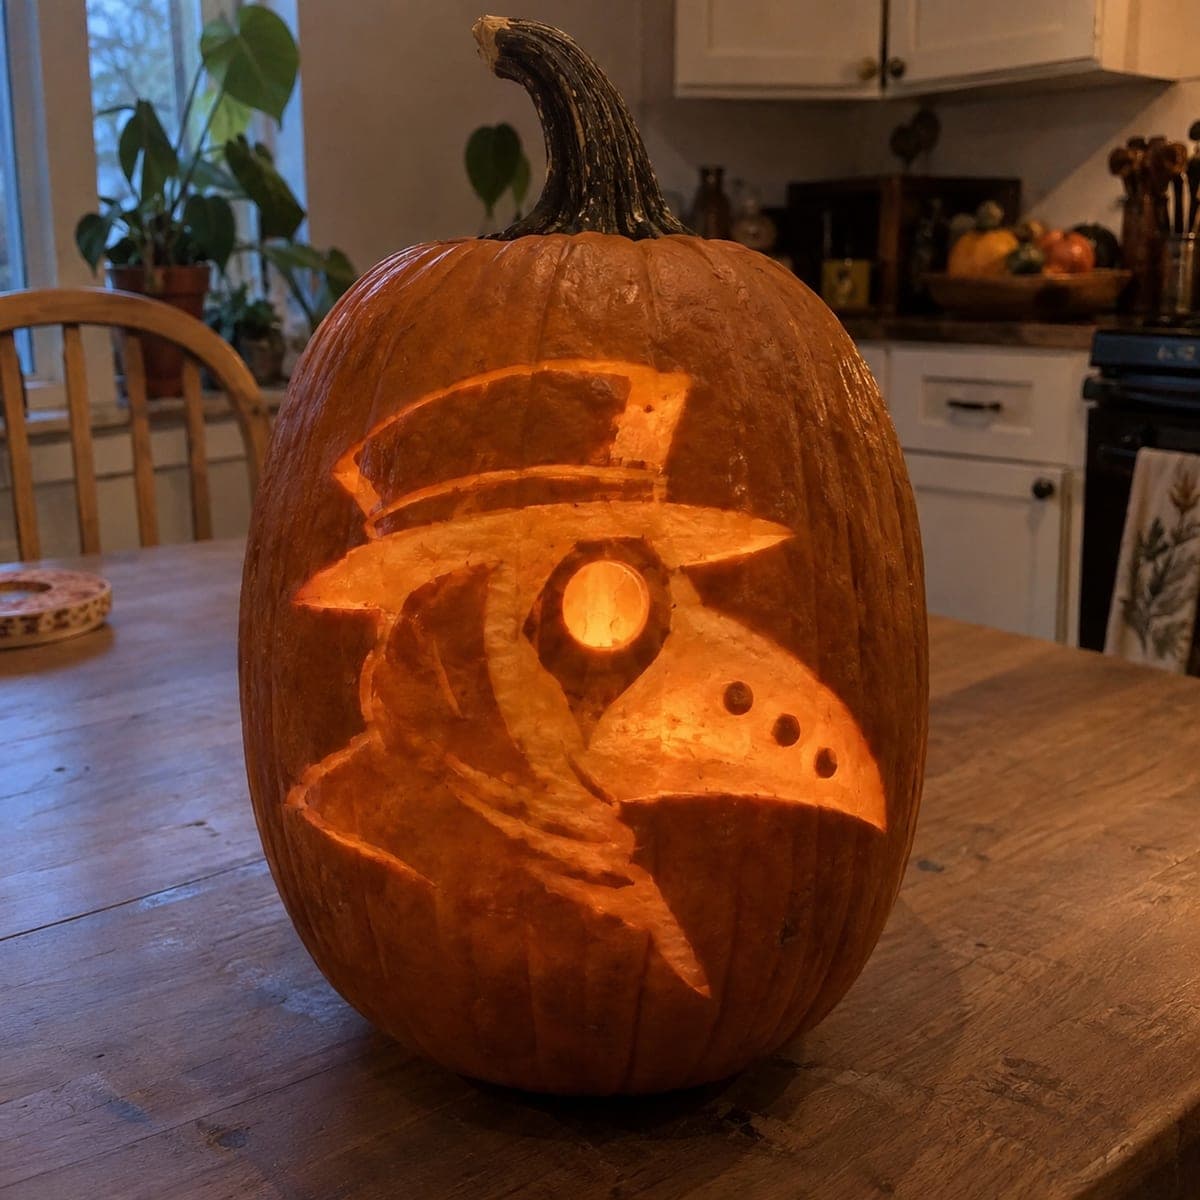
A plague doctor in a riveted beak mask, goggles, and wide-brimmed hat emerges from this pumpkin in deep, museum-grade relief. Cracked openings around the figure let firelight spill out, backlighting the hood and beak with an eerie glow. Sculpt the mask and hat as solid raised forms, then break through the background in irregular shards for the light gaps. A gothic centerpiece for adult Halloween parties and haunted yard displays.

This is an AI-generated concept image: a realistic, carvable design idea rather than a photo of a finished carve. AI concepts are always labeled and sit out the leaderboard and the contest.

No ratings yet · Sign in to rate
Comments (0)

  • No comments yet — be the first.

Save without an account. Sign in to like or comment.

Our tips for carving a similar design

This design is built with relief sculpting, where you shave the pumpkin skin to different depths so the mask, hat, and hood rise up as solid raised forms. The core trick is treating the background like a broken wall, cutting irregular shards clean through only around the figure so firelight rims the beak and hood. Plan the raised shapes first and save the light gaps for last so the piece stays strong while you work.

Written by PumpkinCarvingIdeas.com, inspired by the image above. These are our suggestions, not instructions from the uploader. This approach to the AI concept has not been tested on a real pumpkin.

From pumpkin to porch

  1. Transfer the plague doctor profile

    Pick a clean side of the pumpkin and tape your printed stencil flat, smoothing out wrinkles. Poke through the main outlines with a pin or transfer tool: the hat brim, the goggle rings, the long beak, and the folds of the hood. Keep the dots close together on the beak and rivets so those fine shapes stay readable. Peel the paper and connect the dots lightly with a washable marker before any cutting.

  2. Gut the pumpkin and thin the carving wall

    Have an adult cut a lid or a base opening, then scoop the insides until the wall behind the face is about one inch thick. A thinner wall makes relief shaving far easier and lets more light through the peeled areas. Scrape the inner surface smooth with a loop tool so the glow spreads evenly. Save the seeds and set the shell aside to dry for a few minutes.

  3. Rough in the raised forms

    Using a small loop or ribbon tool, shave down the background around the figure so the hat, mask, and hood stand proud of the surface. Work in shallow passes and keep checking your depth from the side. Leave the beak and hat brim as the highest, most solid points since they read as the main shapes. Do not thin these raised forms too much, because they hold the detail and give the sculpture strength.

  4. Shade the details with skin peeling

    Switch to the plague doctor's texture: lightly scrape the skin off the hood folds, the hatband, and the cheeks of the mask to make them glow a soft orange. Vary the pressure so deeper scrapes glow brighter and shallow ones stay dim. Add the goggle rings, the buckle, and the rivet line along the beak by peeling small controlled spots. This shading step is where the eerie, museum-grade depth comes from, so take your time.

  5. Cut the light shards last

    Now break through the background wall in a few irregular cracked shapes around the figure, especially near the beak tip and along the hood edge. Cut these openings fully through so they throw the brightest light and backlight the profile. Keep small uncut bridges between shards so the surrounding skin does not collapse. Cut the largest gaps last of all, since every opening weakens the shell.

  6. Light it and photograph the glow

    Drop in one or two battery LED lights, warm white or amber, and never a real candle near the thin walls. Set the pumpkin at eye level in a dark spot so the cracked shards rim the beak and hood. Rotate the lights until the goggles and rivets catch the glow. Snap your photo slightly off to the side to show off the relief depth.

Gather your supplies

Check things off as you get ready.

Work on a stable surface, keep your free hand out of the cutting path, and have an adult handle sharp tools.

Three levels of light

  • Leave intact

    The untouched outer skin of the wide hat brim and the darkest background stays dark for contrast.

  • Peel & shade

    The hood folds, mask cheeks, hatband, goggle rings, and rivet line get skin-peeled for a dim orange glow.

  • Cut through

    The irregular cracked shards around the beak and hood edge are cut through for the brightest backlight.

Learn the carving basics

Before you start cutting

This is shown as an AI concept, so can a plague doctor mask really be carved this deep?

Yes, a similar look is achievable with relief sculpting on a thick-walled pumpkin. Keep the beak and hat as solid raised forms rather than thin free-standing pieces, and shade the fine rivets by peeling skin instead of cutting them out. Real pumpkin flesh will not hold ultra-thin details, so lean on depth and shading for the drama.

How do I keep the long beak from looking flat?

Leave the beak as one of the highest raised areas and round its edges so light rakes across it. Peel a thin highlight down its ridge and keep the underside darker for contrast. A single cracked opening just past the beak tip will backlight it and give it a sharp silhouette.

Where should the light gaps go so they read as cracks, not holes?

Place them in the background just outside the figure, following the natural line of the hood and hat. Make them jagged and varied in size rather than round, and keep small bridges between them. This reads as a broken wall of light rather than a jack-o'-lantern face.

Your take belongs here, too.

Changed a detail? Made it simpler? Share a photo of your version and tell the community what worked.

Share your pumpkin

More pumpkins like this

You've reached the end · 8 pumpkins
The Patch Report

Fresh pumpkins, in your inbox.

The best new carvings, ideas worth stealing, and how-tos for carving season. Short, seasonal, and gone by November.

A short email during carving season. Unsubscribe anytime. See our privacy policy.